How to Set Up the Epson TM-m30III With MeeD POS
This guide walks through connecting the Epson TM-m30III to the MeeD POS app on iPad. It supports every connection method — Bluetooth, WiFi, LAN, and USB — and setup takes about 10–15 minutes.
What You'll Need
- An iPad with the MeeD POS app installed
- An Epson TM-m30III receipt printer
- 80mm thermal paper
- Power adapter and cable (included with the printer)
- A LAN cable or USB cable (depending on your chosen method)
- The same WiFi router as the iPad (for LAN/WiFi)
Video Demo
How to Set Up the Epson TM-m30III With MeeD POS — YouTube
Printer Specs
Choose a connection method:
Every method works with MeeD POS — pick whichever cable or setup you already have.
Setup Steps — LAN (Recommended)
Step 1 — Prepare the printer and connect the cable
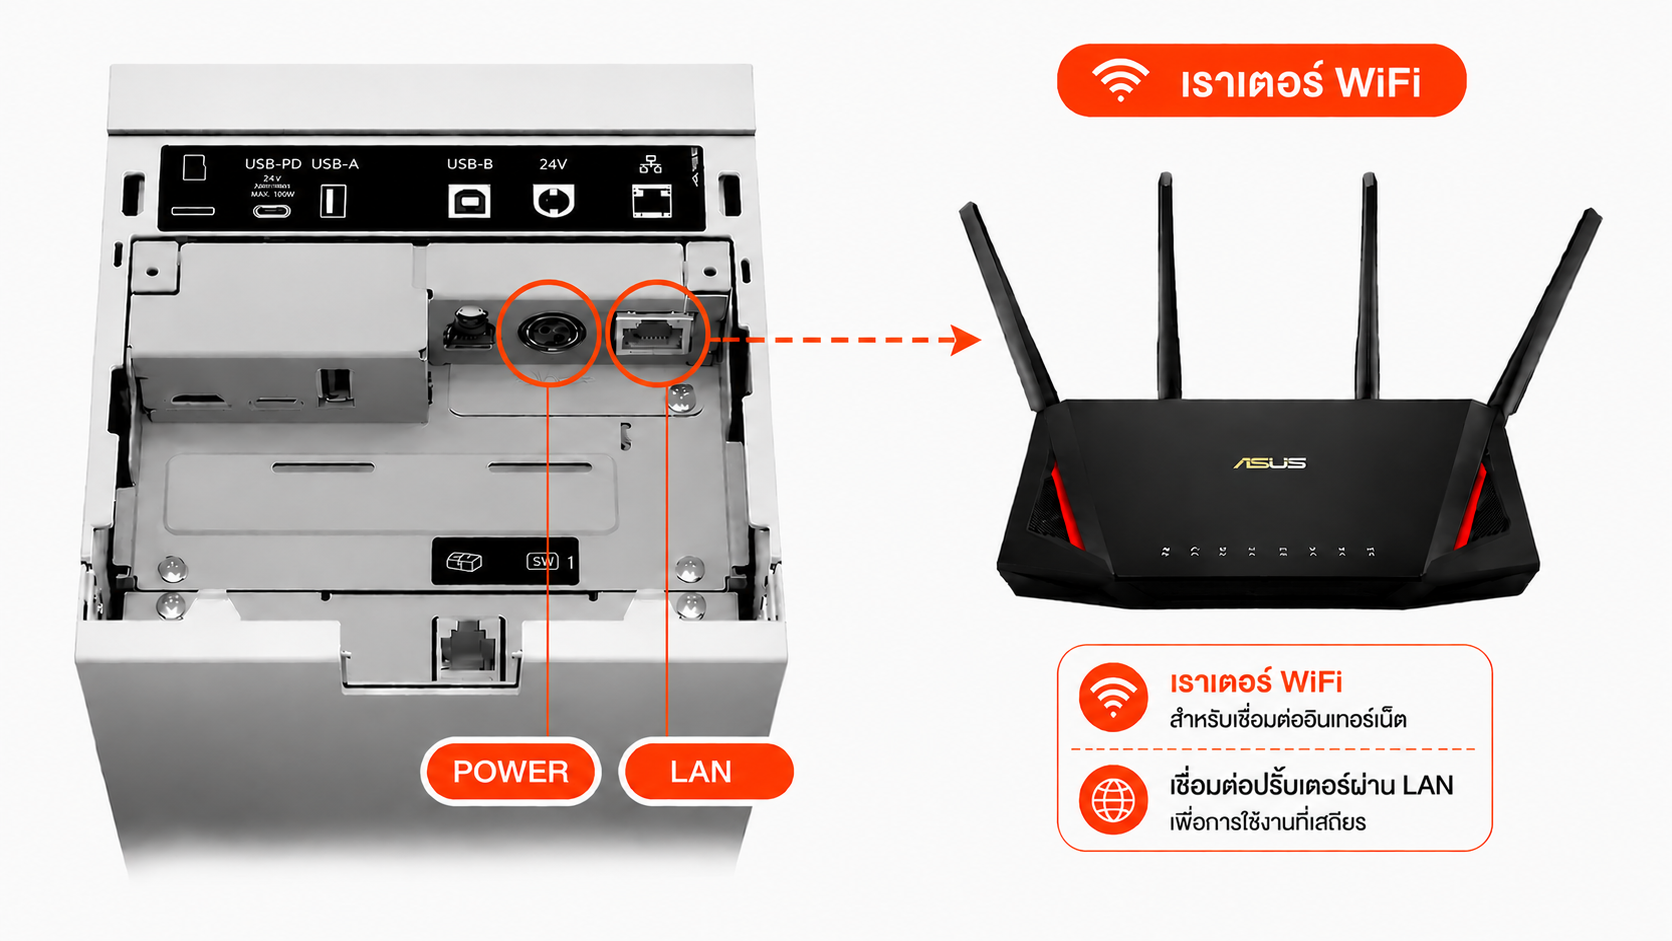
Connect the power cable
Plug the power cable into the adapter, then into a wall outlet — but don't turn on the printer yet.
Connect the LAN cable
Plug a LAN cable (RJ-45) into the Ethernet port on the back of the printer, and the other end into an open port on your router. Make sure the iPad running MeeD POS is on the same WiFi network as that router.
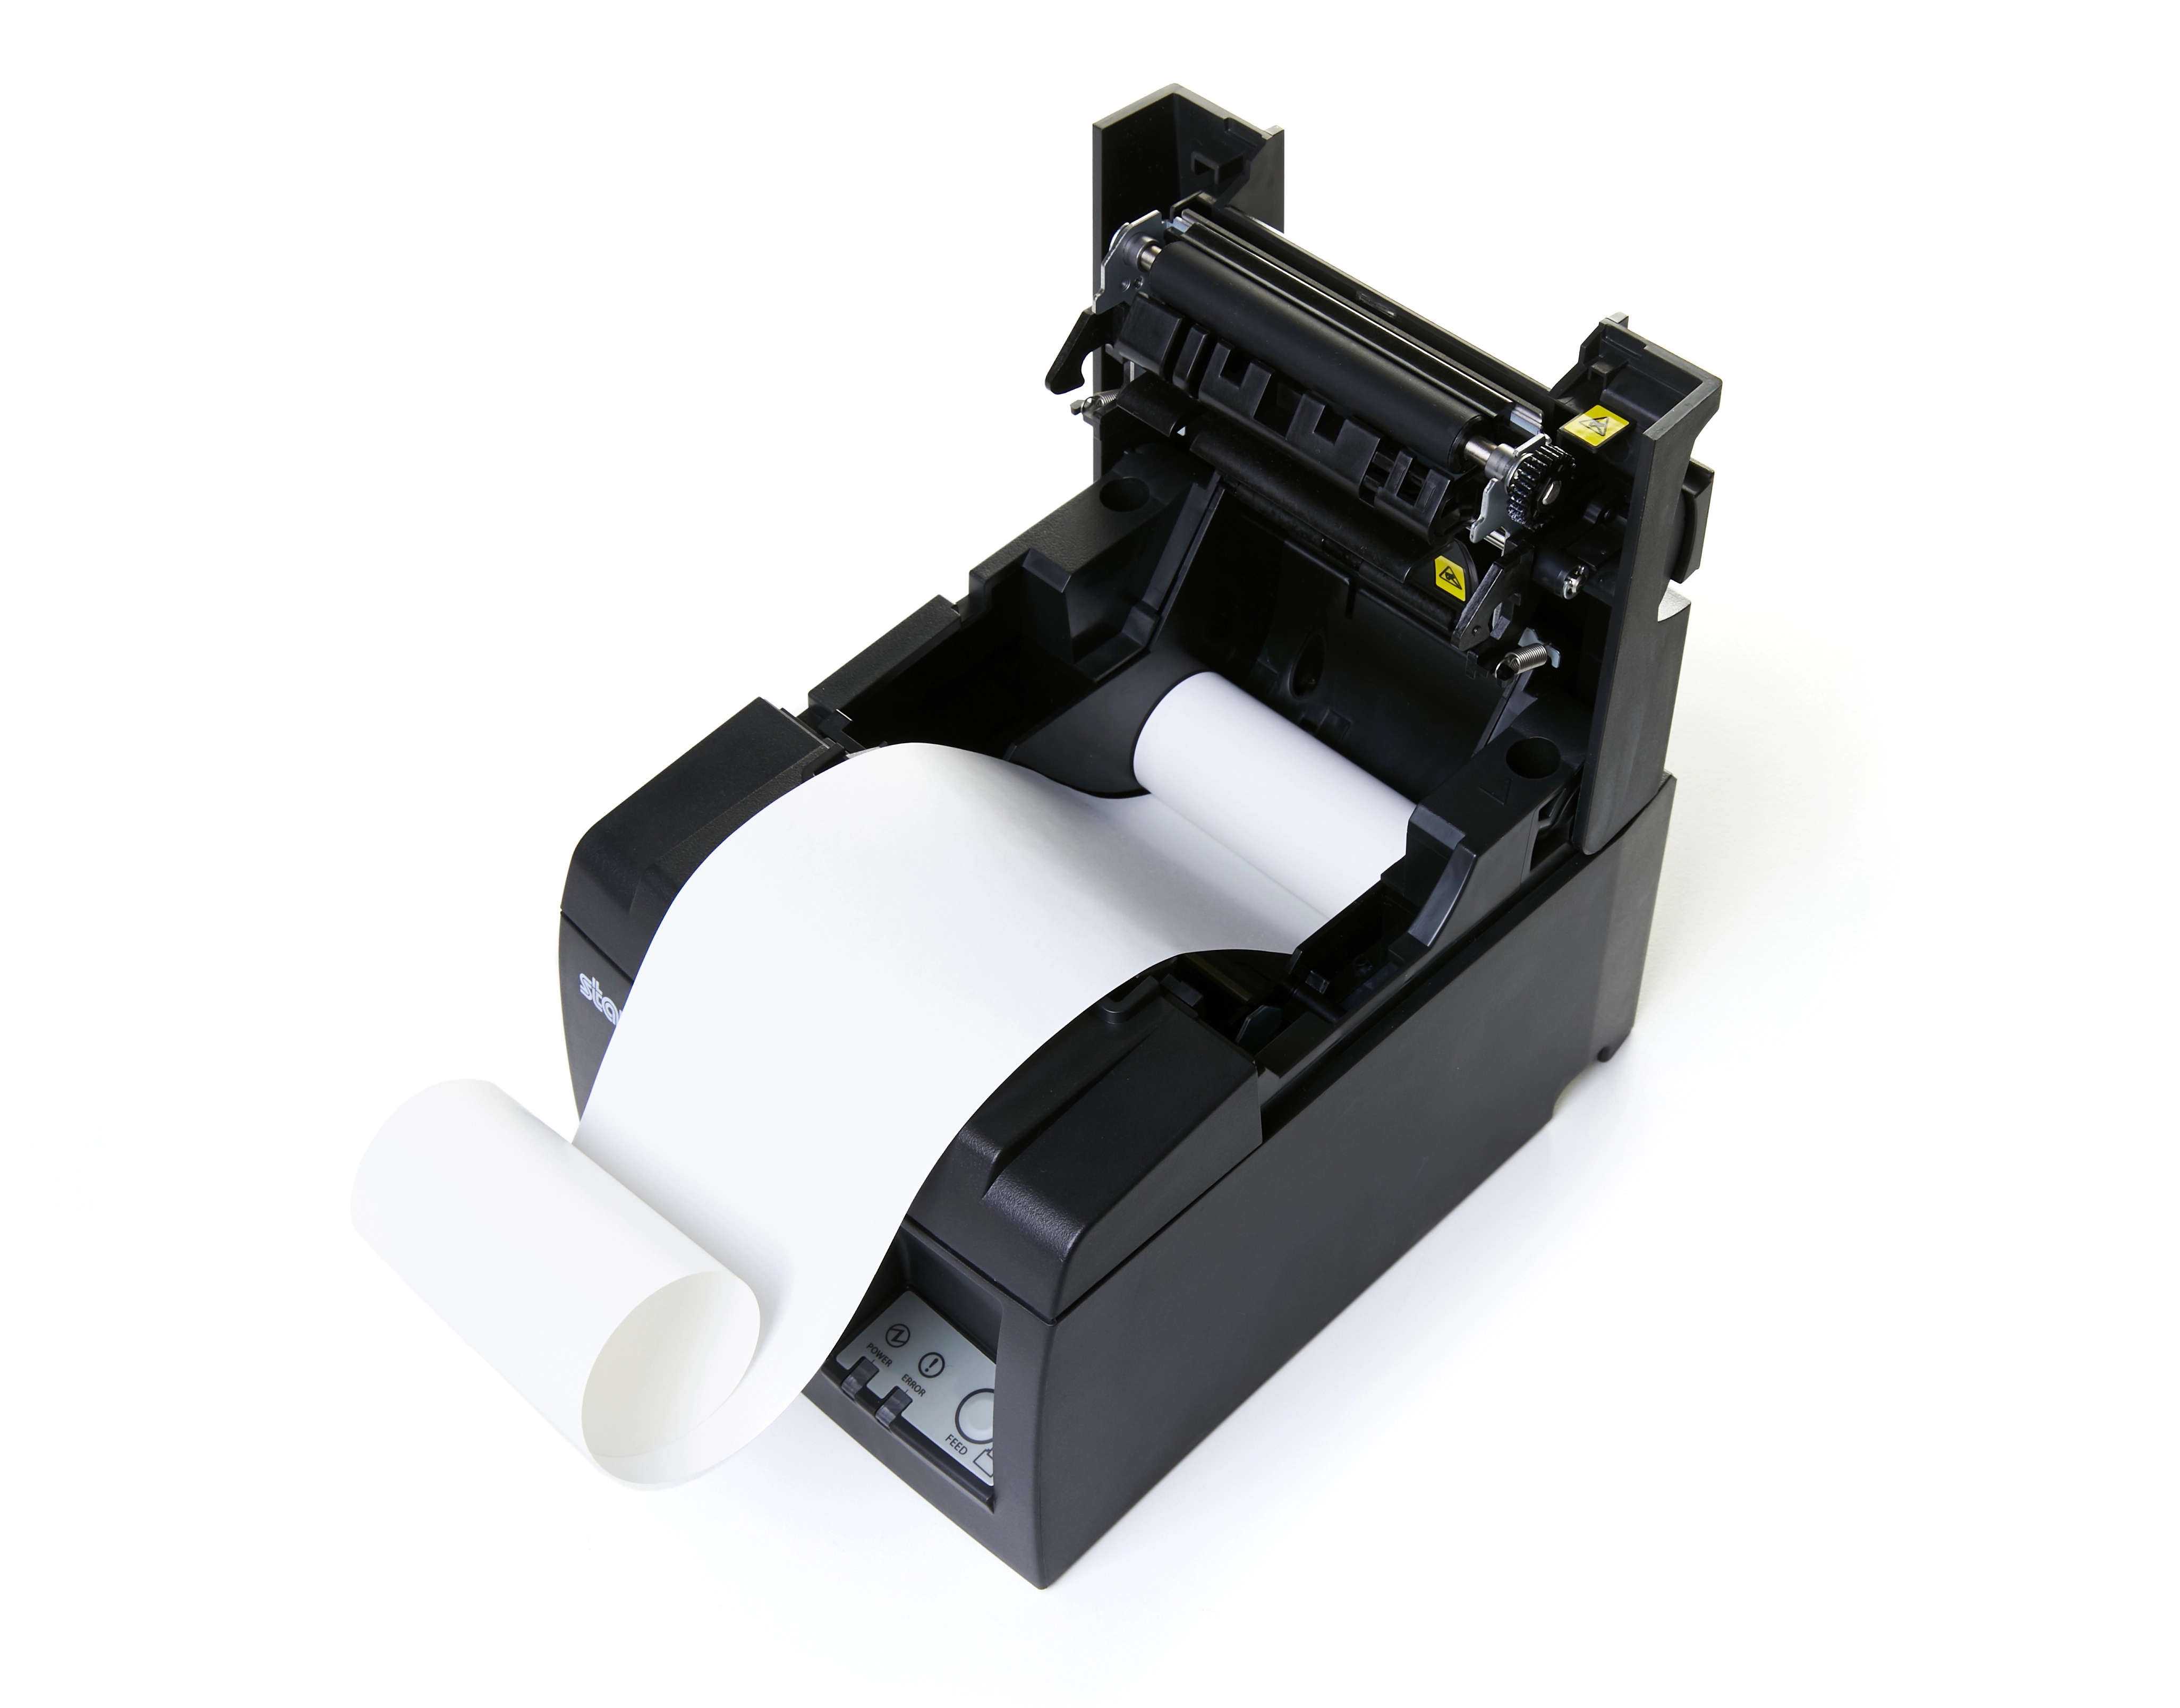
Load thermal paper
Press the cover release or lift the paper compartment lid, then load a roll of 80mm thermal paper with the heat-sensitive (glossy) side facing outward, and close the lid firmly.
Power on and print a test receipt
Press the Power button to turn on the printer and wait for the LED to turn green. Then hold the Feed button for about 3 seconds — the printer prints a test receipt showing its IP address, e.g. 192.168.1.105.
Step 2 — Open the printer settings menu
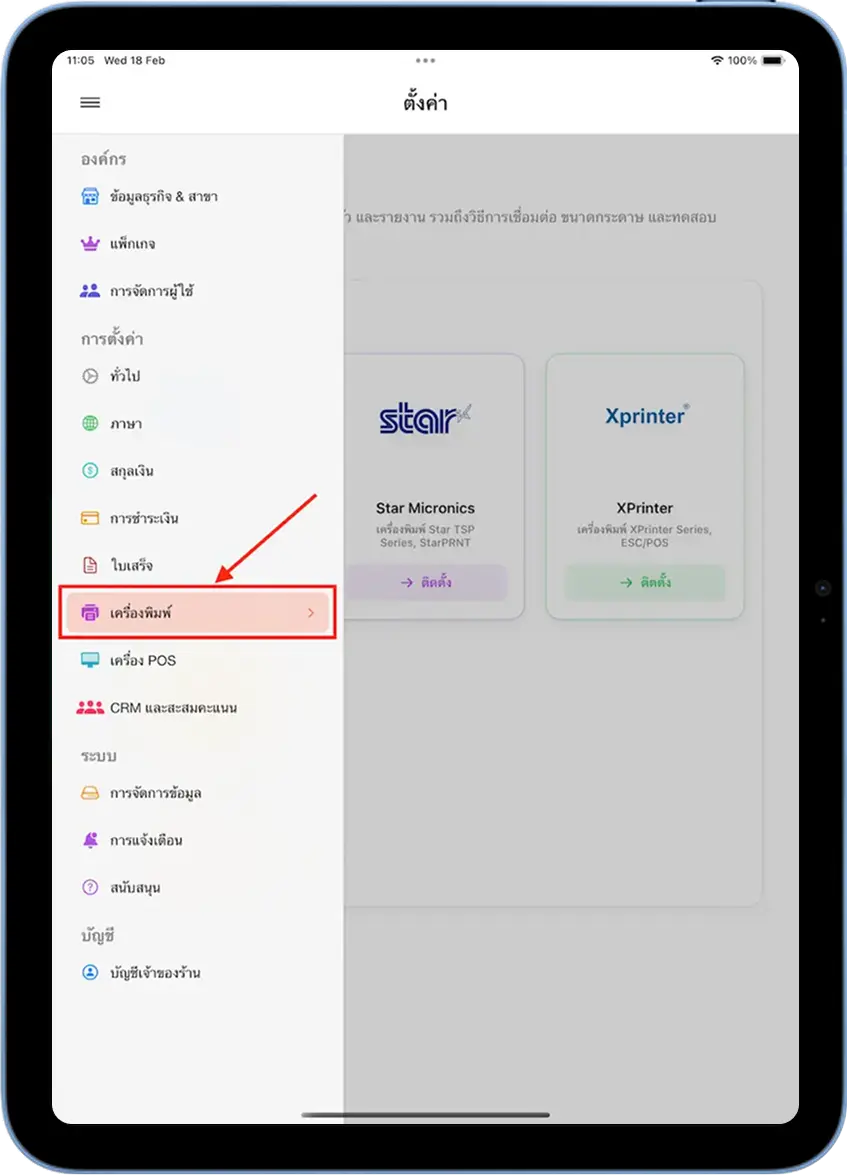
Go to Settings > Printers
Open the MeeD POS app on your iPad, tap the ☰ menu in the top-left corner, scroll to the "Settings" section, and select "Printers".
Step 3 — Choose the Epson brand
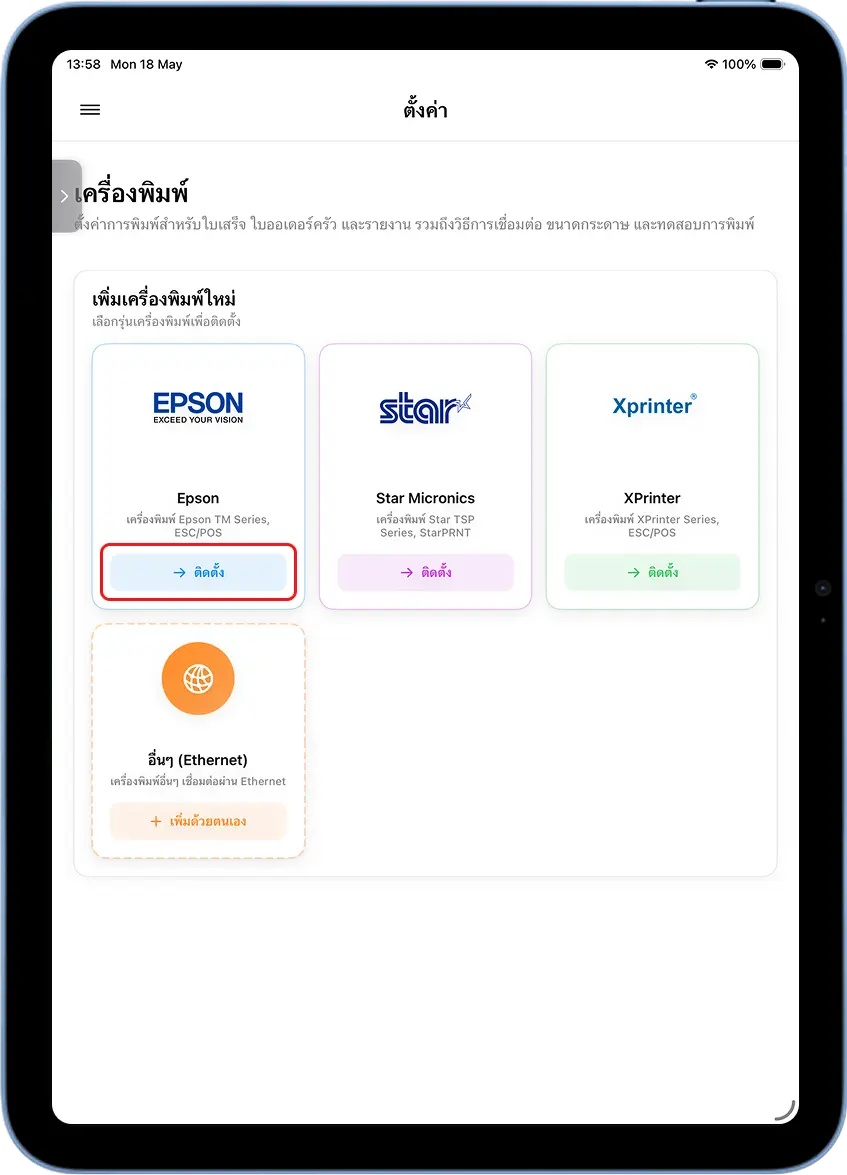
Tap "Install" on the Epson card
On the "Printers" page, you'll see an "Add New Printer" section listing supported brands: Epson, Star Micronics, XPrinter, and Other (Ethernet).
Tap "Install" on the Epson card.
Step 4 — Find and add the printer
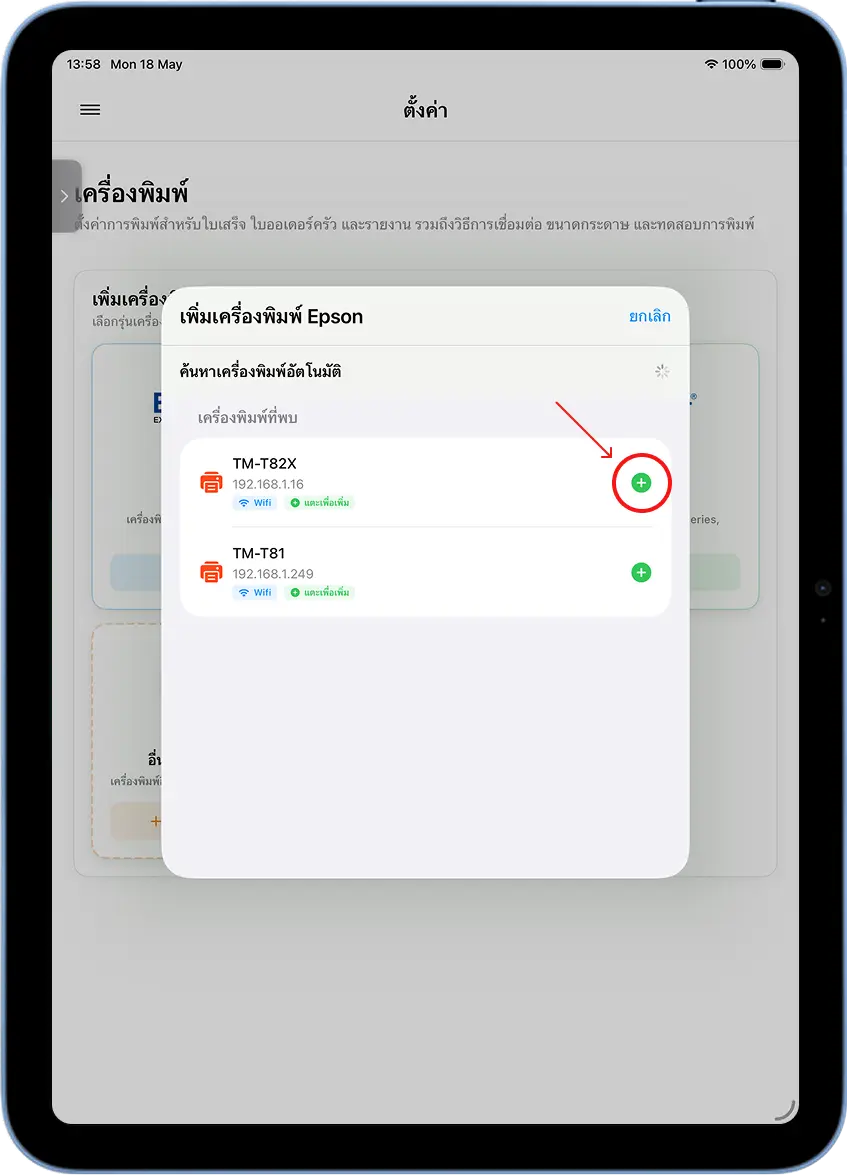
Wait for the automatic printer search
After tapping Install, the system automatically searches for printers on the same network. Once found, it shows the model name (e.g. TM-m30III), its IP address, and connection type.
Tap "+" to add the printer
Tap the "+" button next to the printer you want to add.
Step 5 — Test print
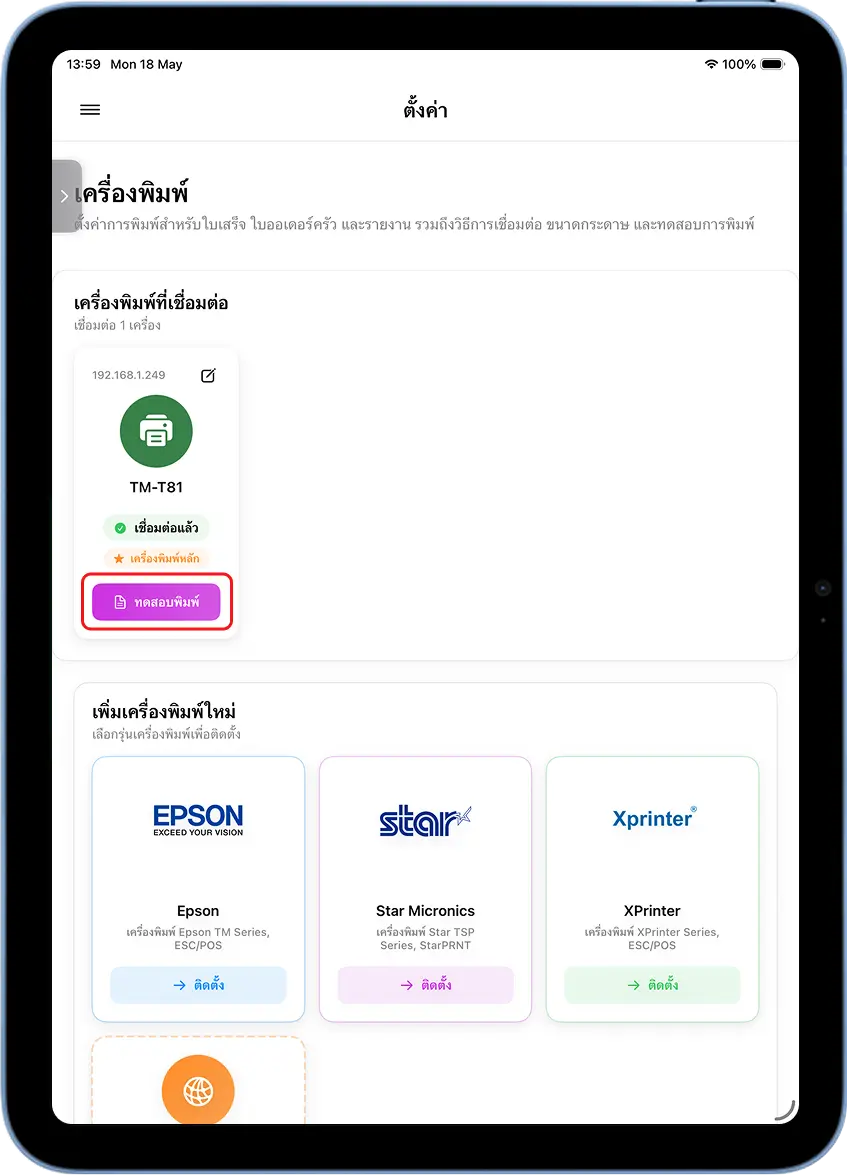
Confirm the connection status
The printer appears under "Connected Printers" with a status of ✅ Connected and ⭐ Primary Printer.
Tap "Test Print"
Tap "Test Print" to confirm the printer is working correctly.
Setup Steps — Bluetooth
Prepare the printer and pair Bluetooth
Turn on Bluetooth on the iPad
Go to Settings → Bluetooth → toggle it on (green).
Power on the printer and enable Bluetooth mode
Turn on the Epson TM-m30III and wait for the LED to turn green. The printer enters discovery mode automatically. If it doesn't appear on the iPad, hold the Feed button for 3 seconds to reset pairing.
Pair the printer with the iPad
In iPad Bluetooth settings, you'll see a name like TM-m30III_XXXXXX under "Other Devices". Tap it and wait for the status to change to "Connected".
Add the printer in MeeD POS
Open the MeeD POS app → Settings → Printers → tap "Install" on the Epson card. The system searches for the printer over Bluetooth automatically — tap "+" to add it.
Setup Steps — WiFi
Configure WiFi via Epson TM Utility
Download Epson TM Utility
Install the Epson TM Utility app from the App Store on your iPad. It's used to configure the printer's WiFi SSID and password over Bluetooth.
Download Epson TM Utility on the App Store →Pair Bluetooth first (one-time)
Follow the Bluetooth steps above to pair the printer with the iPad first. Then open Epson TM Utility → select the printer → choose WiFi Setup.
Enter the SSID and password
Enter the WiFi name (SSID) and password of the router your iPad is connected to. Tap Set and wait for the printer to restart and join the WiFi network.
Epson TM-m30III Support Page · Technical Reference Guide (PDF)
Add the printer in MeeD POS over WiFi
Open the MeeD POS app → Settings → Printers → tap "Install" on the Epson card. The system searches for the printer on the same WiFi network automatically — tap "+" to add it.
Setup Steps — USB
Connect via USB
Get the right USB cable
The printer's USB port is USB-C. Choose a cable based on your iPad model:
- Newer iPad (USB-C): use a USB-C to USB-C cable, connect directly
- Older iPad (Lightning): use a USB-C to Lightning cable
Connect the cable and power on the printer
Plug the USB-C cable into the USB-C (Tablet) port on the back of the TM-m30III, and the other end directly into the iPad. Turn on the printer and wait for the charging icon to appear on the iPad.
Add the printer in MeeD POS
Open the MeeD POS app → Settings → Printers → tap "Install" on the Epson card. The system detects the printer automatically — tap "+" to add it.
Test With a Real Sale
Add items and go to checkout
Add items to the cart
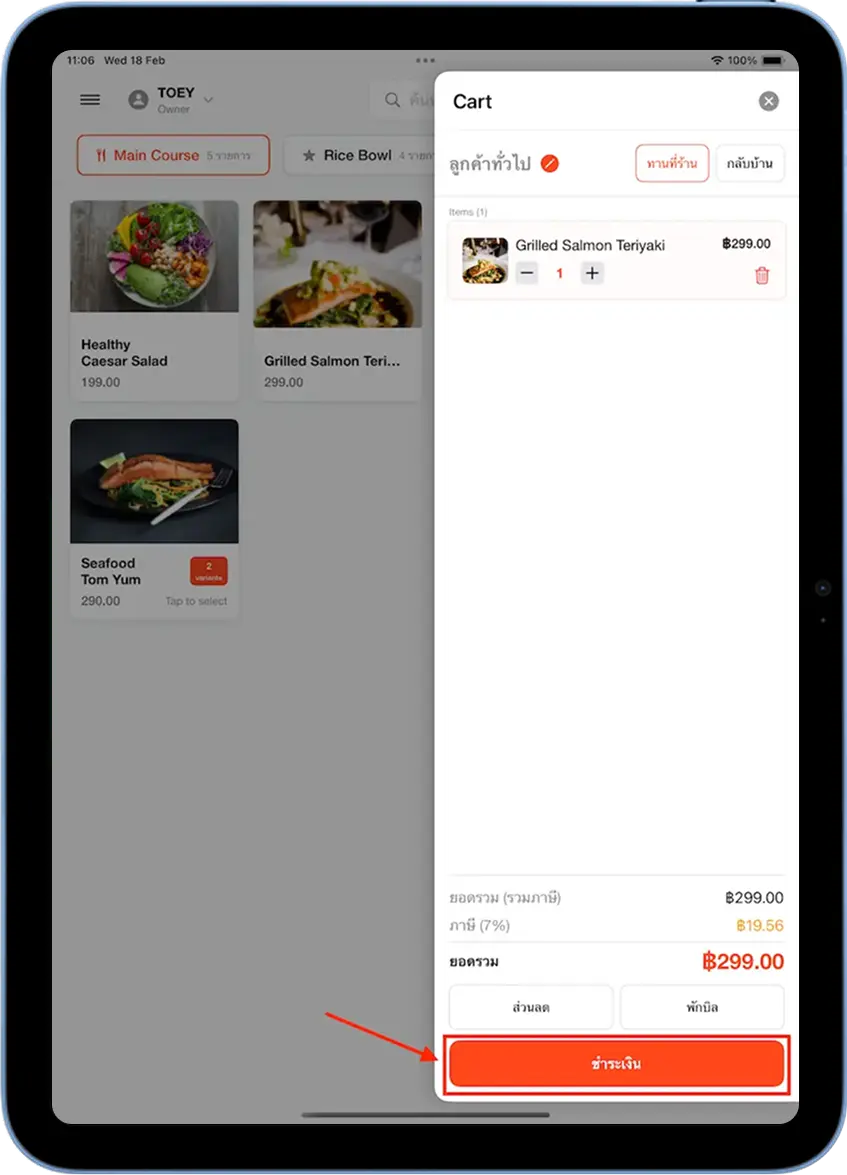
Go back to the sales screen and select the menu items you want. They're added to the Cart with a running total.
Tap "Checkout"
Tap the orange "Checkout" button at the bottom.
Choose a payment method and confirm
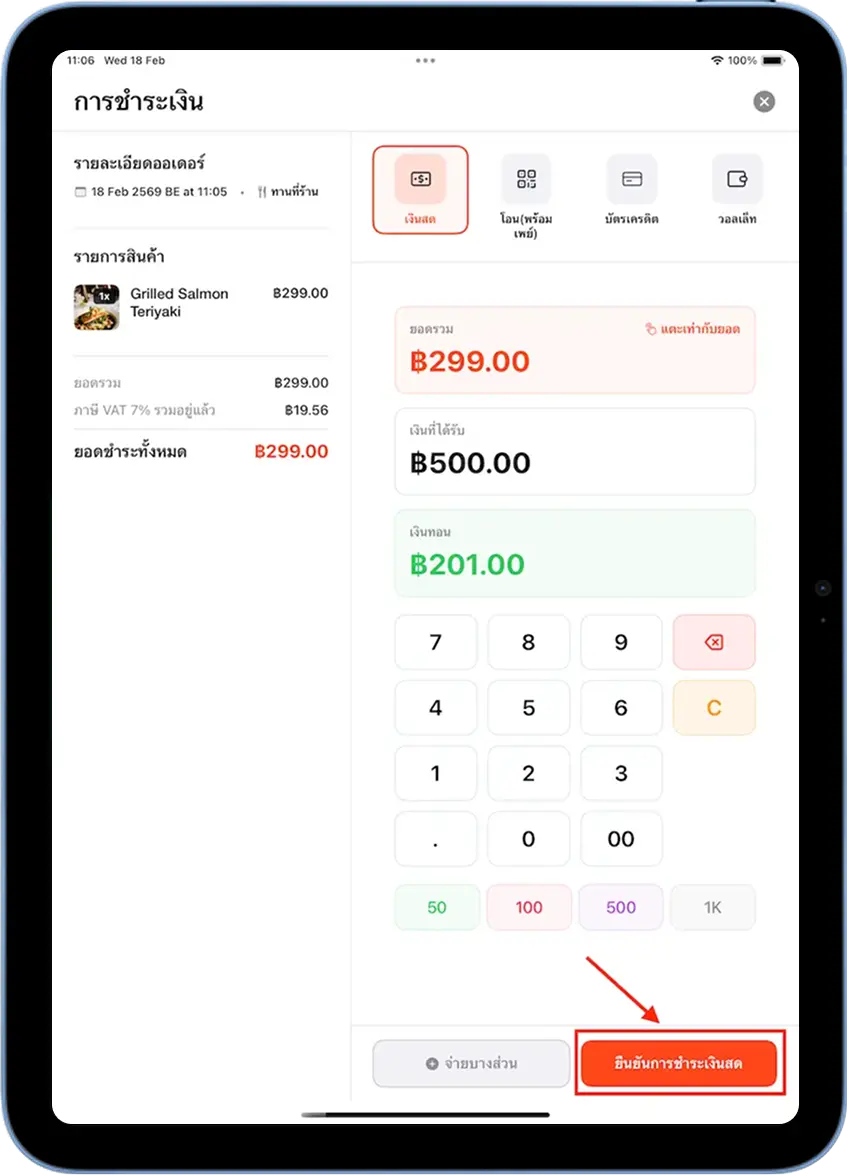
Choose a payment method
On the "Payment" screen, choose a method: 💵 Cash / 📱 Transfer (PromptPay) / 💳 Credit card / 📲 Wallet
Enter the amount and confirm
Enter the amount received — the system calculates change automatically. Then tap the orange "Confirm Cash Payment" button in the bottom right.
Payment confirmed — print the receipt
Tap "Print Receipt"
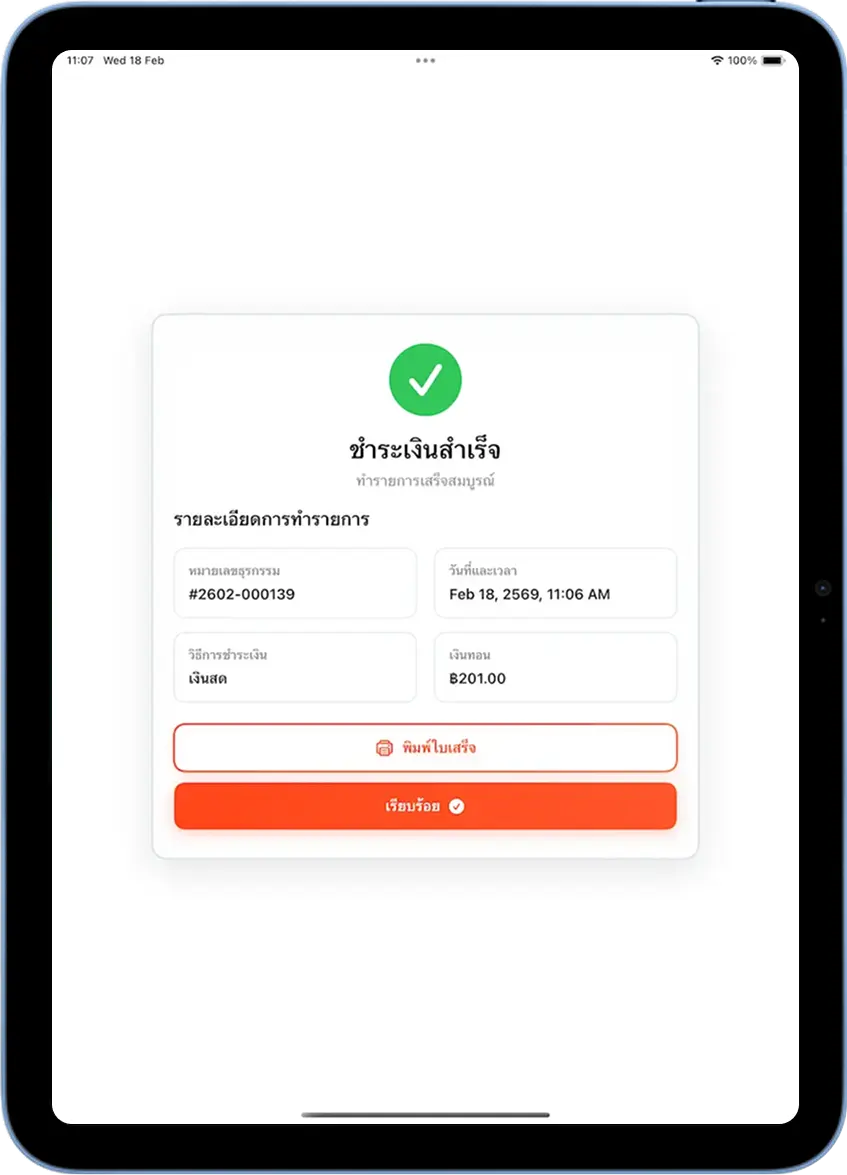
Once payment is confirmed, the "Payment Successful" screen appears with the transaction number, date, payment method, and change due. Tap "Print Receipt" to print via the Epson TM-m30III you set up, then tap the orange "Done" button to return to the sales screen.
Common Issues
Can't find the printer (LAN/WiFi)
Make sure the printer and iPad are on the same WiFi/LAN network. Try power-cycling the printer, then search again.
Bluetooth pairing fails
Hold the Feed button for 3 seconds to reset pairing, then try again. Make sure the iPad's Bluetooth is on and not already paired with another device.
Printer is connected but won't print
Check that the printer has paper loaded, then run a test print again — or try removing and re-adding the printer.
Receipt prints garbled characters
Confirm the printer model is set to Epson, and that the paper is loaded the correct way (print side facing up).
WiFi setup via Epson TM Utility fails
Double-check the SSID and password (case-sensitive), and make sure the iPad stays within WiFi range during setup.

Need More Help?
Still can't connect after setup, or want our team to help remotely? Get in touch anytime.