How to Print Cup Stickers with an Xprinter XP-420B on an iOS POS
This alternative cup-sticker workflow uses an Xprinter XP-420B with individual cup sticker labels. MeeD POS on iPad prints one label per drink with the item name, options, order number, and [n/total] sequence.
MeeD POS Team · For MeeD POS on iPad · Reviewed by Technical Support ·
How this differs from receipt-printer sticker printing
The existing method uses a 58mm receipt printer with continuous sticker paper. This method uses an XP-420B barcode printer and individual cup sticker labels. The printer detects each label and advances it to a peel-ready position.
- Ready to peel — Each label is pre-cut, so continuous paper does not need to be cut manually
- Multiple label sizes — 50 × 30 mm is a common example, but settings must match the actual label
- One label per item — Sticker (Per Unit) mode prints one label for every drink
What you need
- Xprinter XP-420B — Choose a connectivity variant supported by your device and store network
- Direct-thermal cup sticker labels — For example, 50 × 30 mm or a size suitable for your cups
- iPad with MeeD POS — Update the app and sign in with permission to change printer settings
- Network or connection accessory — As required by the LAN, Wi-Fi, or Bluetooth variant
- Beverage categories — Products must be assigned to categories that can be selected for printing
XP-420B cup sticker setup
Part 1 — Prepare the printer and cup sticker labels
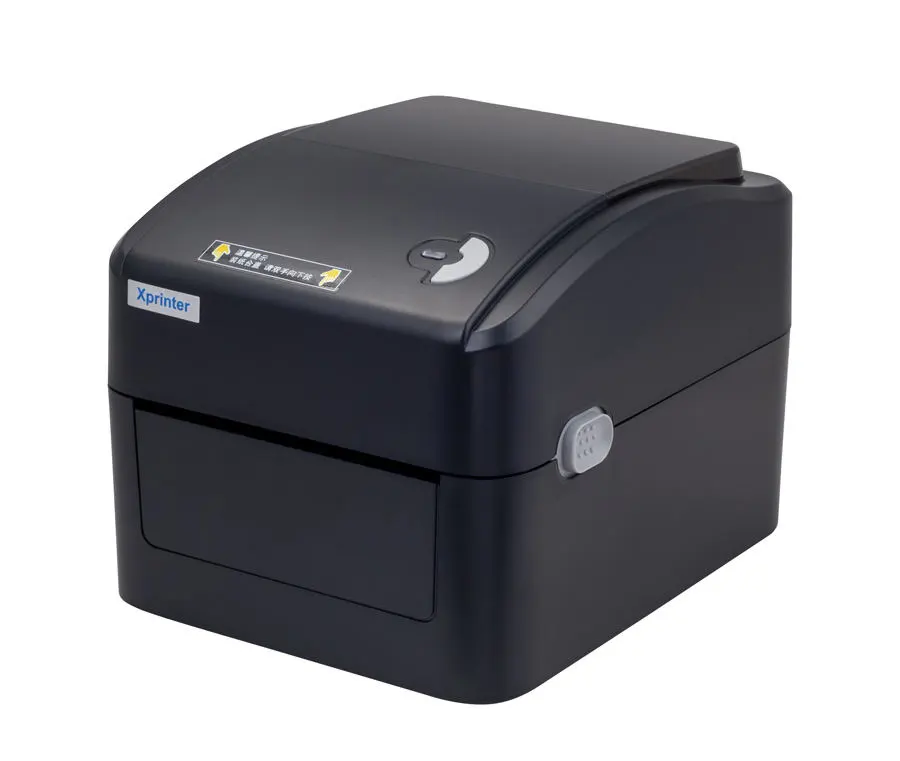
Check your Xprinter XP-420B connection variant
The XP-420B is sold with different interfaces. Check the label under the printer or its box, then use a connection supported by MeeD POS and your iPad. If you have not purchased one yet, review the Xprinter XP-420B product details first.
| Connection | Check | Best for |
|---|---|---|
| LAN / Wi-Fi | The iPad and printer must use the same network | Fixed print stations and multiple devices |
| Bluetooth | The printer variant must support pairing with iPad | Counters that need fewer cables |
Load the label roll and adjust the guides
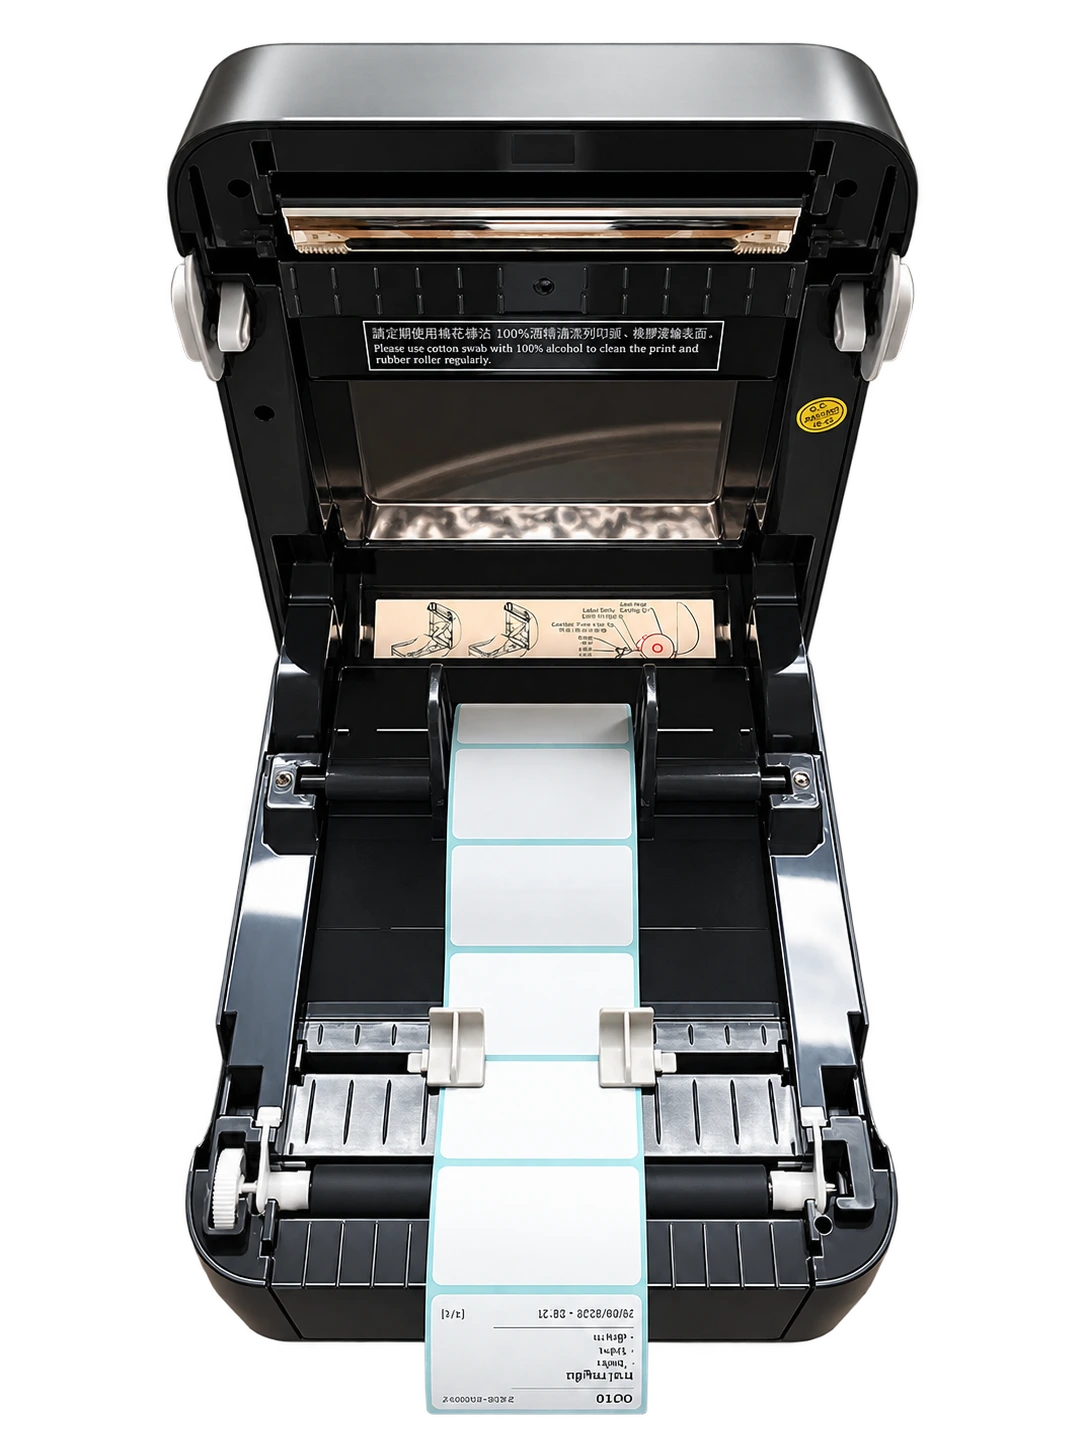
Open the printer, place the roll with the printable side facing up, route it through the sensor, and move both guides against the edges without squeezing the roll.
Close the cover and press Feed to confirm that the label advances straight and stops at the next label edge.
Connect the XP-420B to the iPad
For LAN or Wi-Fi, connect the printer and iPad to the same router and confirm that the printer has an IP address.
For Bluetooth, enable Bluetooth on iPad, pair the printer, and confirm that MeeD POS detects it.
Part 2 — Configure the XP-420B in MeeD POS
Open MeeD POS → Settings → Printer Settings
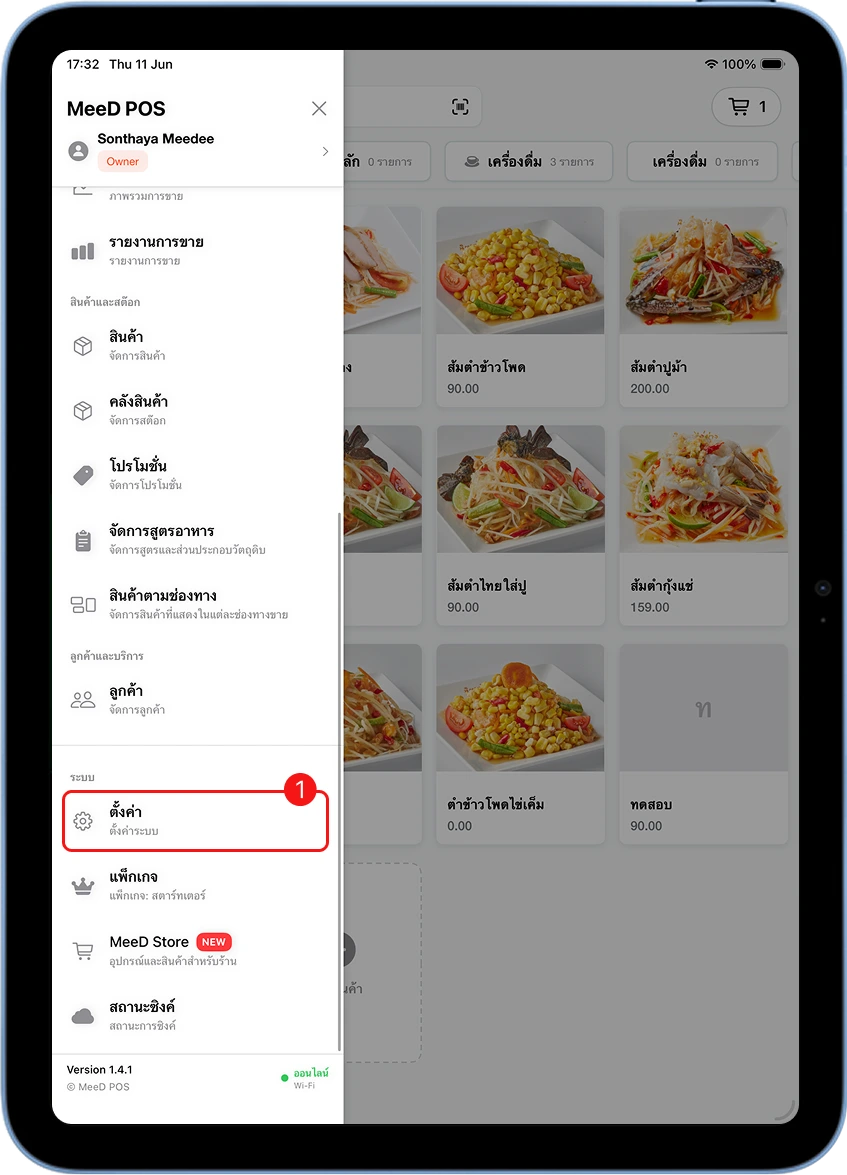
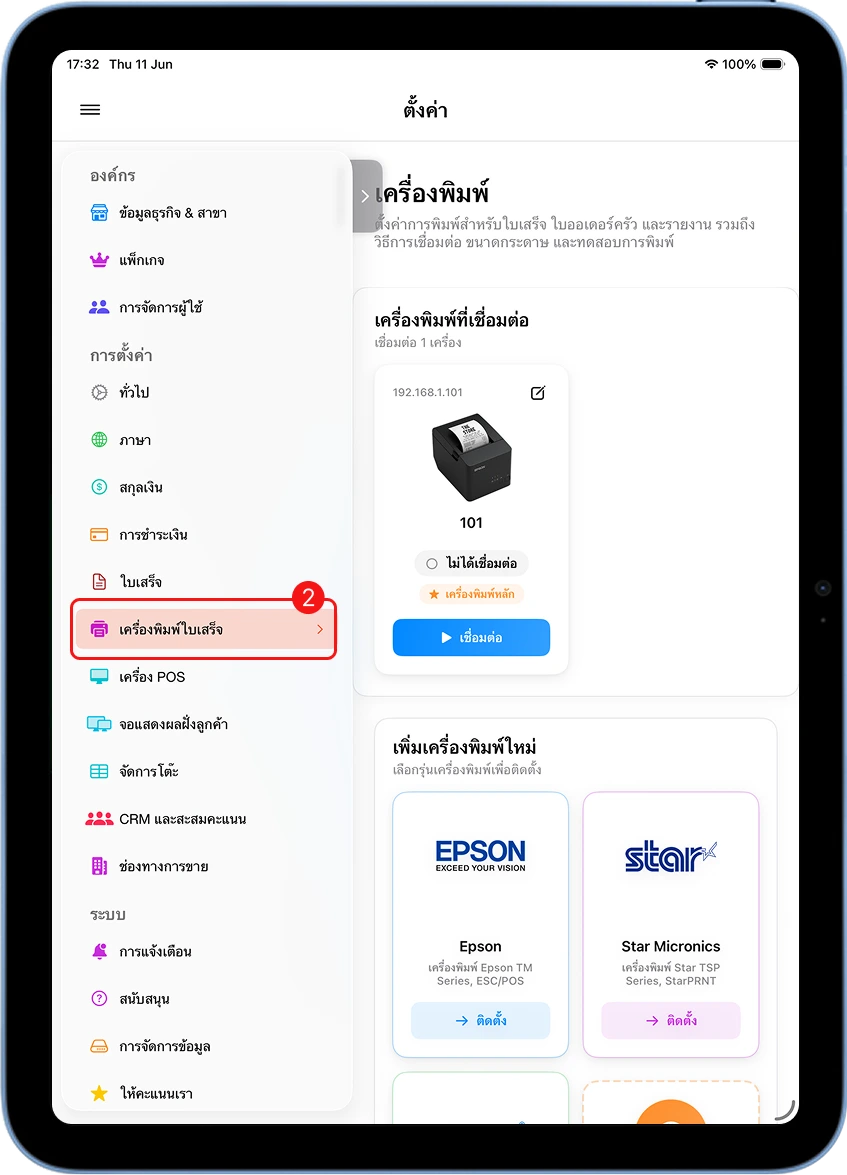
Open MeeD POS on iPad, tap the ☰ menu, select Settings, and open Printer Settings.
Choose the XP-420B connection method
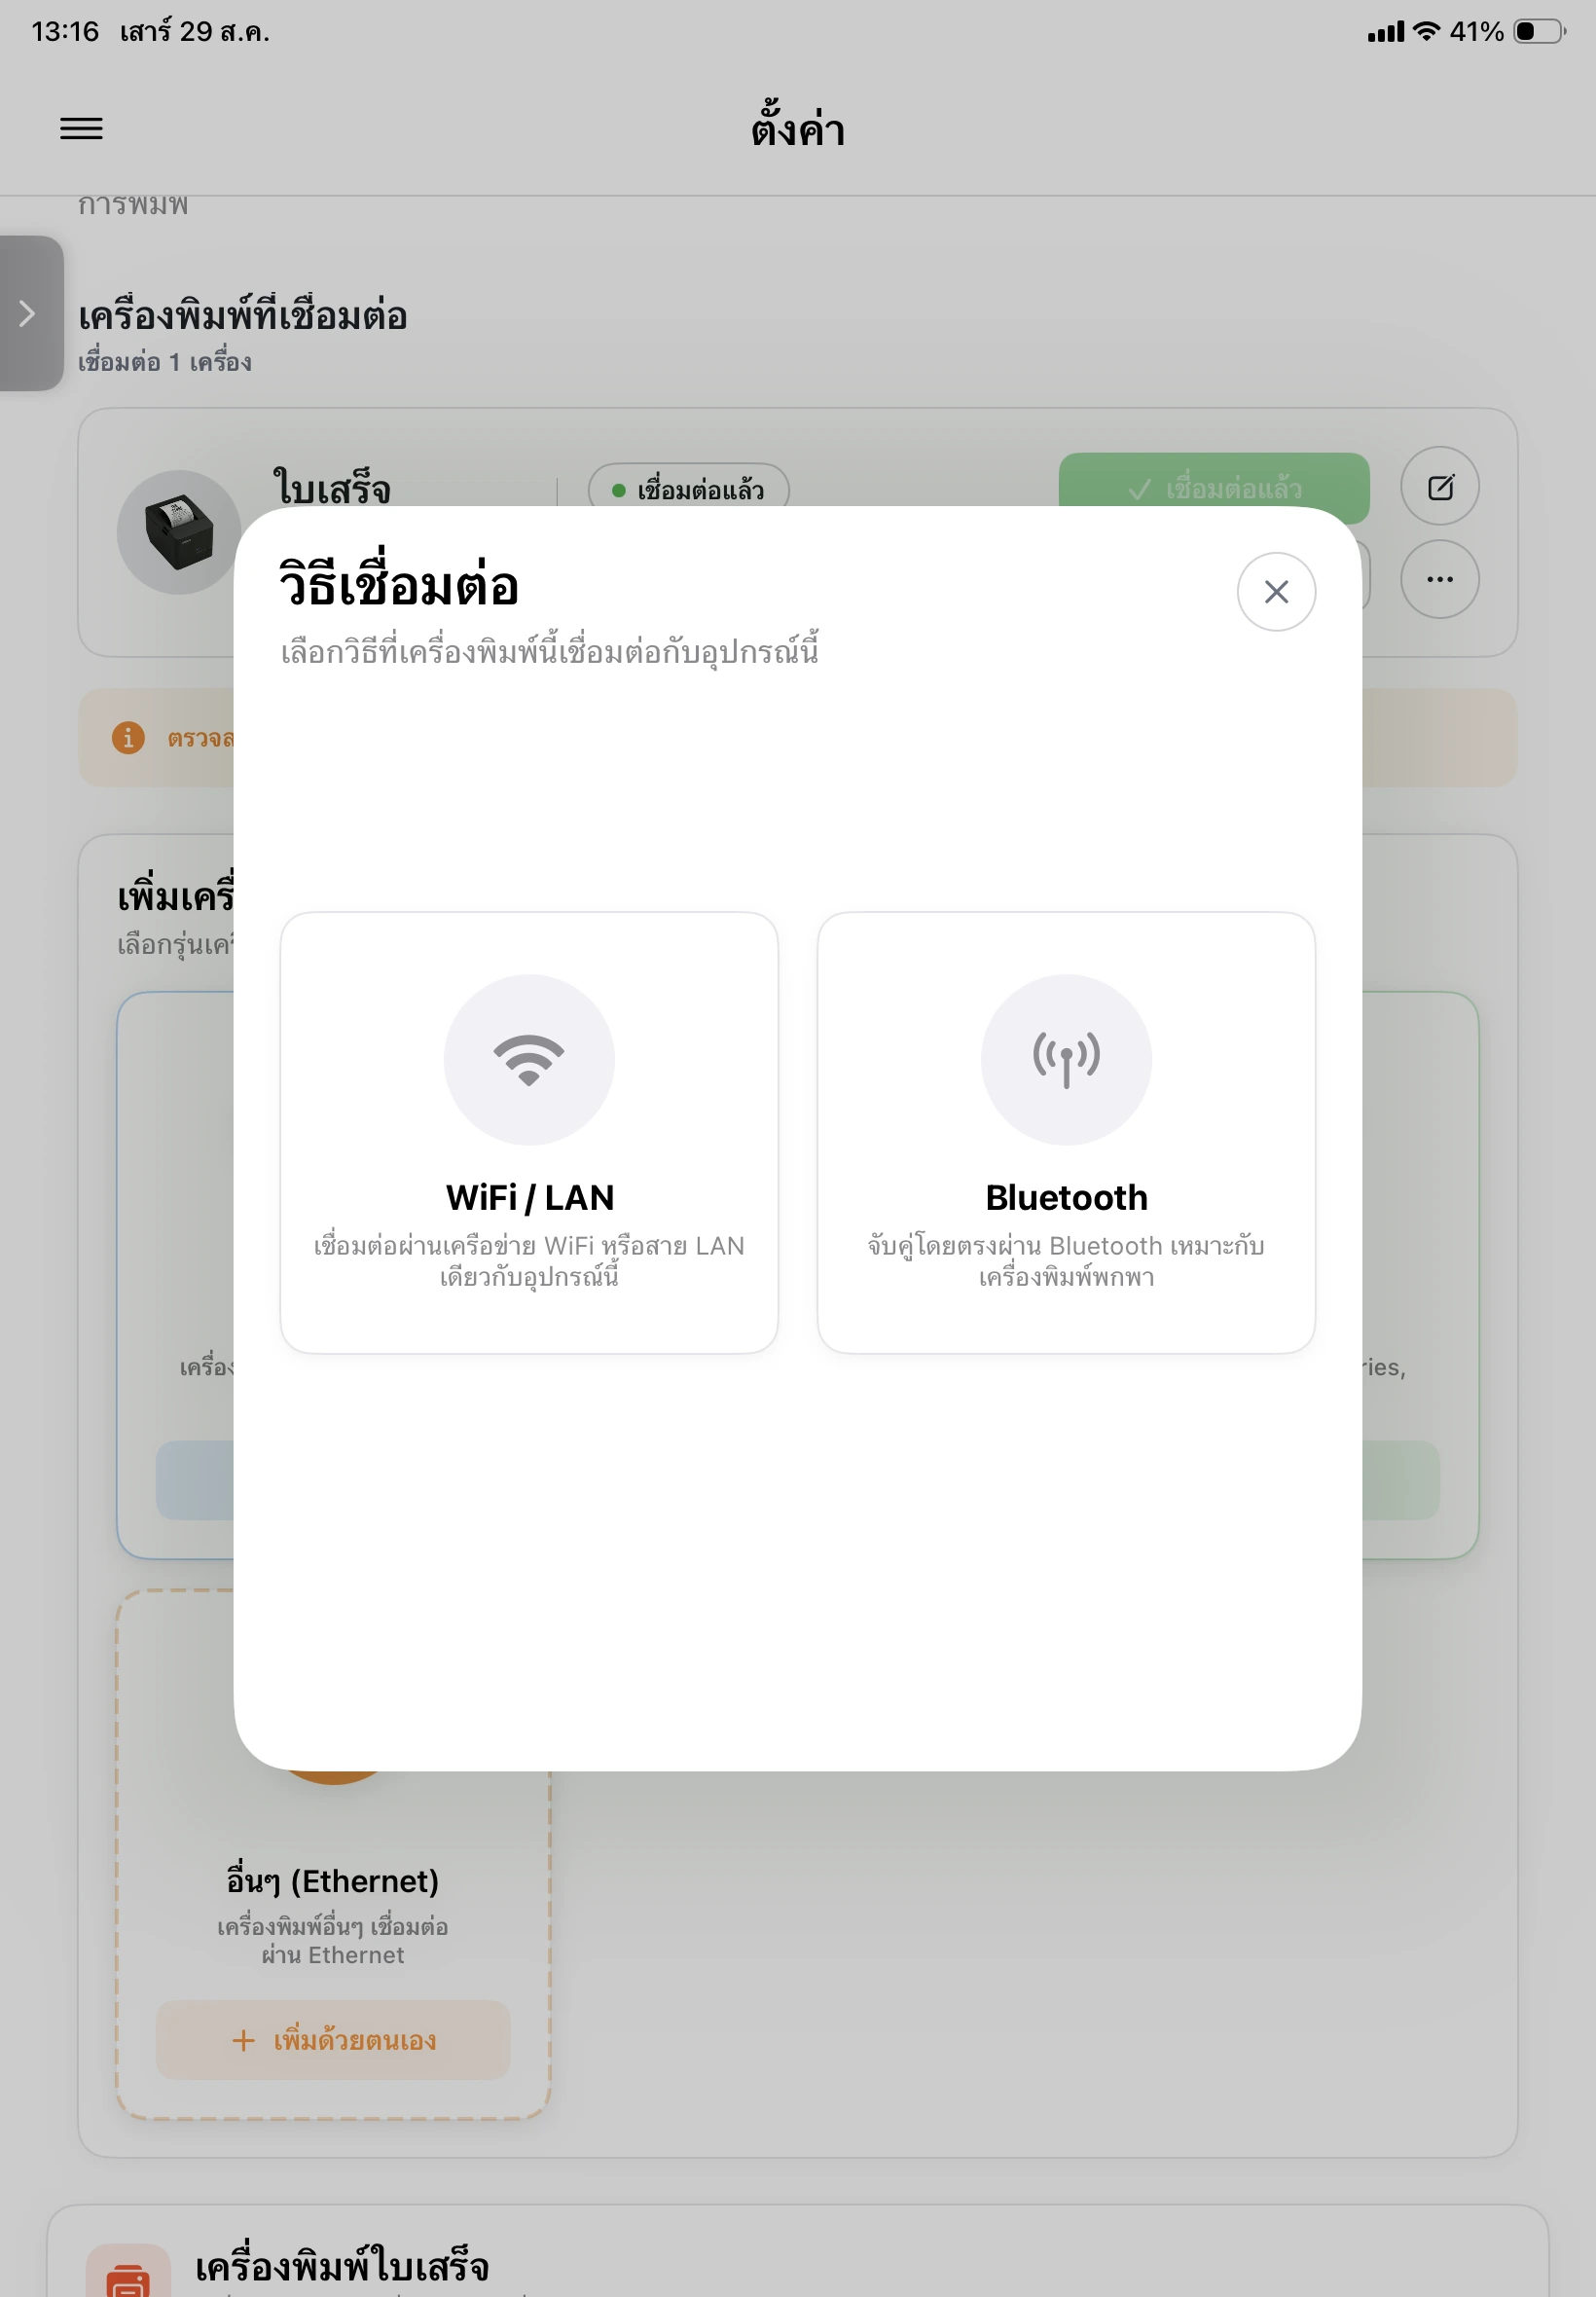
Under Add a New Printer, select XPrinter and tap Install. Choose WiFi / LAN or Bluetooth to match the XP-420B variant in use.
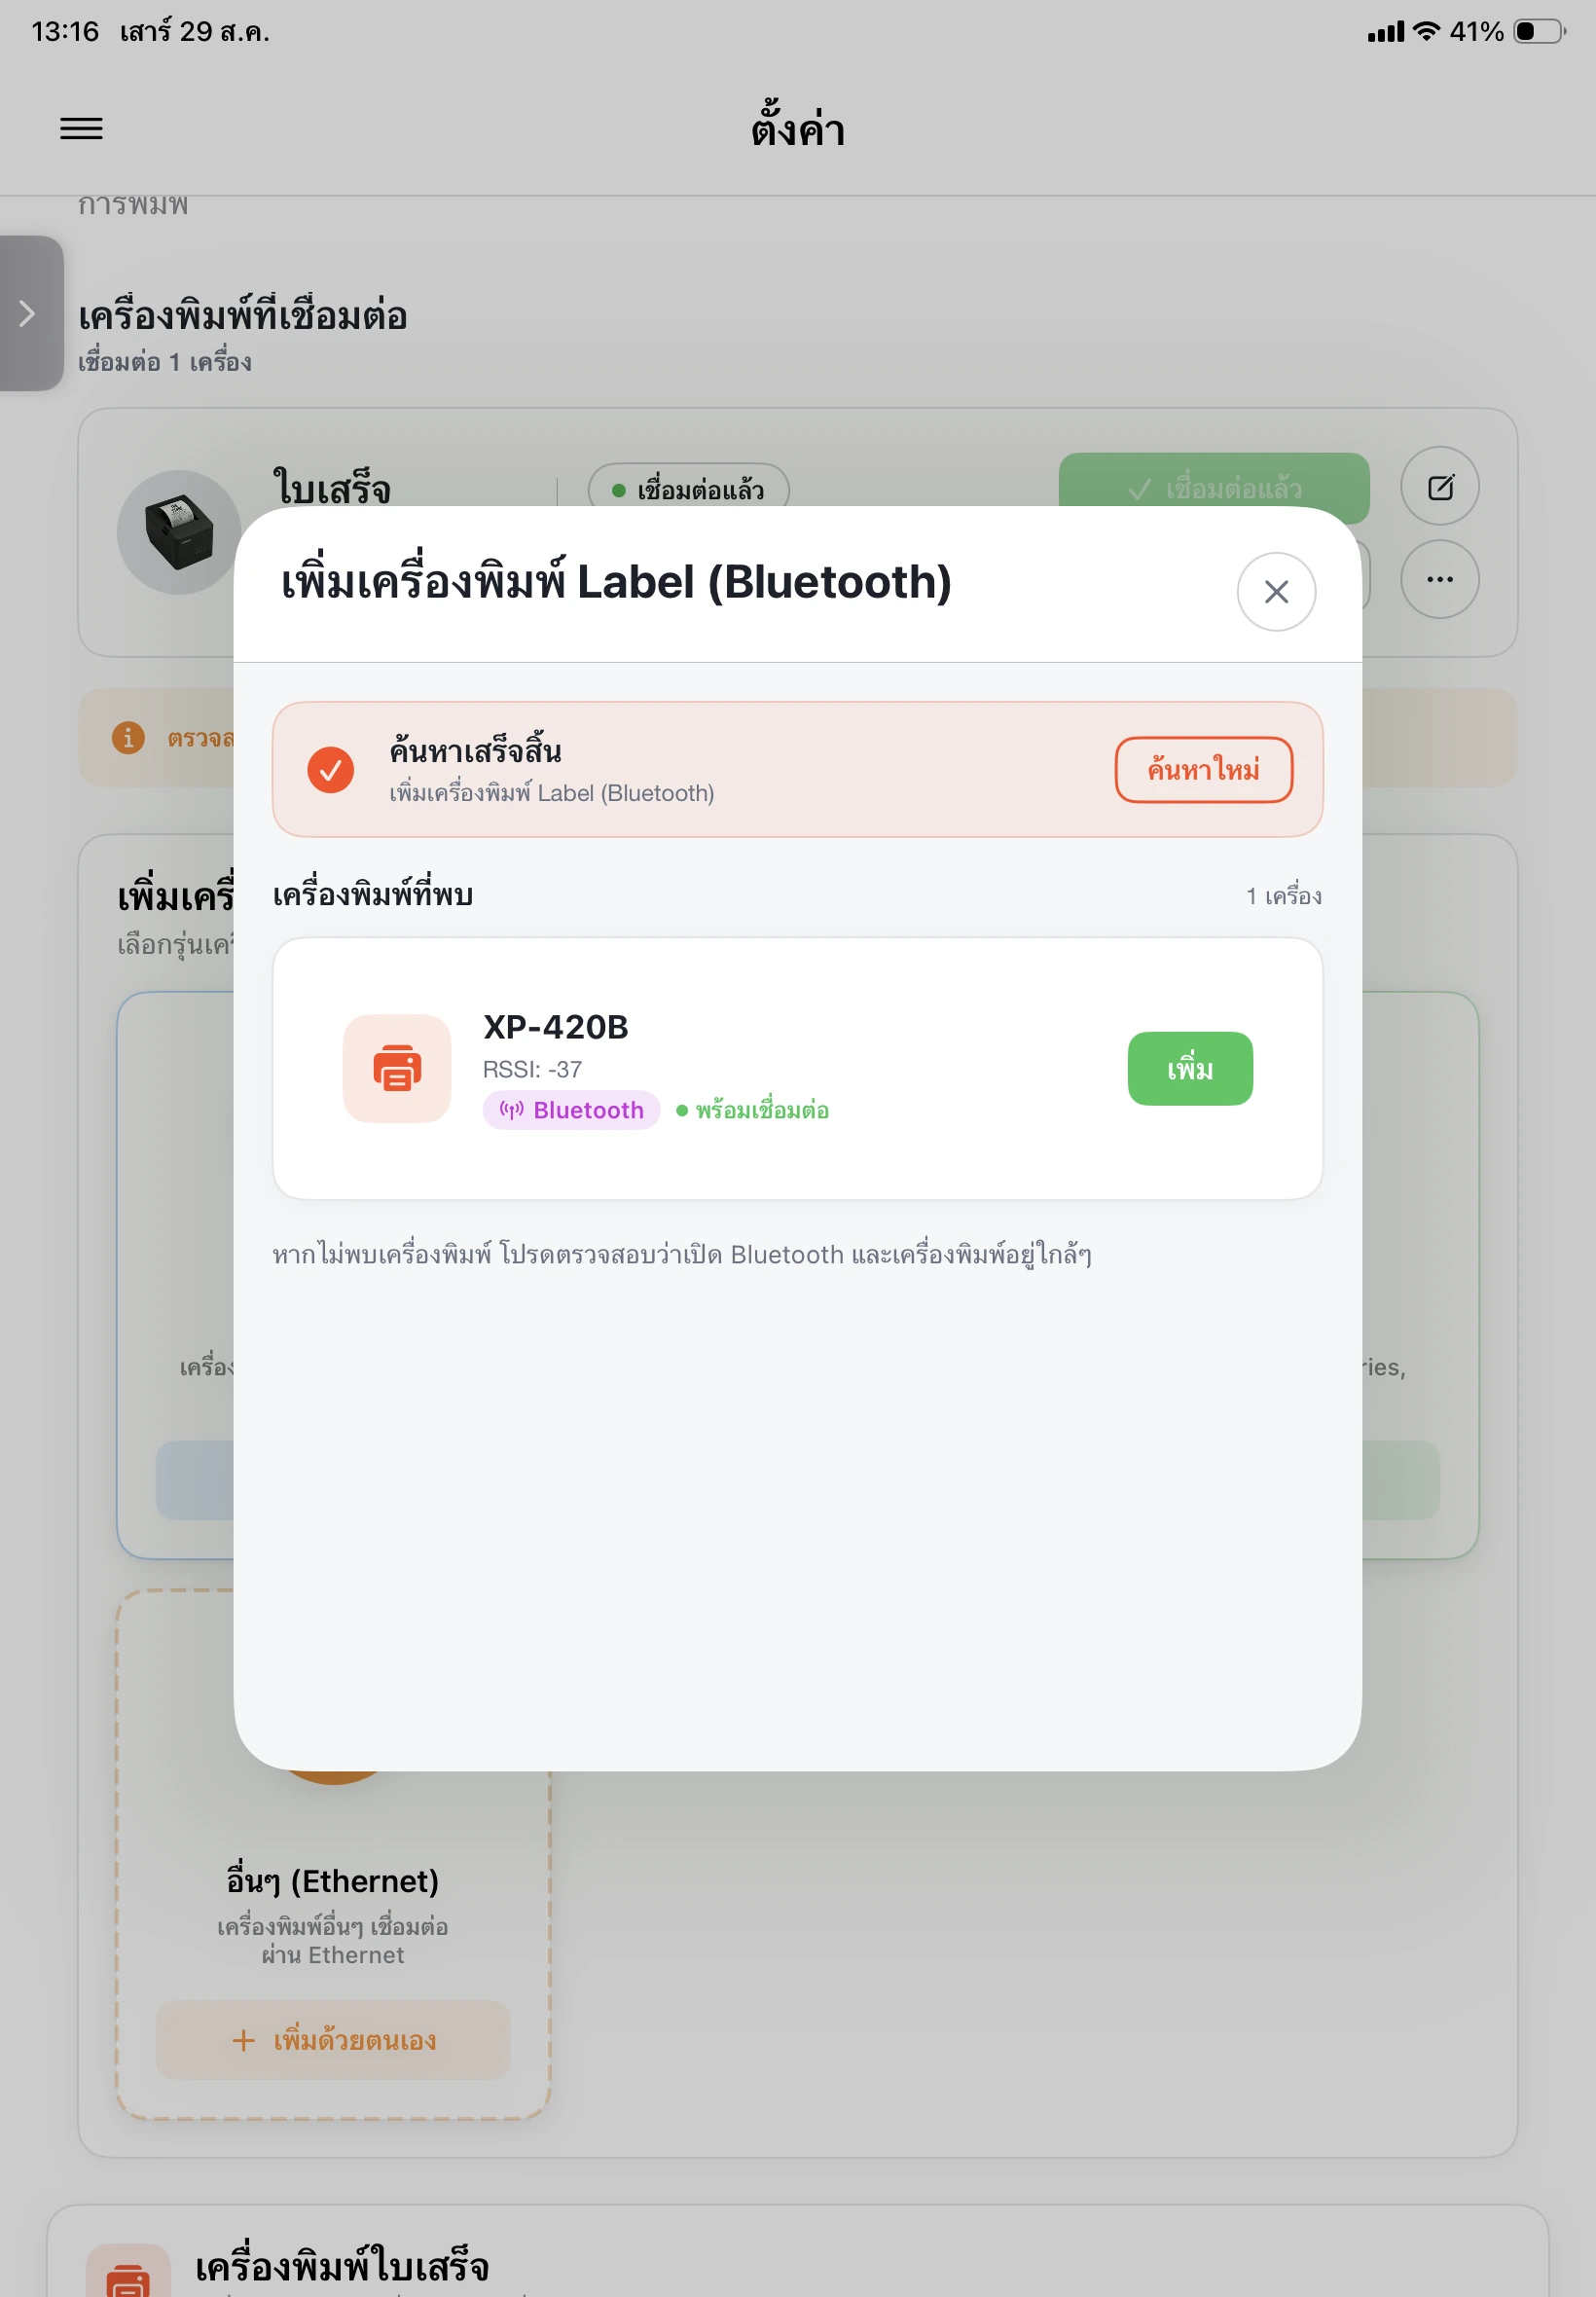
Find the XP-420B and tap Add
Turn on the printer and keep it near the iPad. When MeeD POS finds the XP-420B, verify its name and ready status, then tap Add.
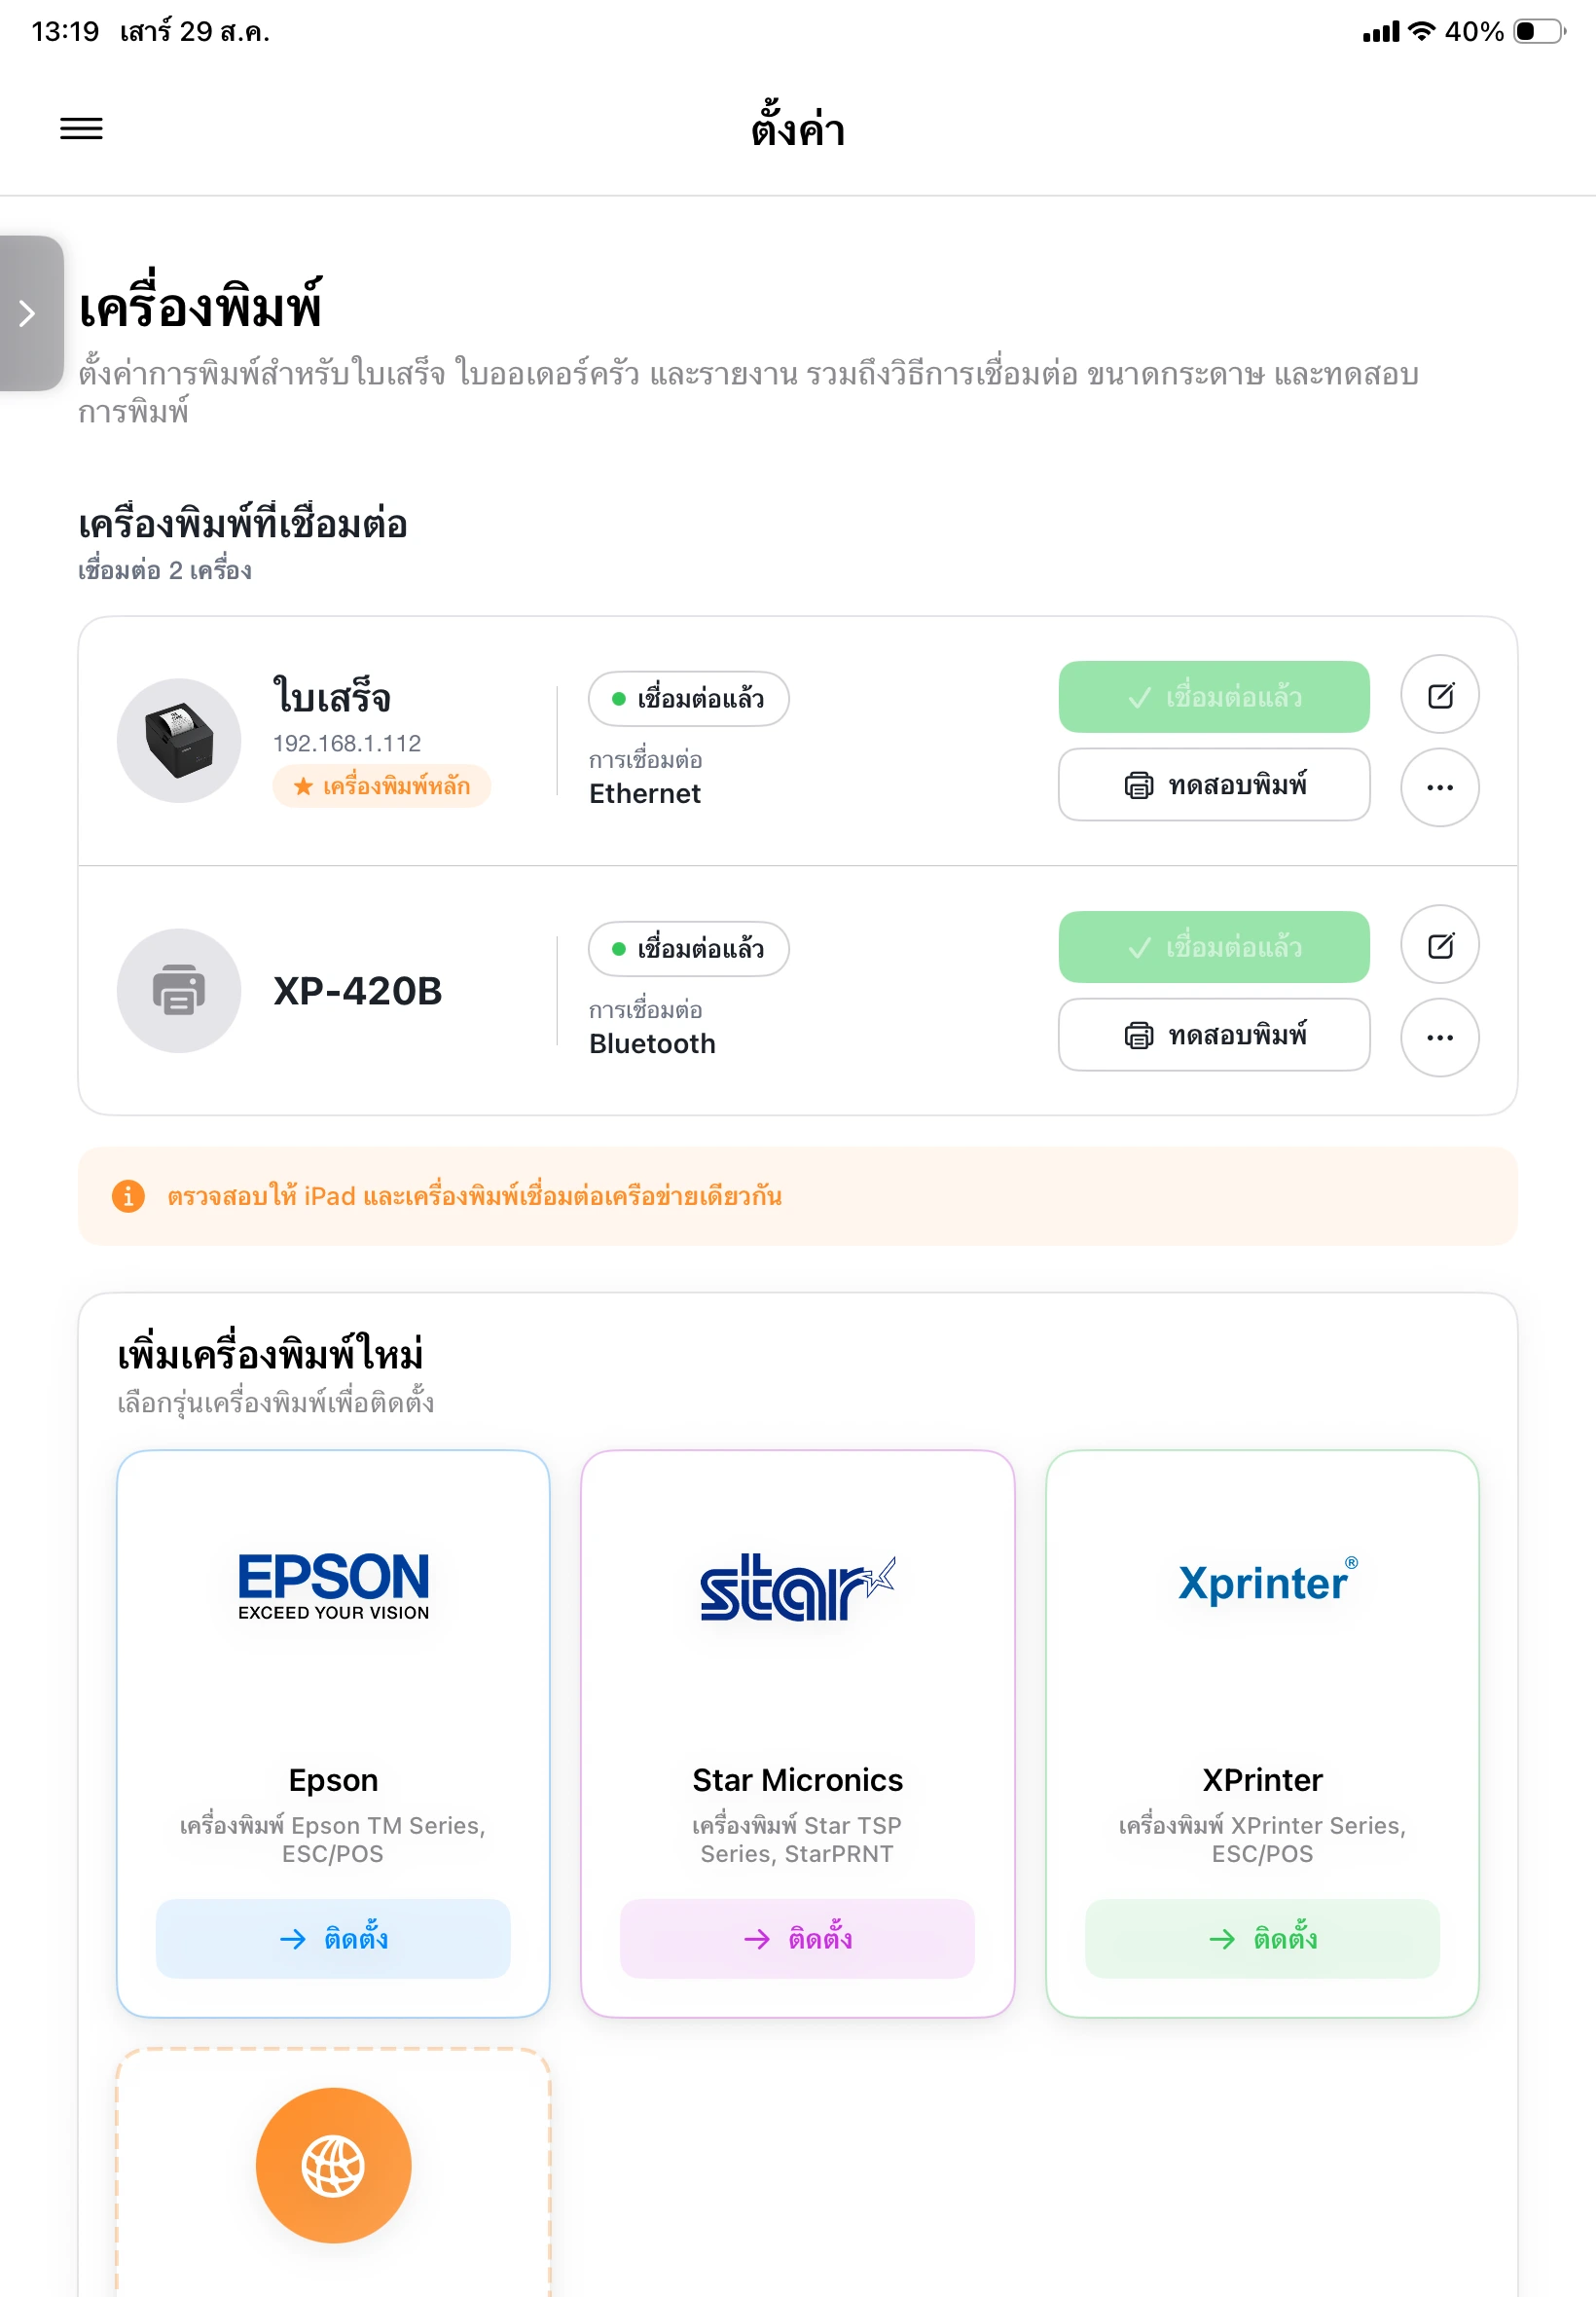
Confirm the connected status
Wait for the XP-420B to appear under Connected Printers with a connected status, then tap its edit icon to open the printer settings.
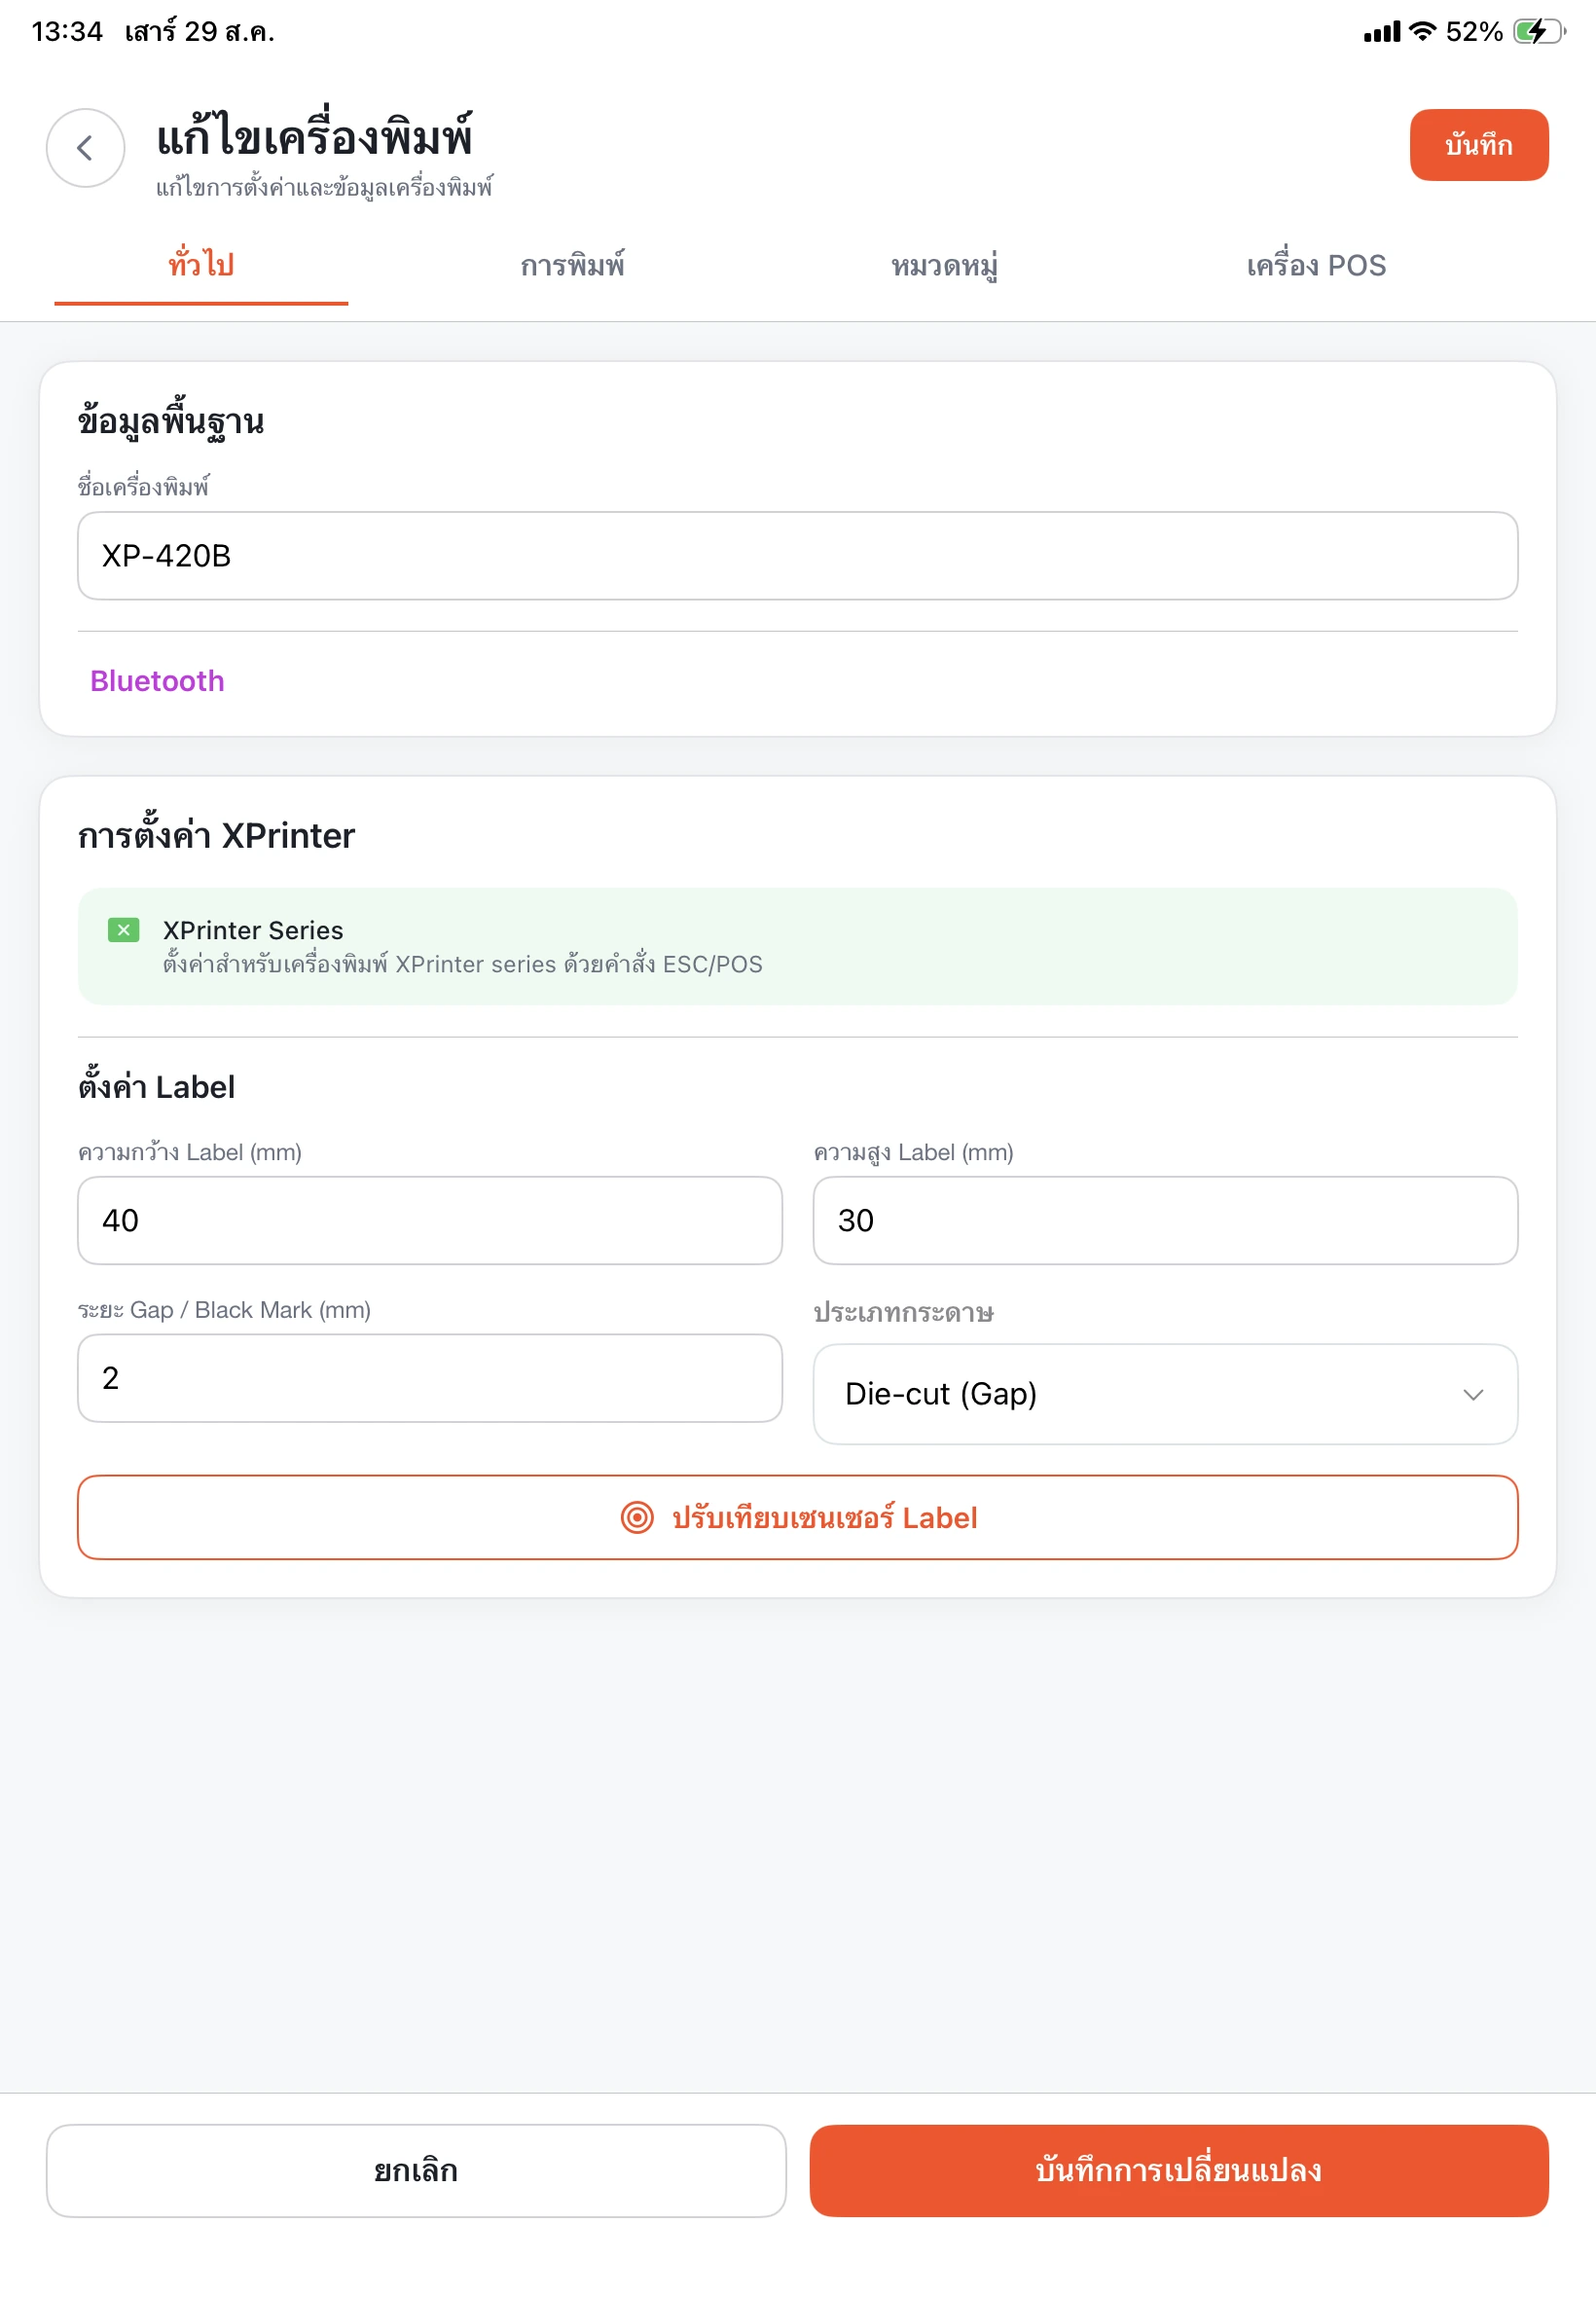
Set the cup-sticker dimensions
On the General tab, enter the actual cup-sticker width, height, and spacing. The screenshot uses 40 × 30 mm, 2 mm spacing, and the Die-cut (Gap) paper type.
Choose Sticker (Per Unit)
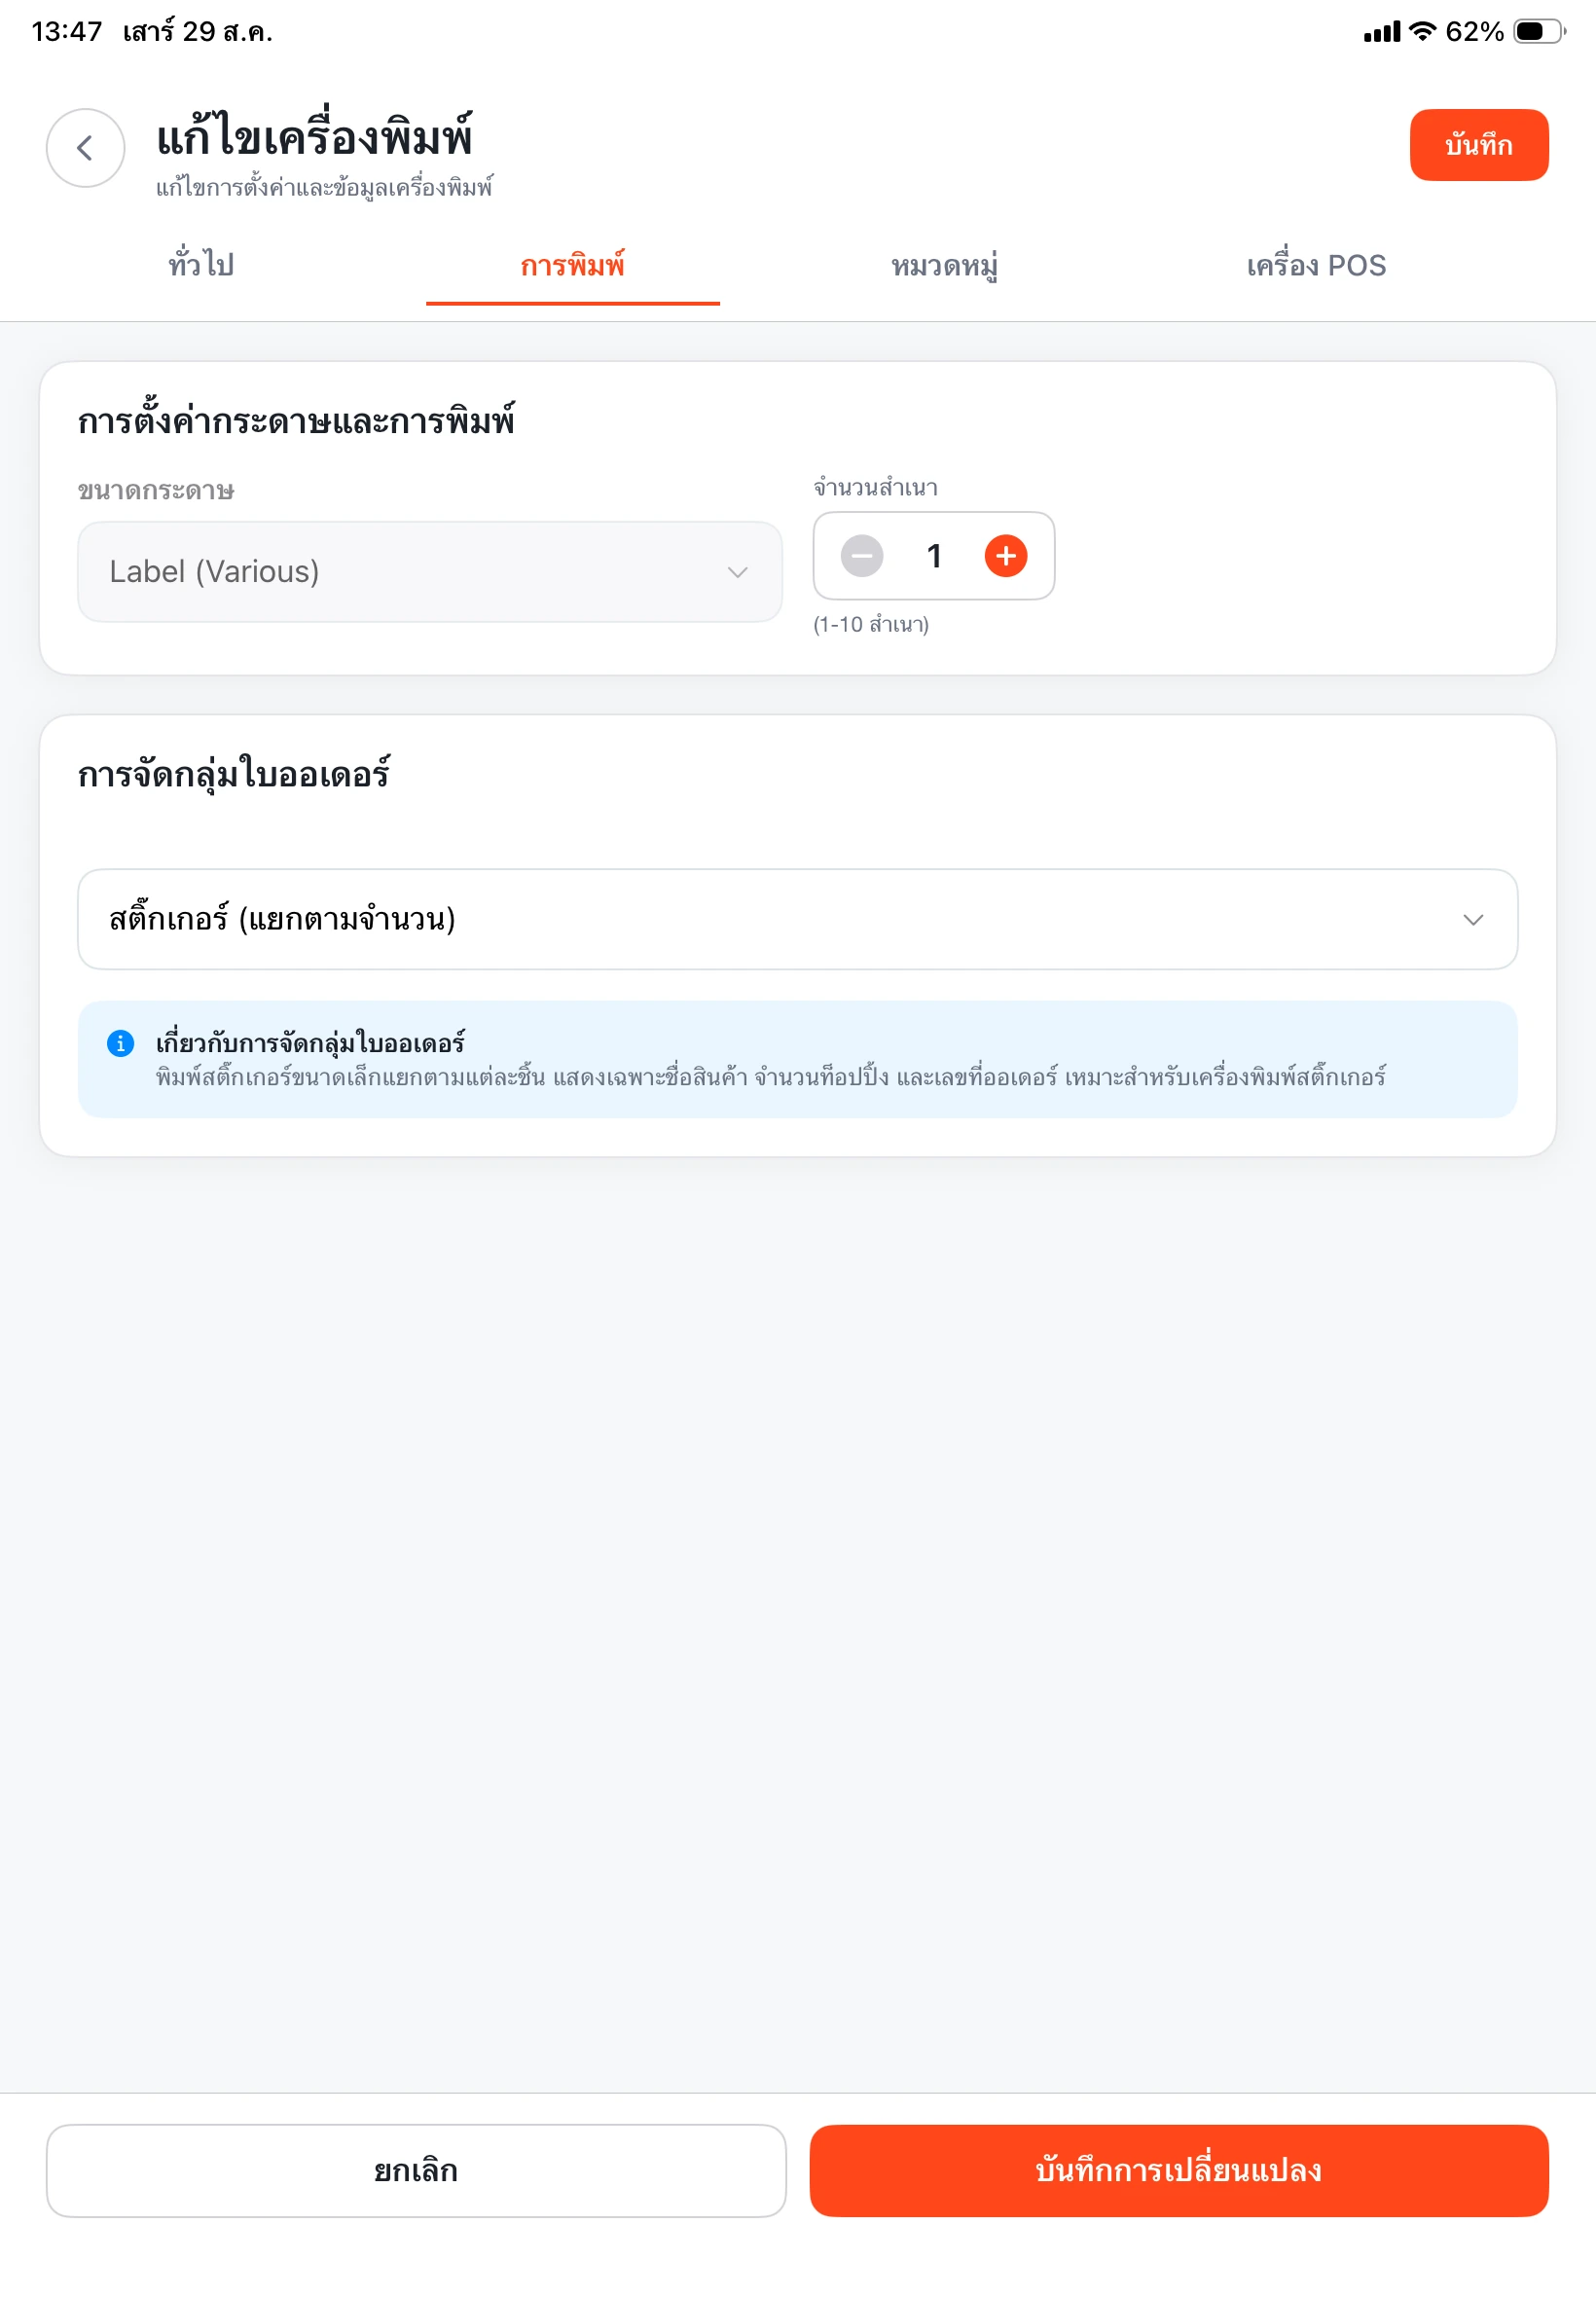
Open the Printing tab, choose Label (Various) as the paper size, set the copy count, and select Sticker (Per Unit) for order grouping.
Select beverage categories and save
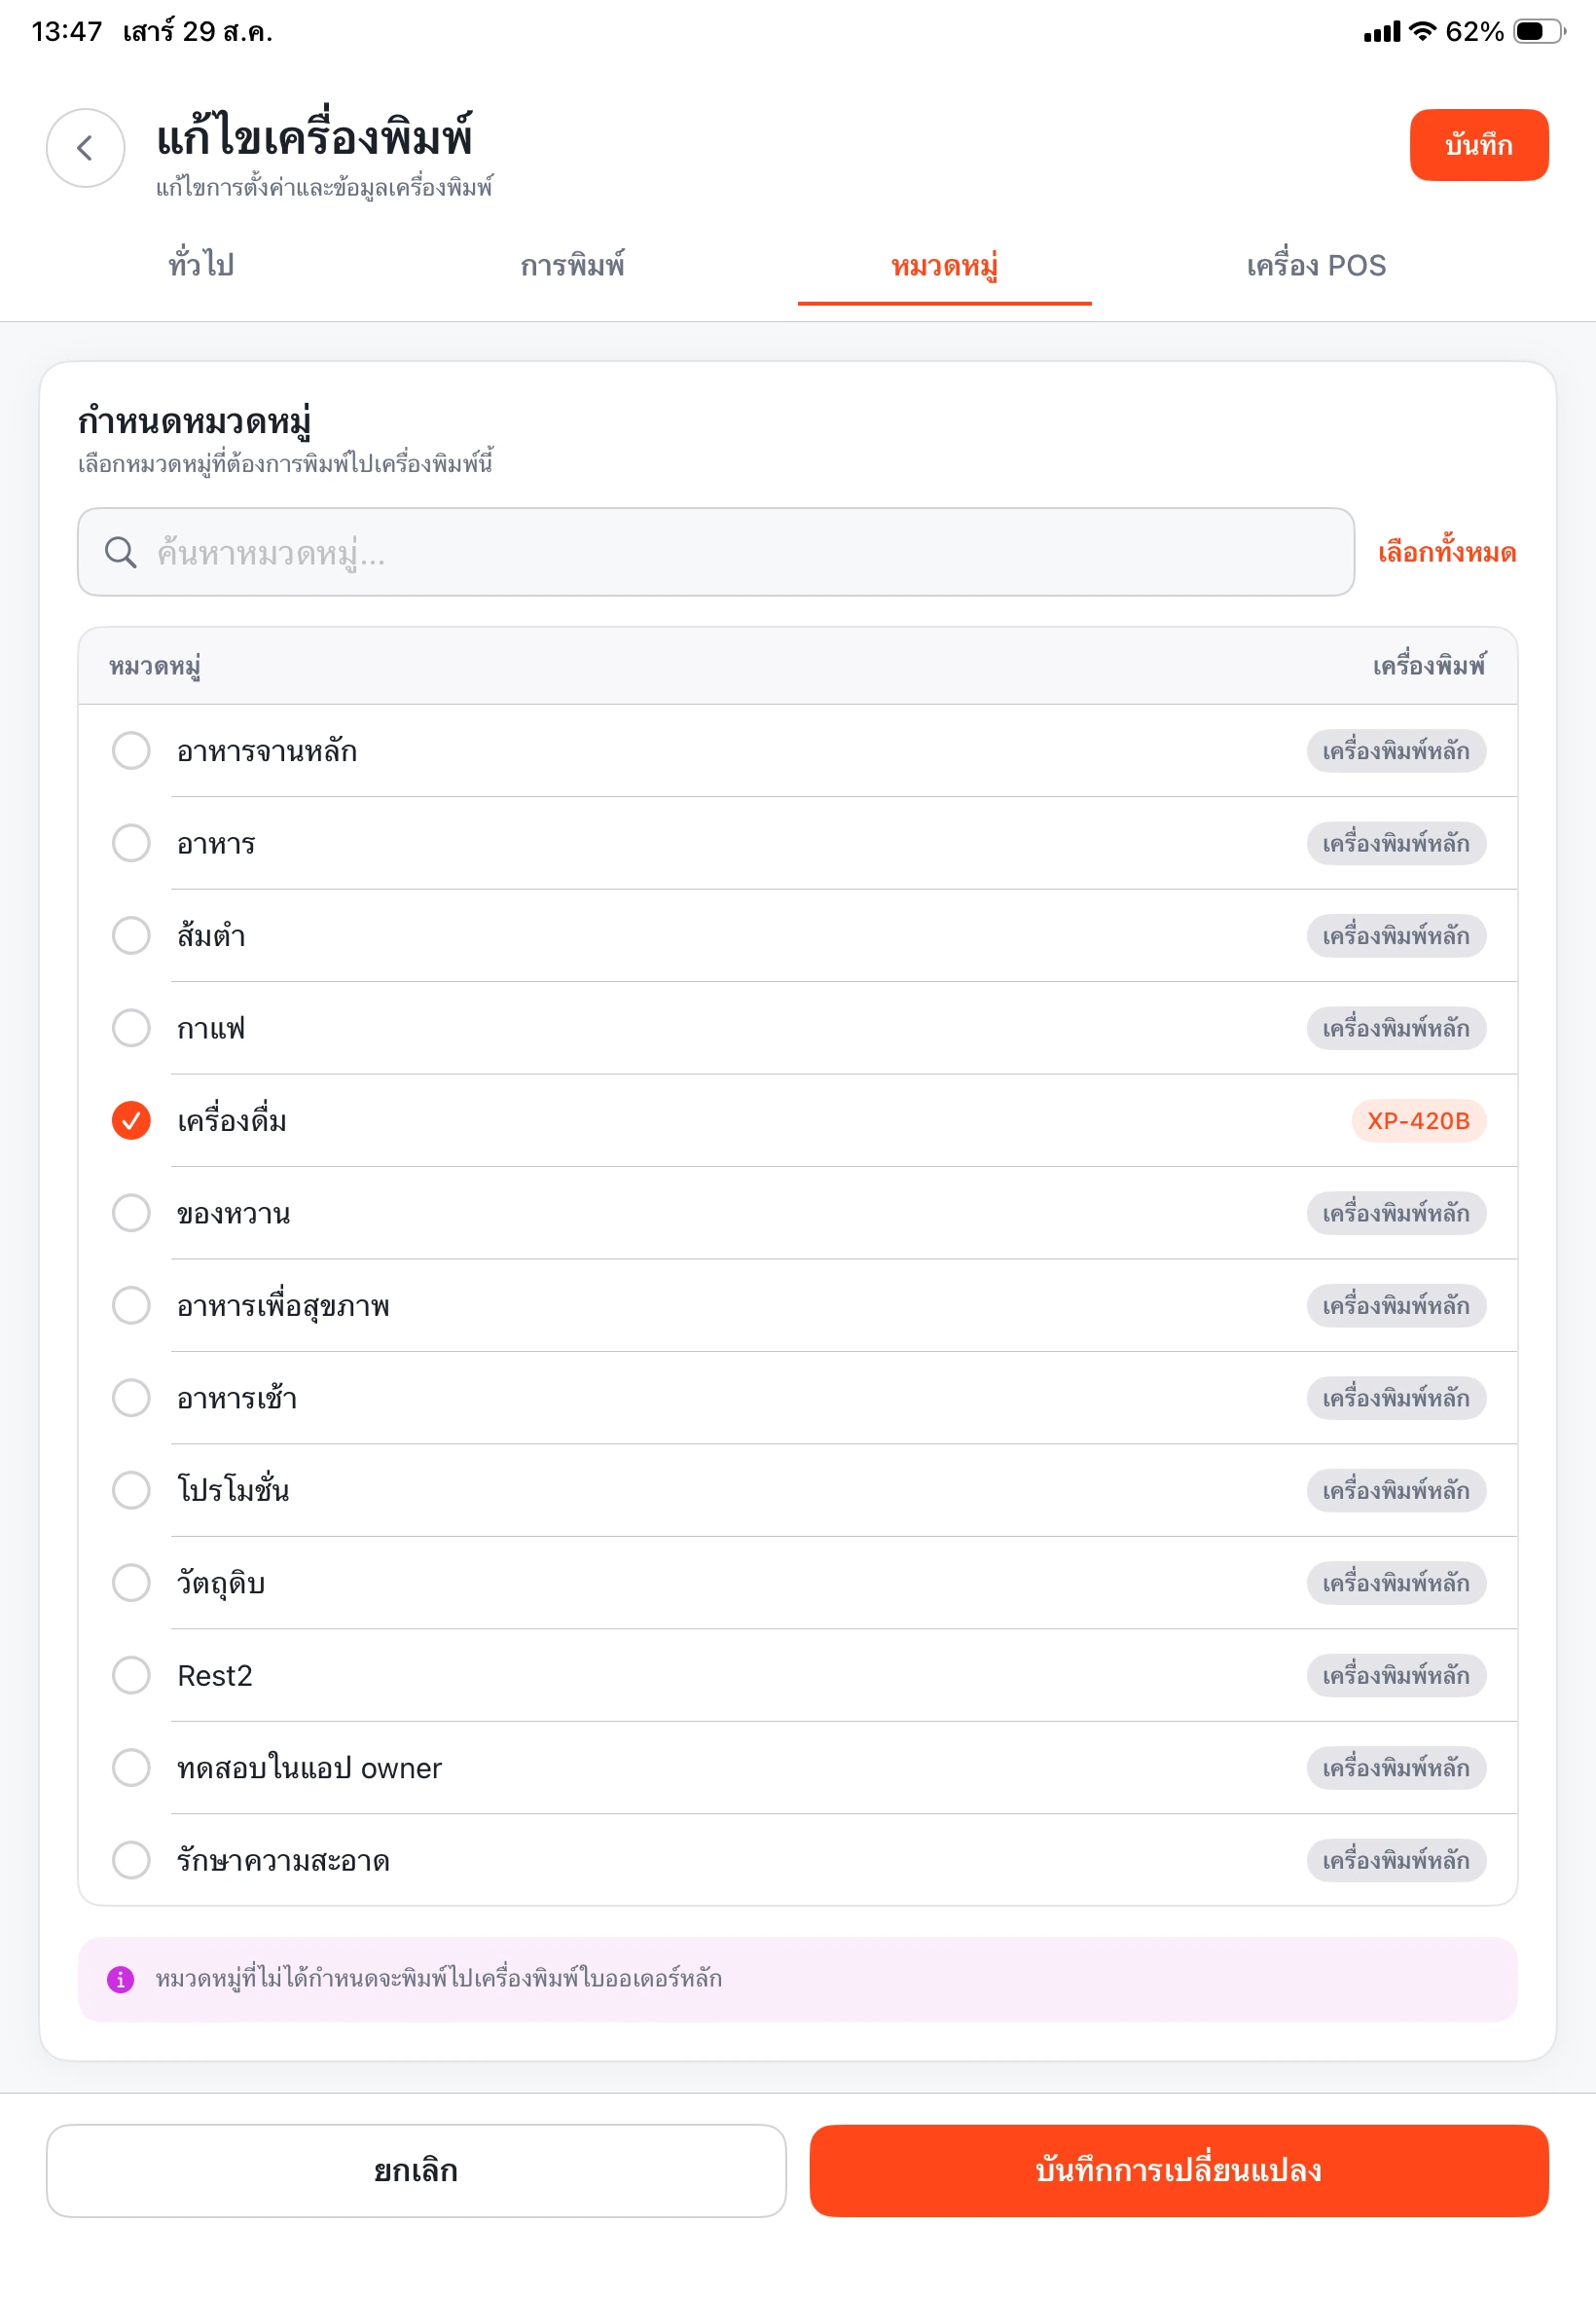
Select only the categories that need cup stickers, such as Coffee, Tea, or Beverages, then save. This prevents food and dessert items from printing unnecessary labels.
Part 3 — Test the output and label position
Create and pay for a 2–3 drink test order
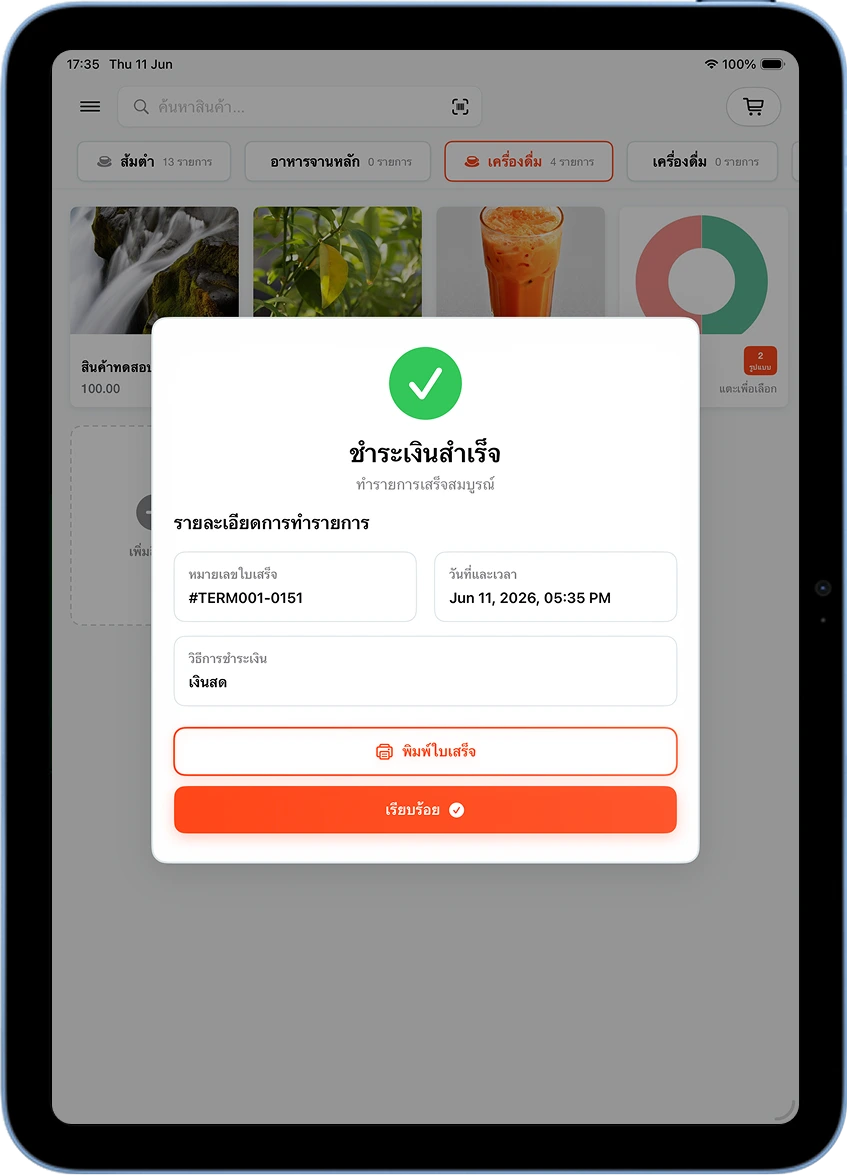
Create a test bill with several drinks and different options, such as 25% sweetness, no ice, or an extra topping, then complete payment to send the print job to the XP-420B.
Confirm one complete label per cup
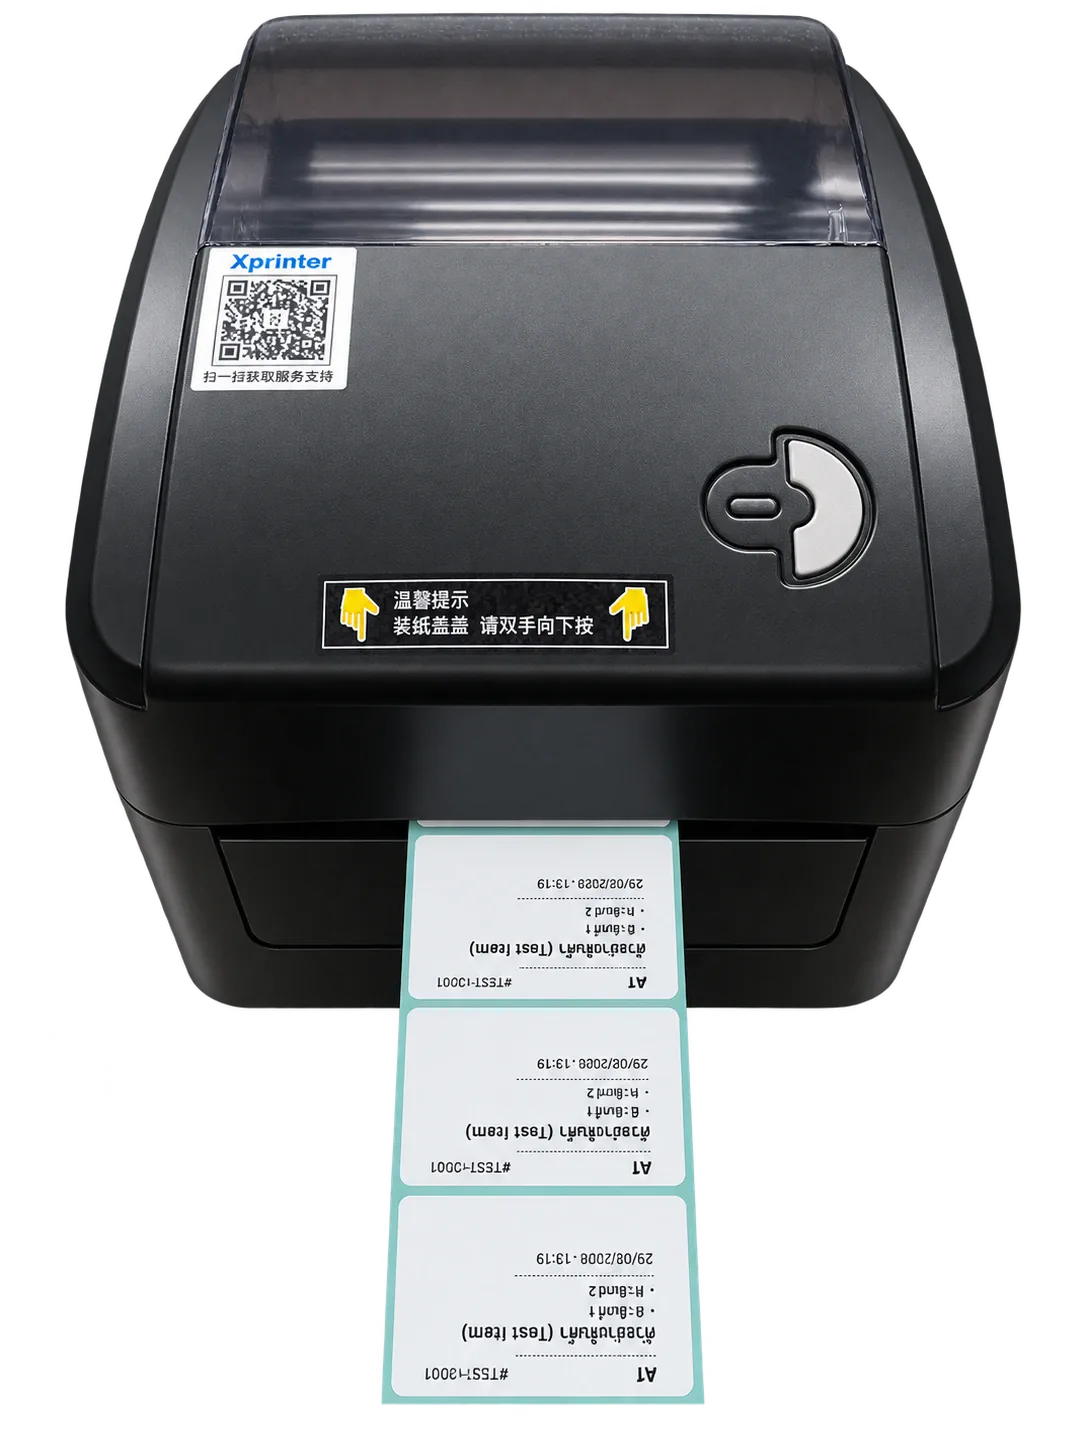
Check the number of labels, item names, options, order number, and [n/total] sequence. Text should be centered without clipping, and the printer should stop at the peel edge of the next label.
Compare the two cup-sticker methods
| Topic | Receipt printer | Xprinter XP-420B |
|---|---|---|
| Media | 58mm continuous thermal sticker paper | Individual direct-thermal cup sticker labels |
| Separating labels | Cut or tear after printing | Peel each pre-cut label from its liner |
| Key setting | Paper width and print length | Width × height and individual-label sensing |
| Best for | Shops that already own a receipt printer | Shops wanting neat, peel-ready individual labels |
Common issues and checks
Printer skips labels or stops midway
Check the printable side, sensor position, and media type, then rerun Label Calibration.
Text is clipped or off-center
Measure the label and align width, height, margins, and orientation in MeeD POS and the printer settings.
The iPad cannot find the printer
For network models, confirm the same router and a stable IP. For Bluetooth, check pairing and the app's Bluetooth permission.
Faint text or hard-to-scan barcode
Use the heat-sensitive side, increase density gradually, and clean the print head after it has cooled.
Before going live
Measure the actual label
Measure one cup sticker without its liner or the spacing between labels so the template stays centered.
Test long names and options
Use a test order with several toppings to confirm text remains readable.
Reserve the IP for LAN
A stable IP helps prevent the iPad from losing the printer after router changes.
Frequently Asked Questions
How does this differ from the existing cup-sticker-printer-setup guide?
The existing guide uses a receipt printer and continuous sticker paper. This guide uses an XP-420B and individual cup sticker labels, so label dimensions and label sensing also need to be configured.
Must I use 50 × 30 mm labels?
No. The XP-420B supports multiple sizes. Choose a size suitable for your cup and content, then make all printer and app settings match the actual label.
Should I choose the LAN, Wi-Fi, or Bluetooth XP-420B?
LAN suits a stable fixed print station, Wi-Fi reduces cable runs, and Bluetooth works well for nearby iPad pairing. Confirm the supported variant with the team before purchase.
Does a cup sticker need a barcode?
No. Although the XP-420B is a barcode printer, it can print item names, options, order numbers, and cup sequences from a MeeD POS template.
How do I print one label per cup?
Set the printer type to Sticker (Per Unit) and select the beverage categories. MeeD POS then prints according to the item quantity in the order.
Related guides and products
Need help checking your XP-420B variant?
Send us a photo of the printer ports, your label size, and iPad model so our team can check the setup.