Receipt Settings
Customize your receipts to match your store's brand — store name, logo, receipt title, footer text, and even a promotional image or QR code printed at the bottom of the bill.
MeeD POS Team · Tested on a real iPad ·
Step 1 — Set Business and Branch Info
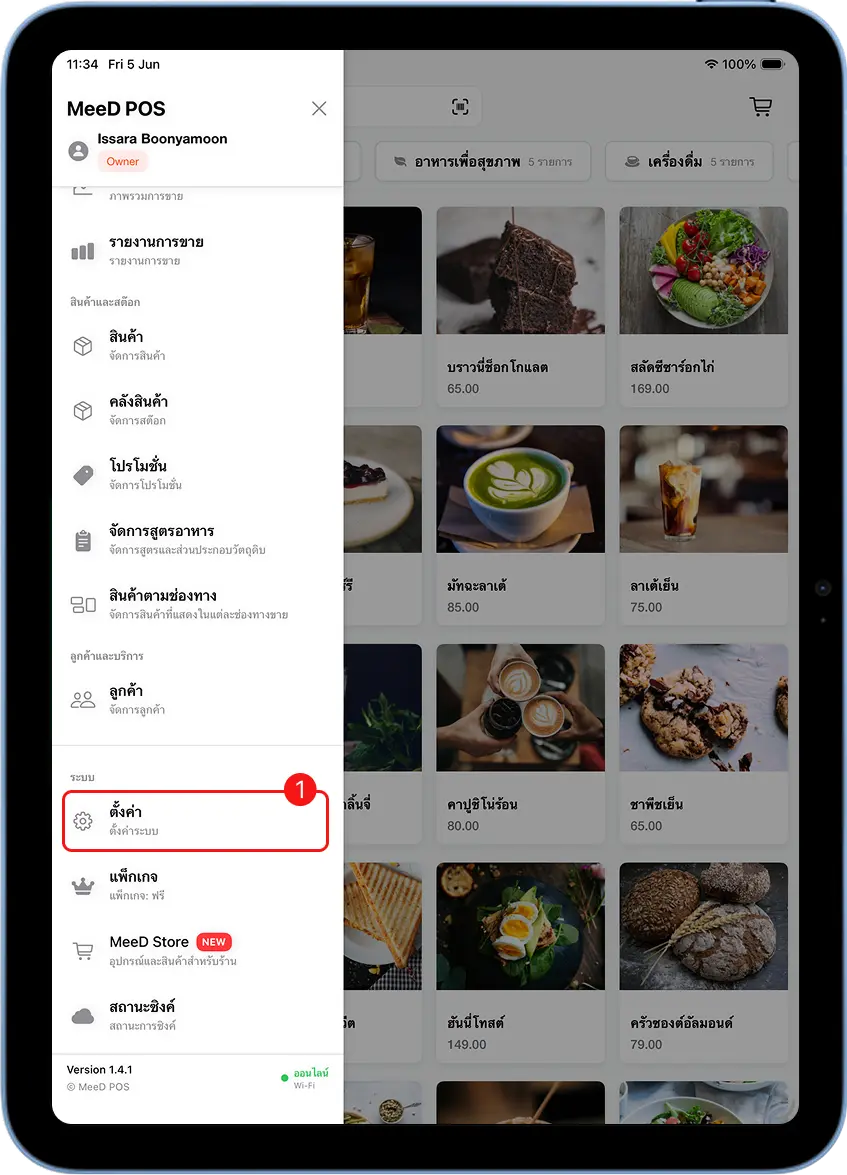
Open the left menu → tap "Settings" → select "General"
Tap the ☰ icon in the top-left corner, scroll to the "System" section, tap "Settings", then tap "General" in the left sidebar.
Fill in business and branch details
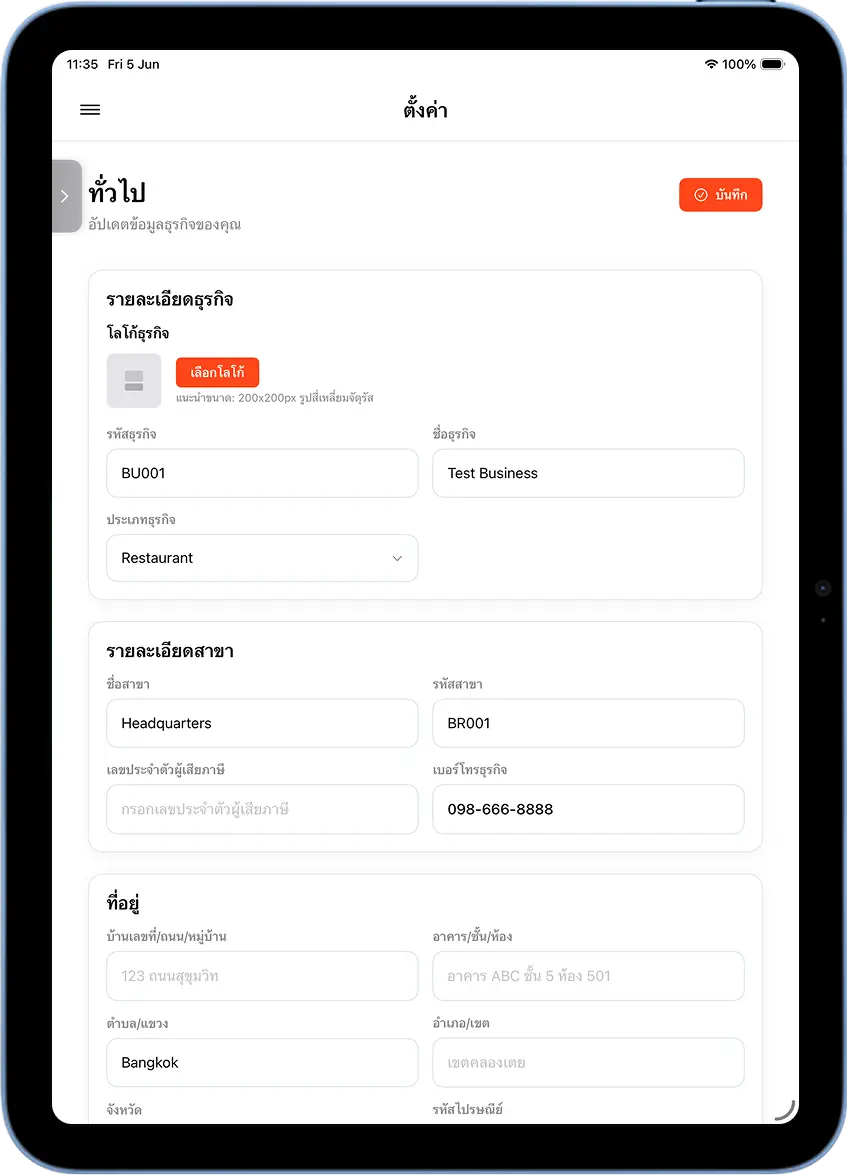
Tap "General" in the left sidebar. Everything entered here appears on the header of every receipt. Fill it in, then tap "Save" in the top-right corner.
| Field | Description |
|---|---|
| Business Logo | Your store logo — 200×200px PNG recommended, white or transparent background |
| Business Code | Internal reference code, e.g. BU001 (not shown on receipts) |
| Business Name | Store name printed on the first line of every receipt |
| Business Type | Restaurant / Retail / etc. — used to tailor the system UI |
| Branch Name / Branch Code | Shown below the business name, e.g. "Headquarters / BR001" |
| Tax ID | For issuing Tax Invoices — can be left blank if not applicable |
| Business Phone | Shown in the receipt header, e.g. "Tel: 098-666-8888" |
| Address | Shown below the branch name — street, sub-district, district, province |
Step 2 — Configure Receipt Title and Logos
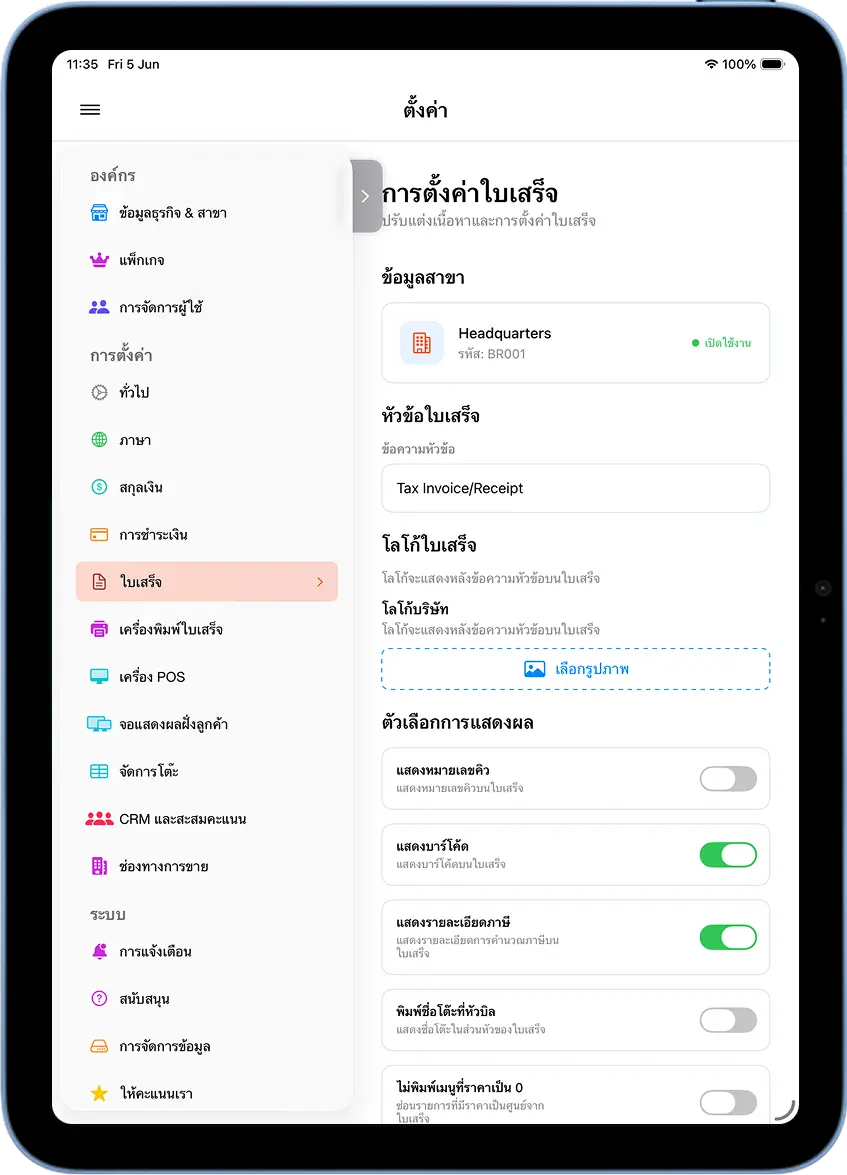
In the left sidebar, tap "Receipt" under "Settings"
In the left menu, scroll to the "Settings" section and tap "Receipt" (the document icon). The receipt settings page opens with a live receipt preview on the far right.
Fill in the "Receipt Title"
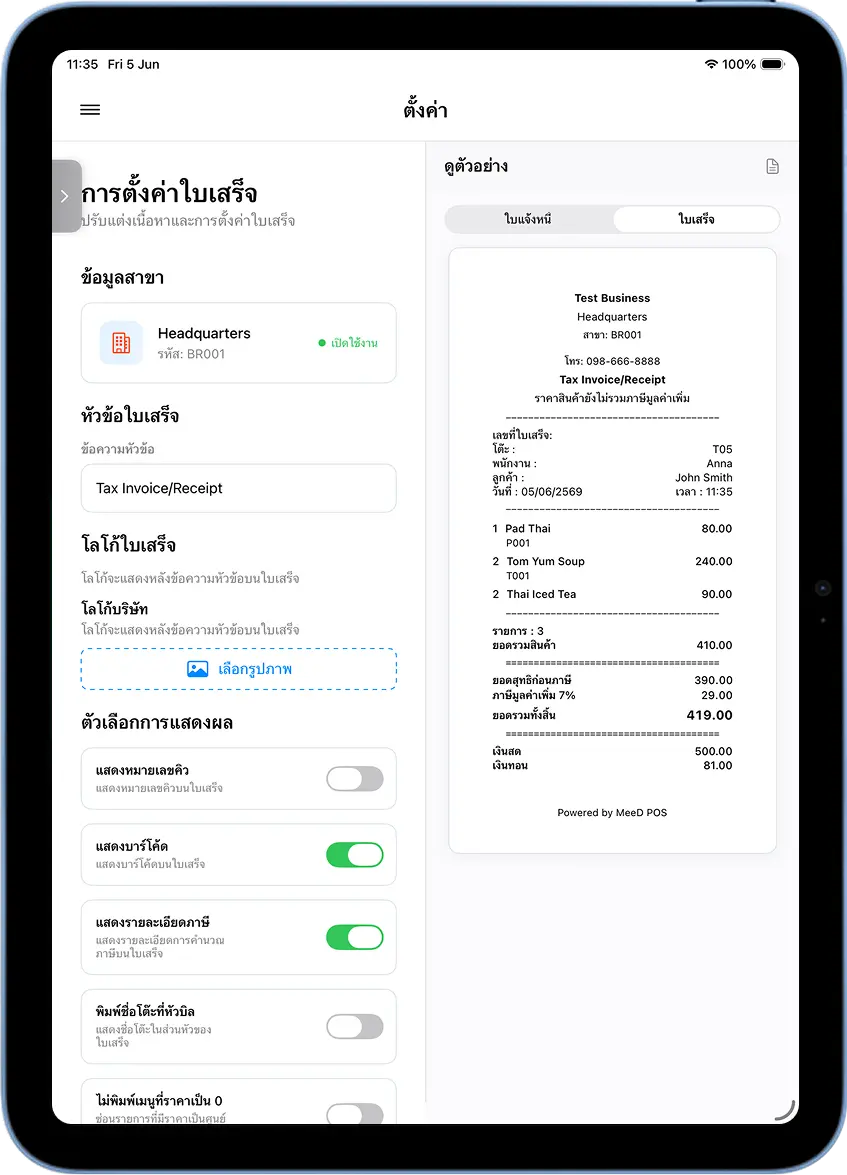
The "Receipt Title" field is the text shown at the top-center of the receipt. The default is "Tax Invoice/Receipt" — you can change it to "Receipt" or any other text you prefer.
Upload a "Receipt Logo" and "Company Logo"
There are two logo fields: "Receipt Logo" — replaces the title text, shown at the top in place of the text once uploaded, and "Company Logo" — shown additionally in the receipt header alongside your business info.
Tap "Choose Image" to open the photo library on the iPad and select the image you want.
Step 3 — Display Options
Toggle receipt display options on or off
Scroll down to the "Display Options" section — each toggle controls something printed on the receipt. Check the preview on the right to confirm the result before saving.
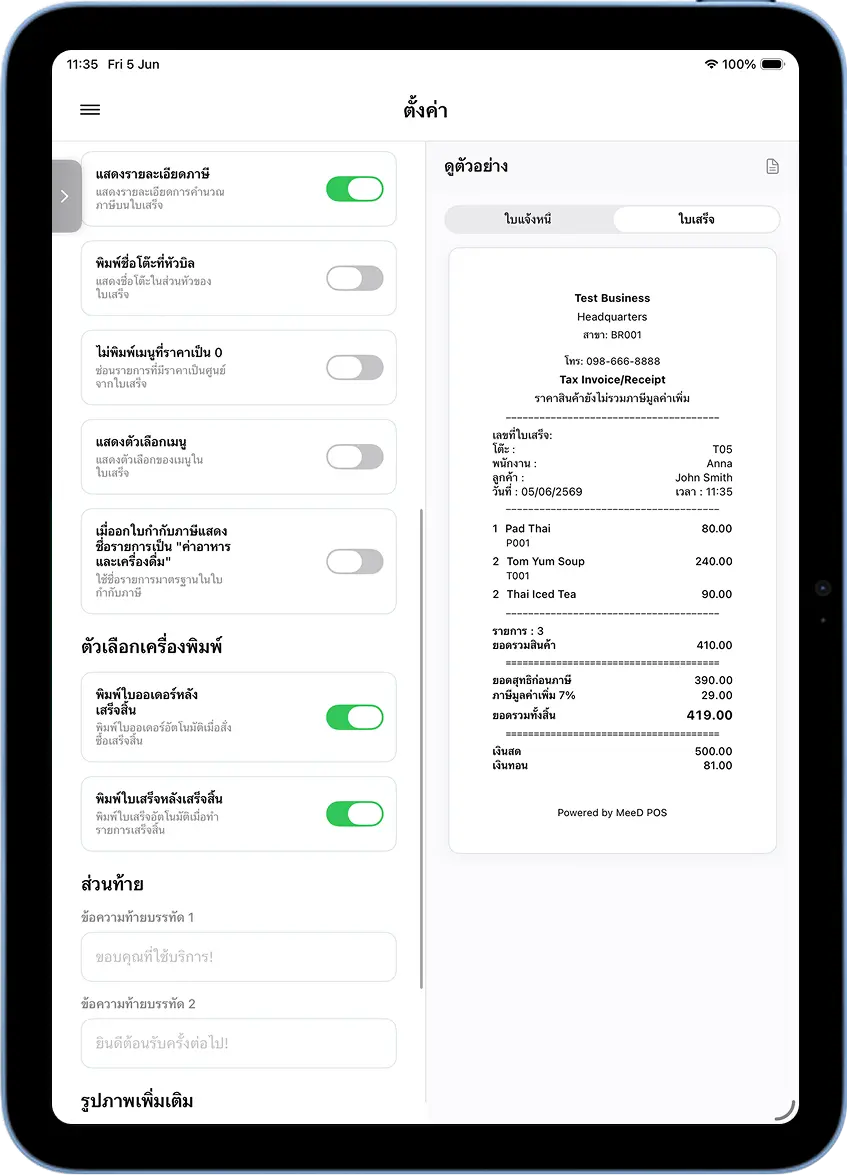
| Option | Effect When Enabled |
|---|---|
| Show Table Number | Prints the table number on the receipt — useful for stores with table service |
| Show Barcode | Prints a barcode at the bottom of the receipt for bill lookup |
| Show Tax Breakdown | Shows the pre-tax and tax amounts on separate lines — useful for VAT-registered stores |
| Hide Zero-Priced Items | Hides free or ฿0 items from the receipt |
| Show Item Modifiers | Shows product modifiers/options, e.g. "Less sweet, no ice" |
| Show "Food & Beverage" as the line item on tax invoices | Displays the line item as "Food & Beverage" on the receipt |
Step 4 — Printer Options
Toggle auto-printing on or off
The "Printer Options" section controls what the system automatically prints when a bill closes.
"Print Order Slip After Checkout" — sends the order to the kitchen/bar printer immediately once the order is confirmed. Useful for stores with a separate prep station.
"Print Receipt After Checkout" — automatically prints the customer receipt the moment a bill closes, no need to tap "Print Receipt" separately.
Step 5 — Footer Text and Additional Images
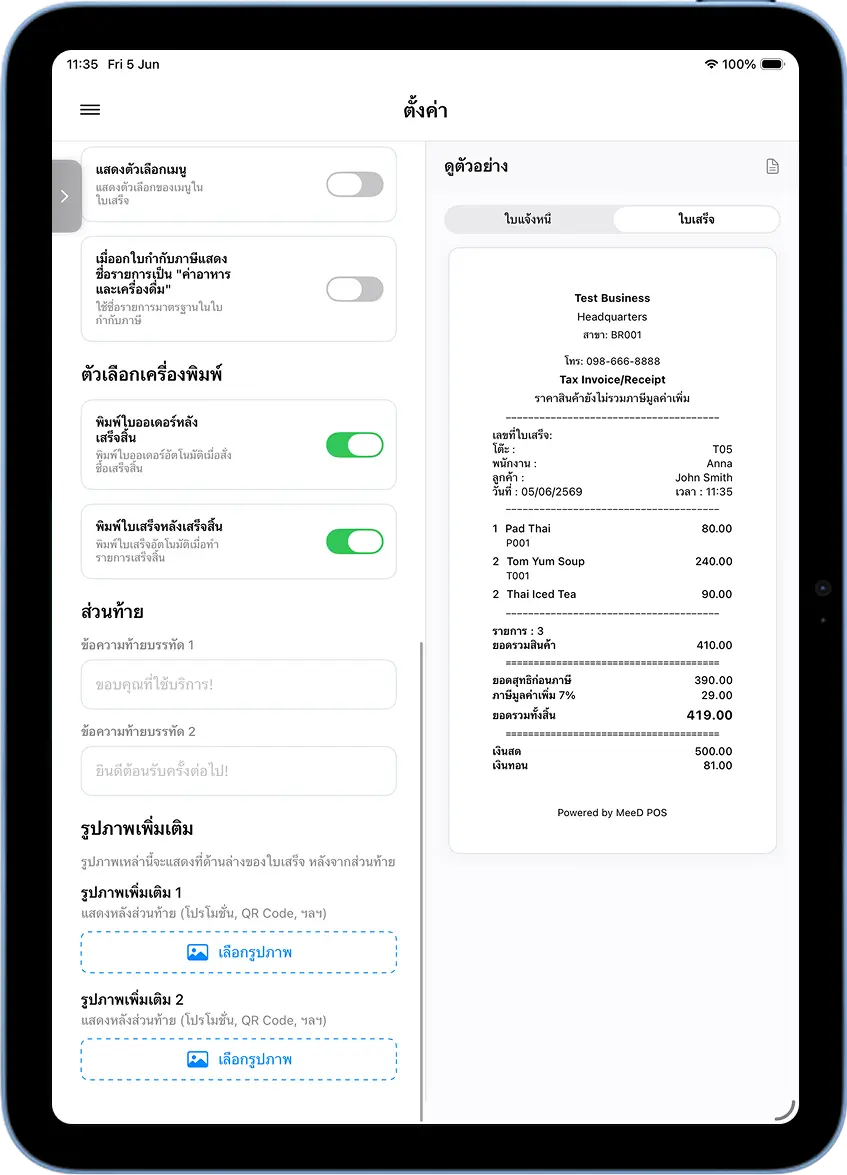
Fill in "Footer Text"
There are 2 fields for text printed at the bottom of the receipt after the total. Common uses include a thank-you message ("Thanks for visiting, come back soon! 😊"), a promotion ("Spend ฿500, get ฿50 off next time"), social media ("Follow us on LINE: @yourshop"), or return policy terms.
Upload "Additional Images" for the receipt footer
There are 2 fields for images printed at the bottom of the receipt — common uses include a LINE Official Account QR code so customers can add you as a friend, a promotional banner or monthly special, or a QR code linking to a Google Maps or Facebook review.
Tap "Choose Image" for each field, then tap "Save" every time you make a change.
Things to Watch Out For
Tap "Save" every time you make a change
Switching to another menu or leaving the settings page without saving discards all your changes.
Changes only affect receipts printed afterward
Any bill closed before you saved keeps its original data — nothing is updated retroactively.
Logos should use a white or transparent background
Thermal paper only prints in black and white — a logo with a colored background prints as a solid black block, which looks poor.
Tips for Managers
Always check the preview before saving
The live preview on the right updates instantly — a few seconds of checking confirms the receipt looks right before you save.
Add a LINE OA QR code to the footer
The easiest way to grow your fan base — just upload a QR image in the 'Additional Image' field and customers can scan it right off the receipt.
Do a real test print after configuring
After saving new settings, create a test bill and print one receipt to confirm the logo, text, and layout all look the way you expect.
Frequently Asked Questions
Can I change the store name shown on receipts?
Yes — go to 'Settings → General' and edit the 'Business Name' and 'Branch Name' fields, then tap 'Save'. Every receipt printed afterward shows the new name immediately.
What size should the receipt logo be?
We recommend 200×200 pixels, PNG format, white or transparent background, under 1MB — this prints most sharply on thermal paper.
How much text can I put in the footer?
There are 2 fields, each fitting roughly 1-2 lines. Keep it concise — e.g. 'Thanks for visiting' or 'Follow us on LINE: @yourshop'. Check the preview on the right for an example.
Does the preview on the right match the actual printed receipt?
Very closely. The preview shows the layout and text that will appear, though font size and spacing on actual thermal paper can vary slightly by printer model. We recommend always doing a real test print after configuring.
Related Articles
Need More Help?
Have questions about receipt settings, or want our team to walk you through it? Get in touch anytime.