How to Set Up Separate Kitchen and Bar Printers
For restaurants and cafés with more than one printer — for example a kitchen printer for main dishes and a bar printer for drinks — MeeD POS can automatically route each product category's order ticket to the correct printer, so staff never need to print and hand-sort tickets themselves.
What You'll Need
- An iPad with the MeeD POS app installed
- 2 or more printers — All connected and test-printed successfully
- Product categories already set up — e.g. Main Dishes, Drinks, Desserts
Setup Steps
Step 1 — Open the Receipt Printer Menu
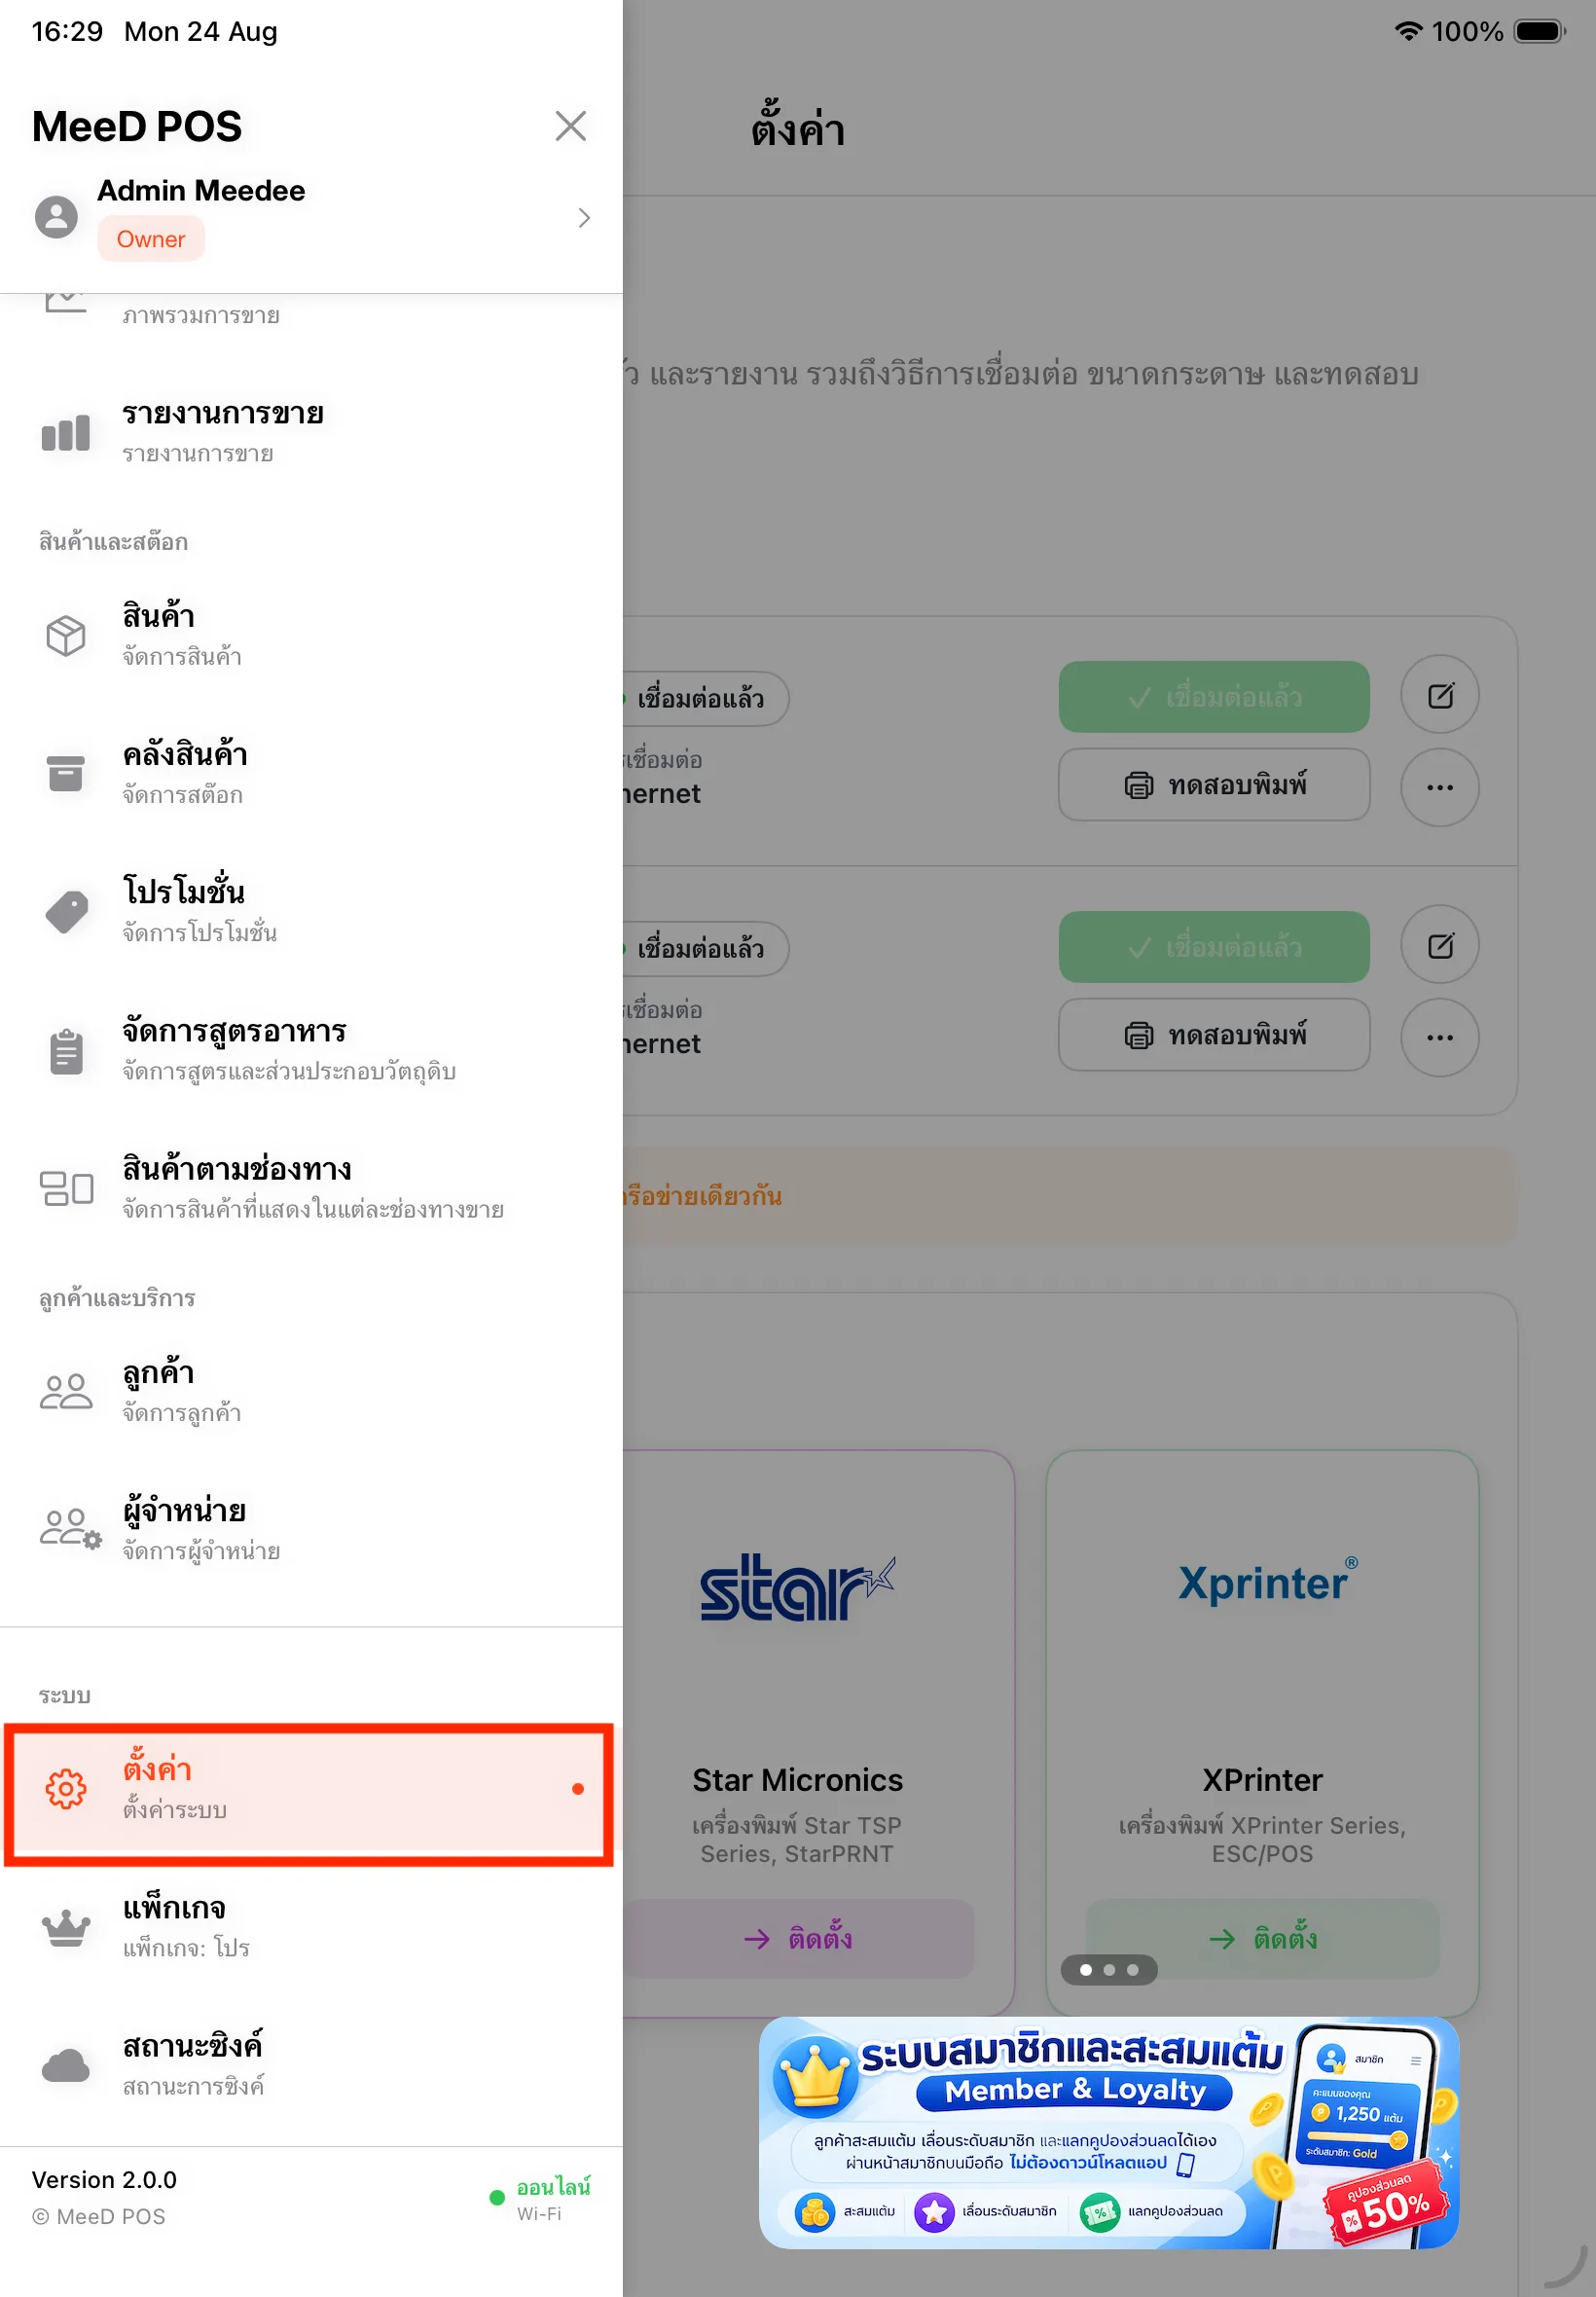
Open ☰ → Settings → Receipt Printer
Tap the ☰ icon in the top-left corner of MeeD POS, scroll down to "Settings", then tap "Receipt Printer".
Step 2 — Confirm All Printers Are Connected
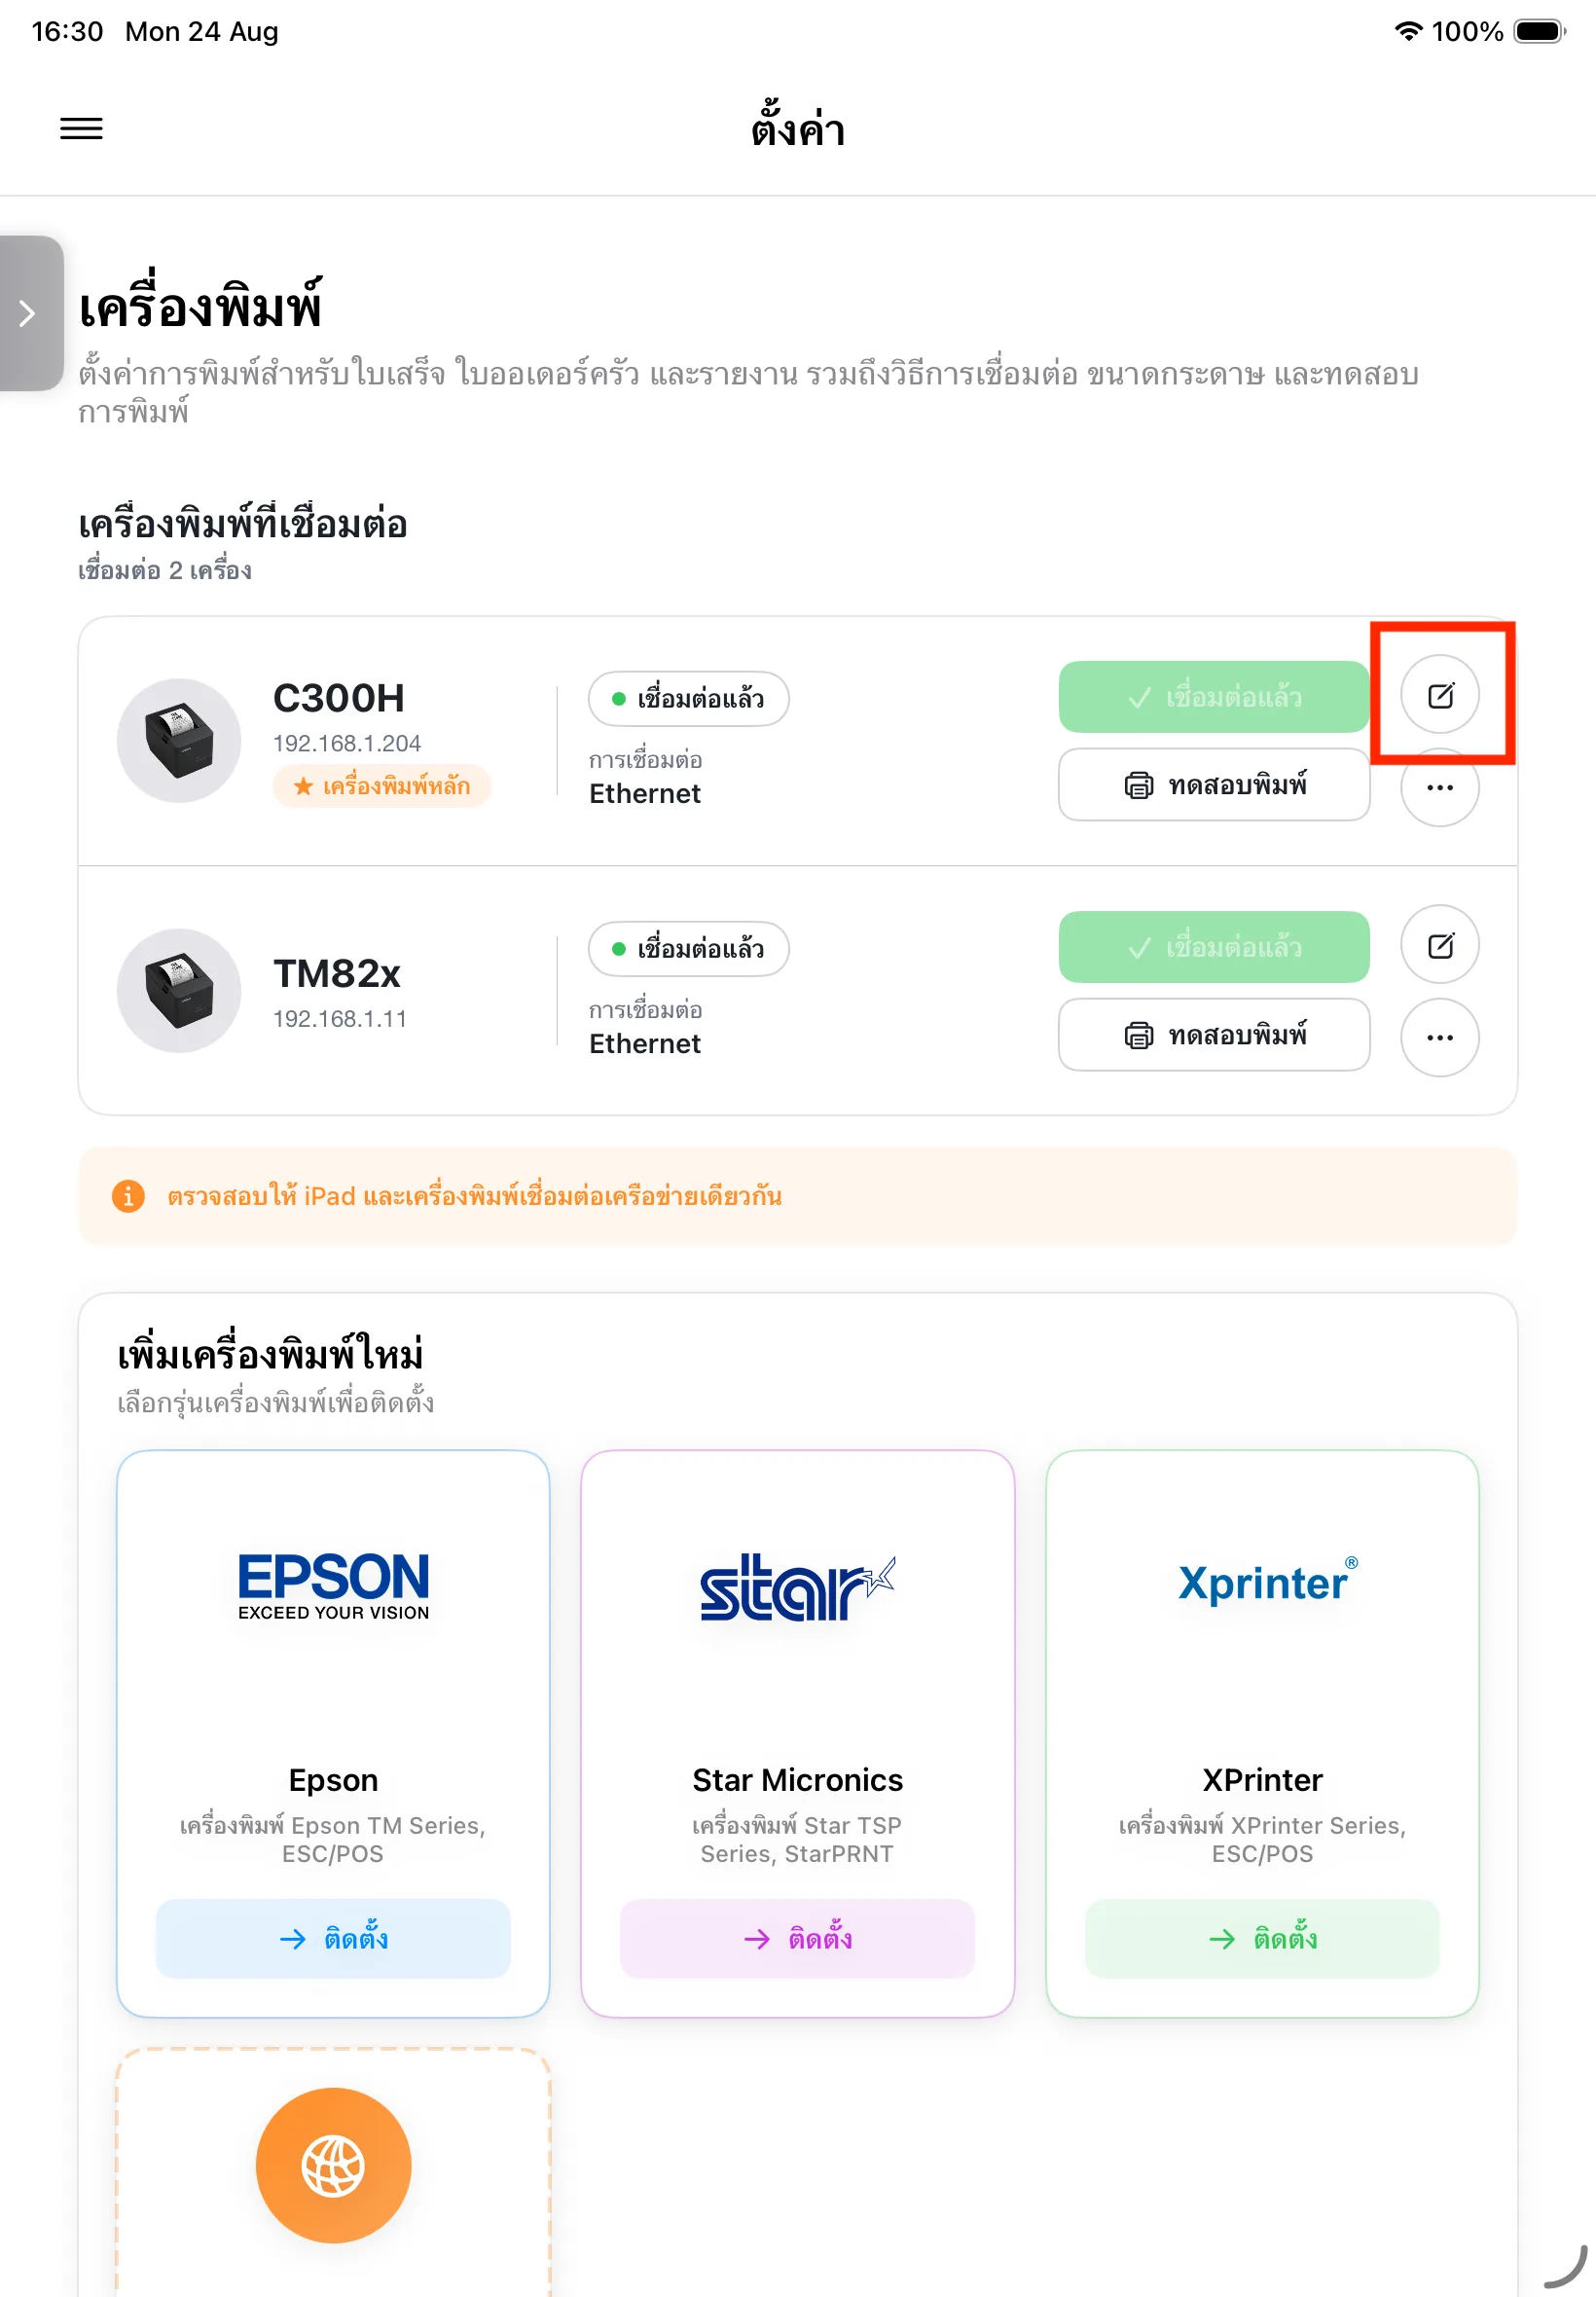
Check that every printer shows 'Connected'
The "Printers" page lists all connected printers, e.g. C300H (Primary Printer) and TM82x. Confirm each one shows a green "Connected" status. If any printer isn't connected yet, add it under "Add New Printer" before moving to the next step.
Step 3 — Assign Product Categories to Each Printer
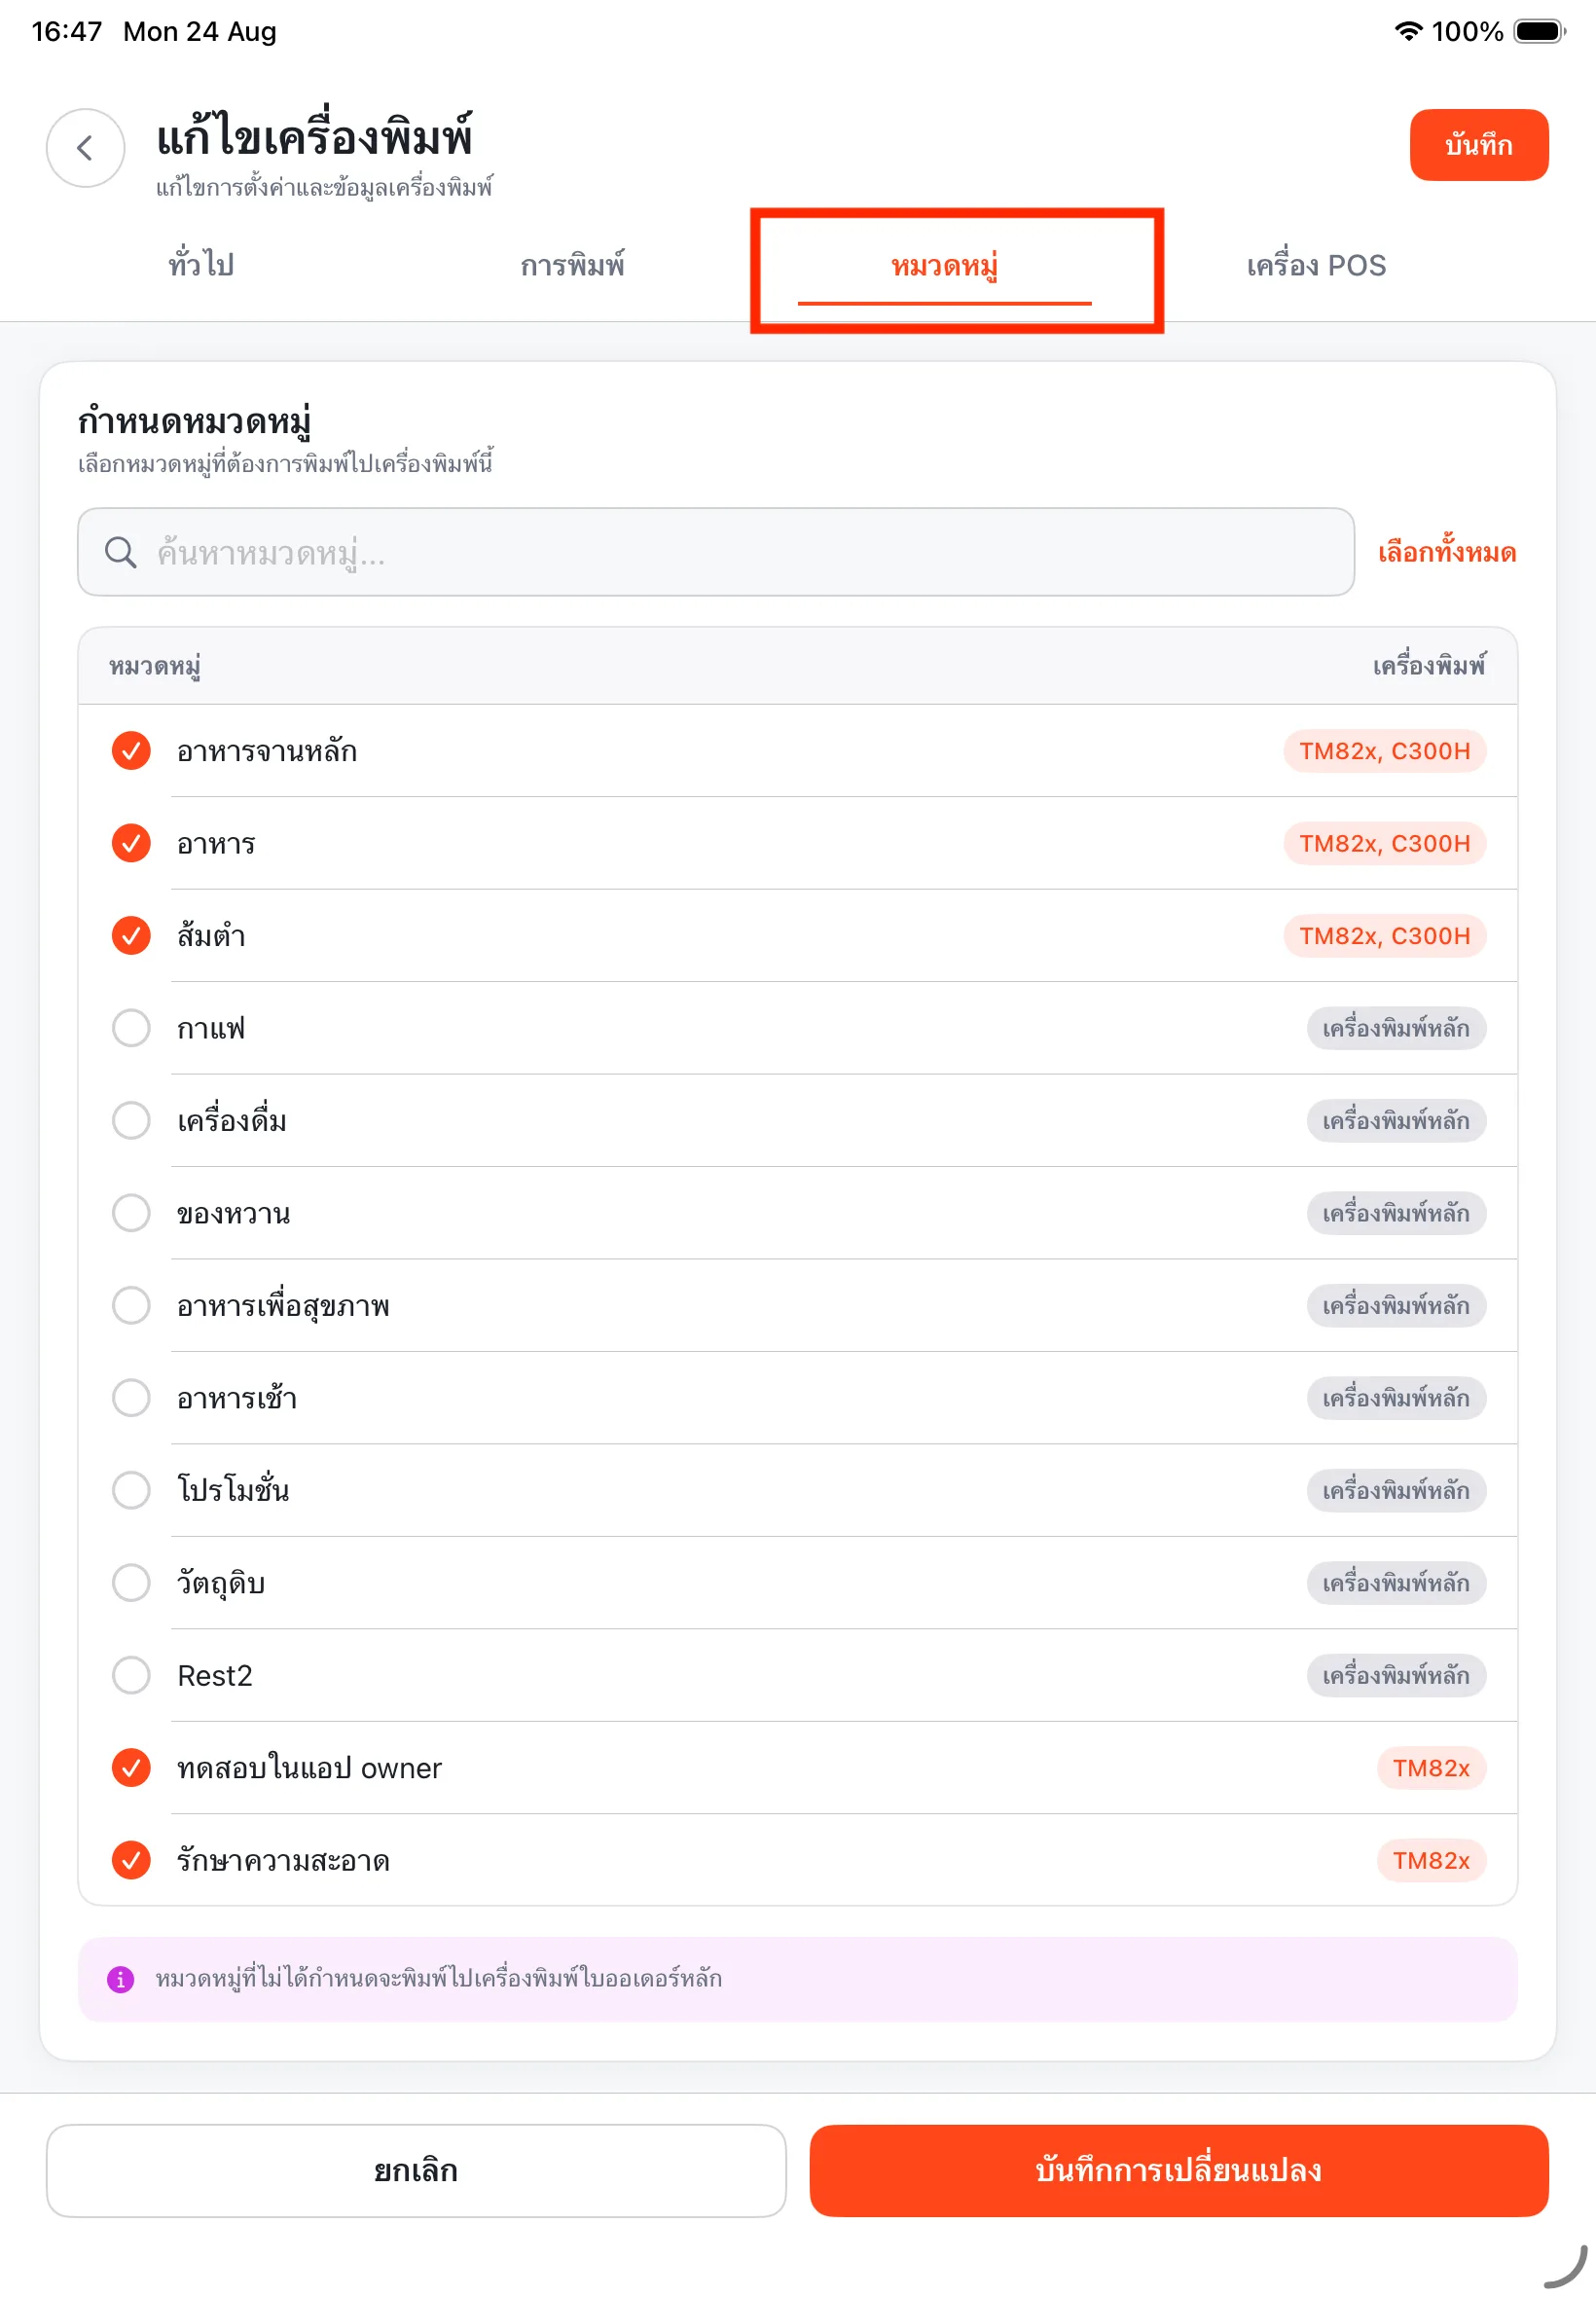
Tap the edit icon (✎) on a printer → the 'Categories' tab
Tap the pencil icon (✎) next to the printer you want to configure to open "Edit Printer", then tap the "Categories" tab at the top.
Check the categories that should print to this printer → tap 'Save Changes'
In the "Categories" tab, check the box next to each product category whose order tickets should print to this printer. For example, for a bar printer (TM82x) check categories like "Owner App Test" and "Cleaning"; for a kitchen printer (C300H) check "Main Dishes", "Food", "Som Tum", and so on.
Repeat this for every printer until all the categories you want to split are assigned, then tap the orange "Save Changes" button in the bottom right.
Step 4 — Test With a Real Order
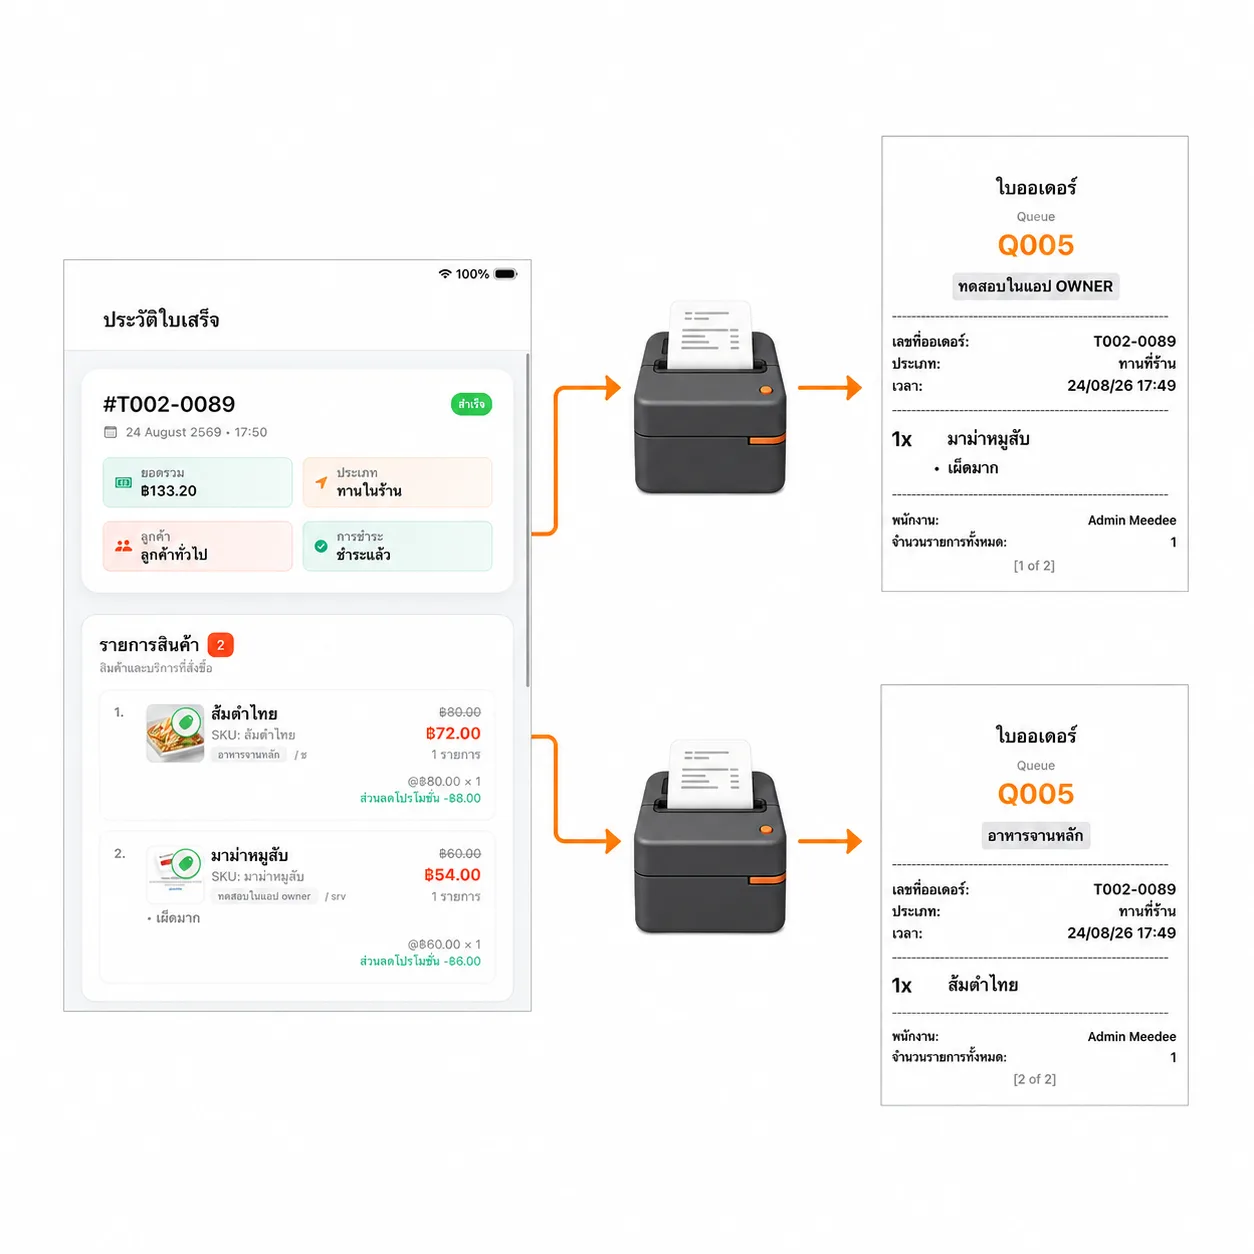
Place an order with items from multiple categories → confirm each ticket prints to the right printer
Go back to the main sales screen and create an order with items from different categories — for example Thai Som Tum (Food category) and Instant Noodles with Minced Pork (Owner App Test category). When you send the order, the system automatically prints separate tickets to whichever printer you assigned in step 4 — the kitchen printer only receives food items, while the bar printer only receives the items assigned to it.
Things to Watch Out For
Unassigned categories print to the main printer
If you forget to check a category, its tickets will print to the main order-ticket printer instead. Double-check every category before going live.
An item can belong to more than one category
If an item is filed under multiple categories that are each assigned to a different printer, its ticket may print more than once. Keep category assignments clear to avoid duplicate tickets.
Always tap 'Save Changes'
Checking categories has no effect until you tap "Save Changes". If you leave the page without saving, the assignment won't be applied.
Tips for Managers
Match printers to real kitchen stations
Assign one printer per station — hot kitchen, cold kitchen, bar — so each station only sees the tickets relevant to them, cutting confusion and prep time.
Name categories after the station
Use category names that immediately identify the station, e.g. "Hot Kitchen", "Bar", "Desserts" — this makes setup and future audits much easier.
Re-test after adding new categories
Whenever you add a new menu item or category, remember to assign it to a printer and place a test order again to confirm it prints where expected.
Frequently Asked Questions
How many printers can I split categories across?
There's no limit — you can assign categories to as many printers as you have connected to MeeD POS. Each printer can be assigned multiple categories at once.
Where do items with no assigned category print?
They automatically print to the main order-ticket printer (the one set as default).
Can I change the assigned categories later?
Yes — go back to Edit Printer, the Categories tab, check or uncheck the categories you want, then tap Save Changes anytime.
Why does an order print twice, on two different printers?
This usually happens because that item is filed under multiple categories, each assigned to a different printer. Check the item's categories and narrow it down to one.
Related Articles
Need More Help?
Set up multiple printers but tickets still print to the wrong one? Get in touch and we'll help.