How to Use Table Mode in MeeD POS — Floor Plans, Zones, Kitchen and Bar Printing
This guide walks you through setting up and using Table Mode in MeeD POS from scratch — creating a floor plan, setting up zones (Indoor, Outdoor, VIP), taking table orders, and printing kitchen/bar tickets along with customer receipts. It's built for restaurants, cafés, and any store with a drink bar, of any size.
What You'll Be Able to Do After This Guide
- Set the ordering mode — eat-then-pay or pay-then-eat
- Create zones and lay out tables — for your restaurant
- Add tables — set their shape, size, and seat count
- Open a table and take orders — including via QR ordering
- Review orders and take payment — right from the floor plan
Part 1 — Configure Table Mode
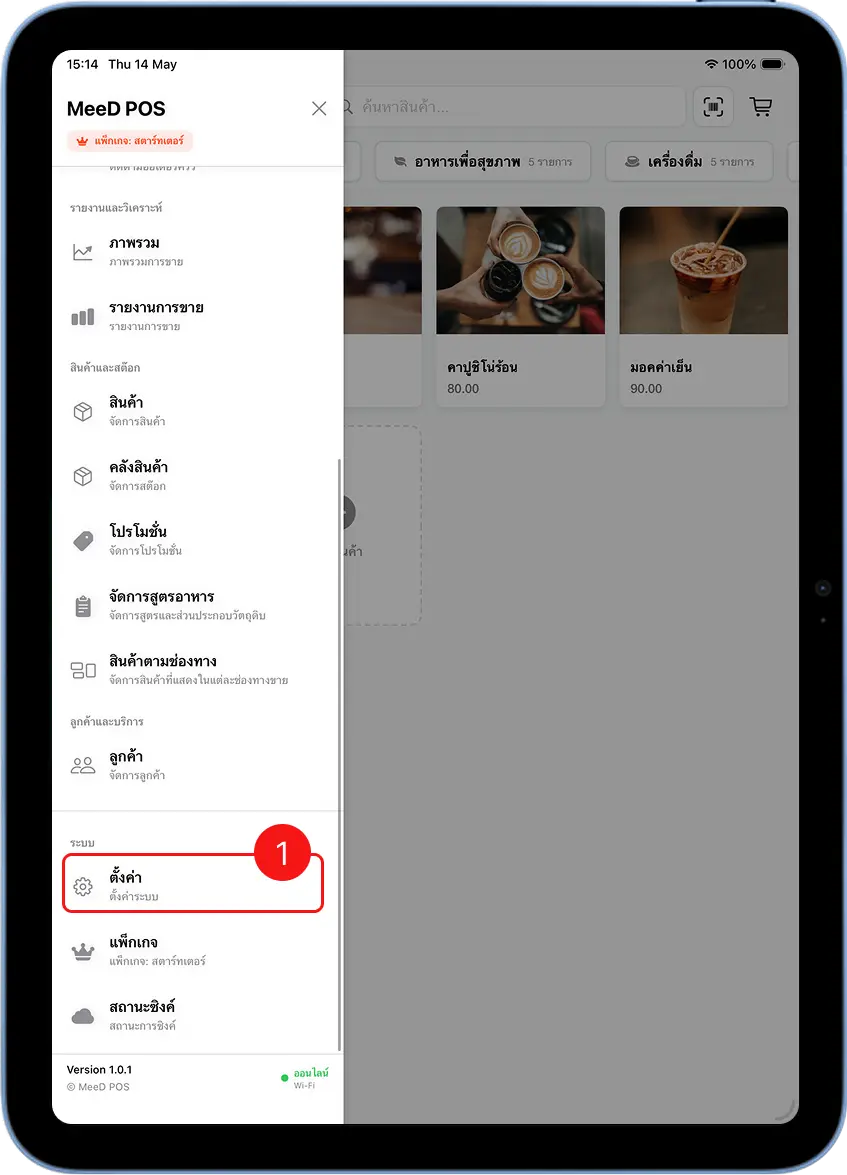
Tap the ☰ menu in the top-left, then go to Settings under System
Open the MeeD POS app on your iPad, tap the ☰ menu in the top-left corner to open the sidebar, scroll down to the "System" section, then tap "Settings".
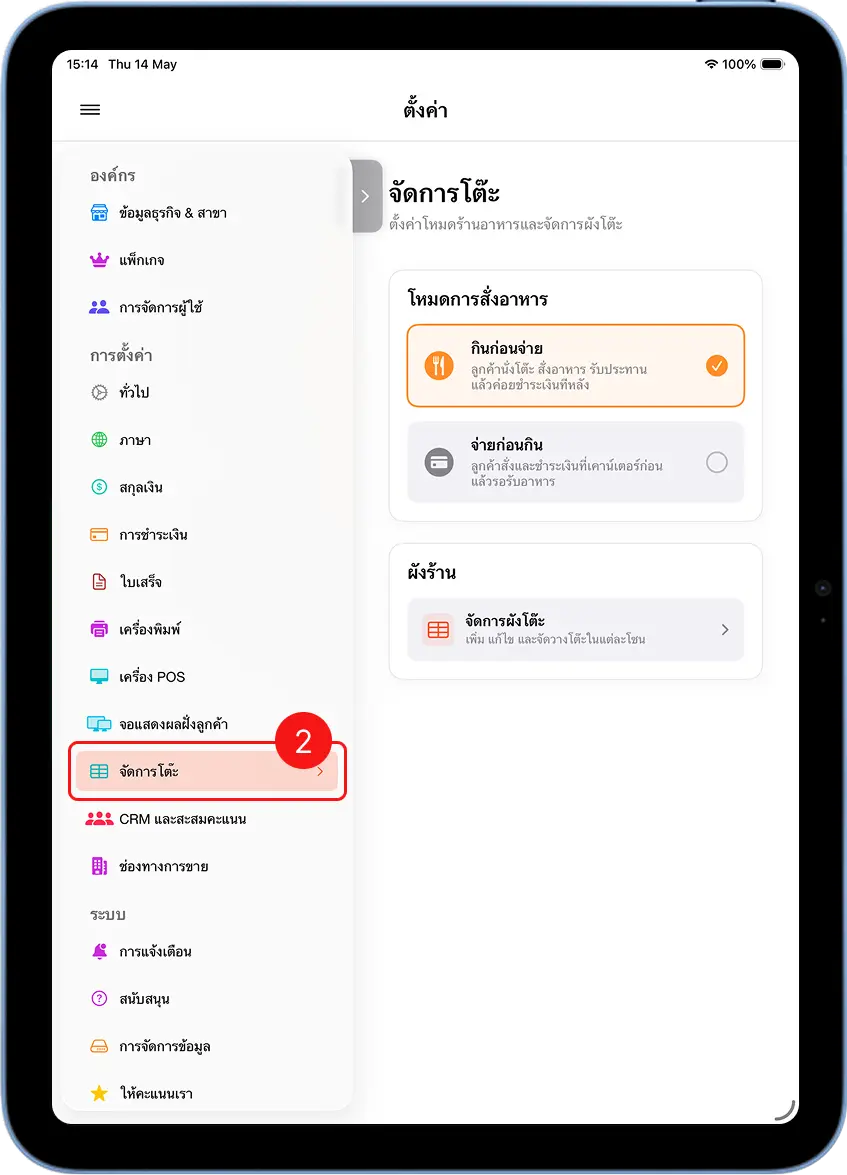
Select Table Management in Settings to set the ordering mode
To adjust the ordering mode and floor plan behavior, go to Settings → Table Management. The system shows options: Ordering Mode — e.g. Eat Then Pay (customers order first and settle up when leaving) or Pay Then Eat, and Floor Plan → Manage Floor Plan — opens the zone and table layout page.
Part 2 — Create Zones and Lay Out Tables
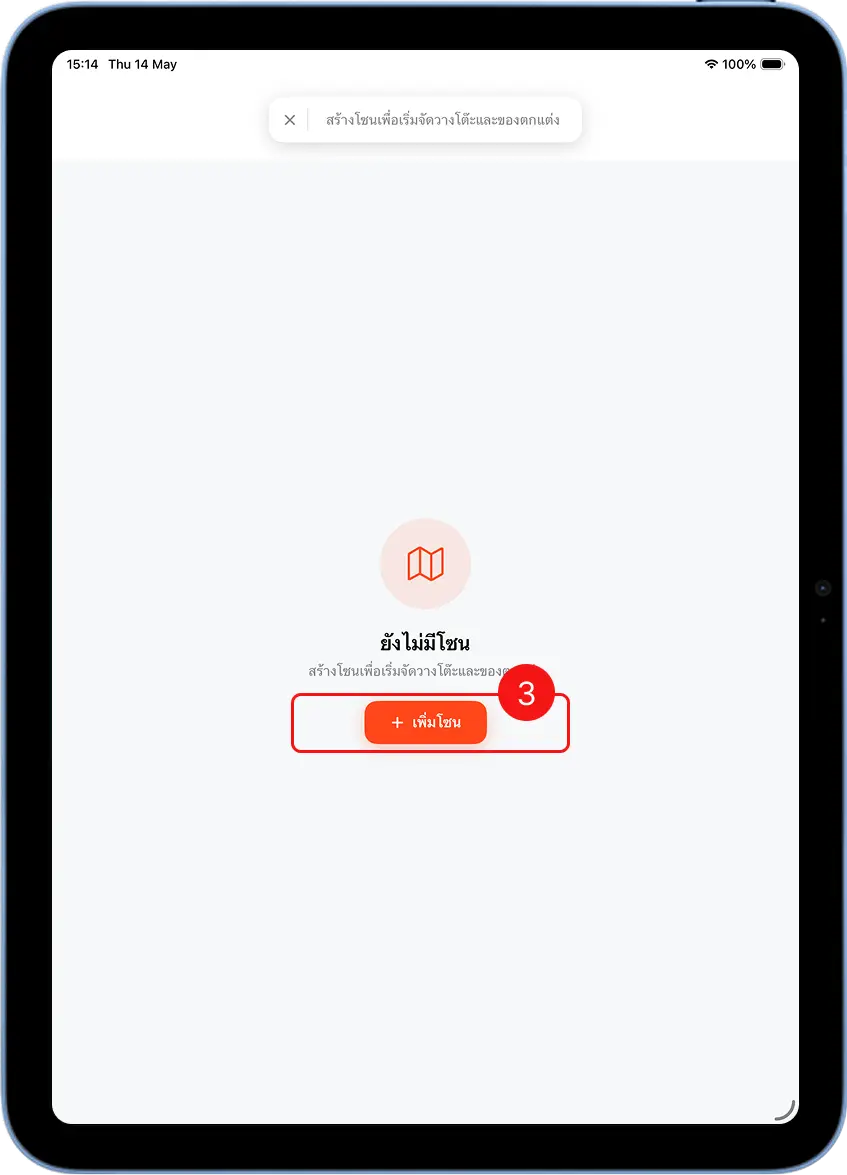
Tap + Add Zone to create your first zone
The first time you open the floor plan page, the system shows "No zones yet." Tap the orange "+ Add Zone" button to create your first zone, e.g. Indoor.
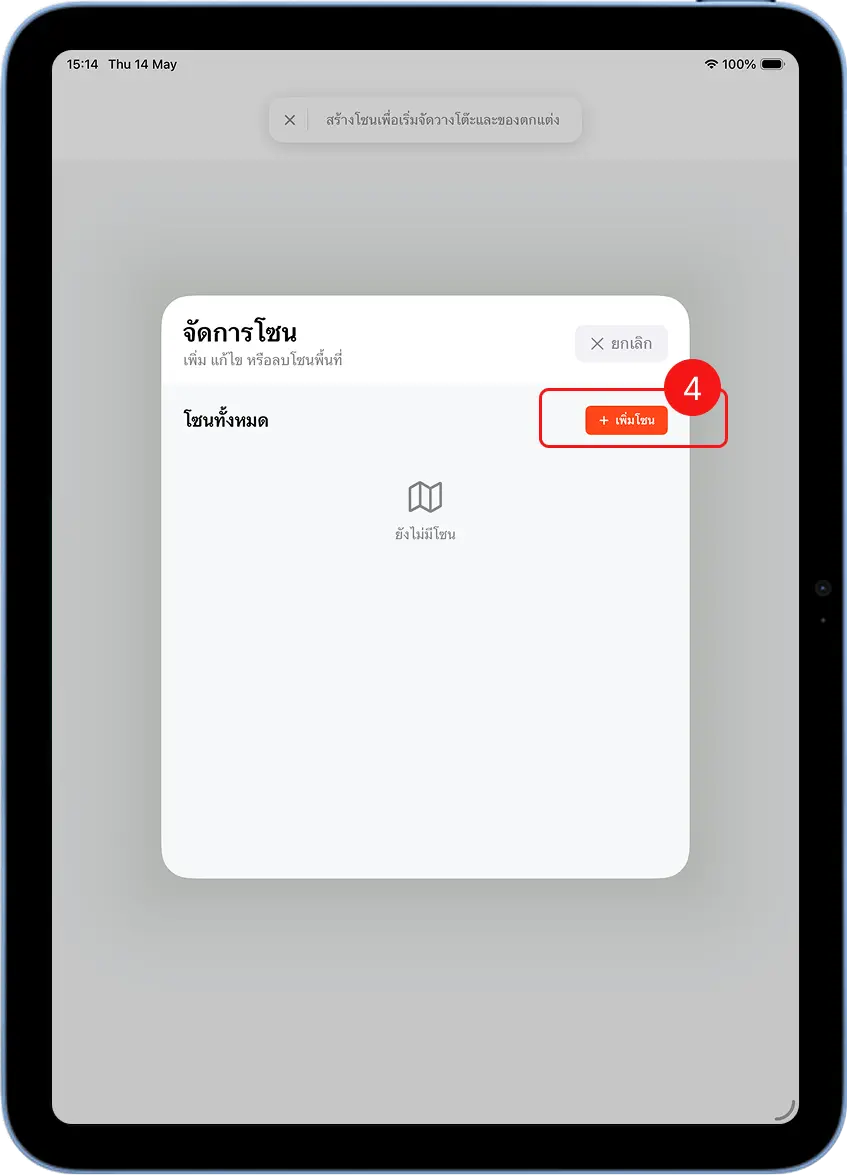
In the Manage Zones dialog, tap + Add Zone again
The system shows a "Manage Zones" dialog listing every zone. Tap "+ Add Zone" in the top-right to create a new one.
Enter a zone name, color, and orientation
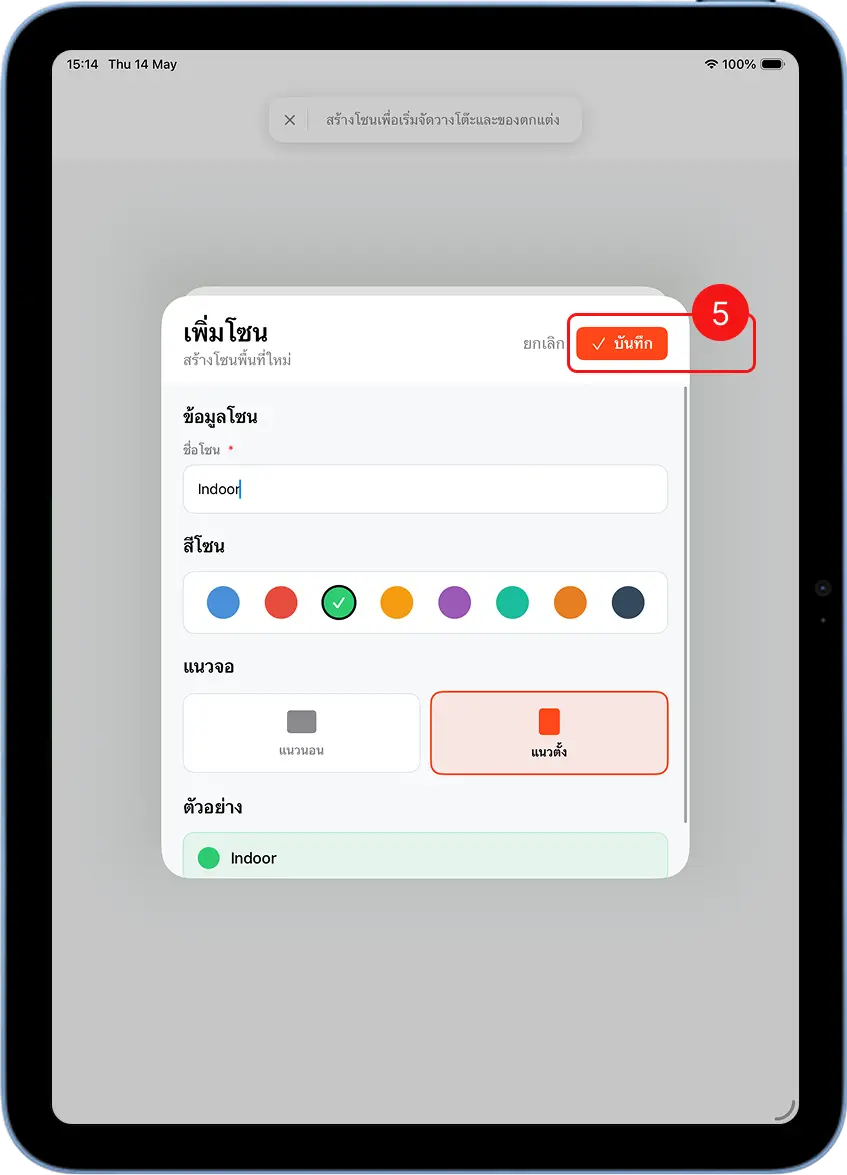
The system shows an "Add Zone" form to fill in: Zone Name (e.g. Indoor, Outdoor, VIP), Zone Color (choose from 8 colors to tell zones apart on the floor plan), and Orientation (landscape or portrait, matching your actual floor plan). Then tap "Save" to create the zone.
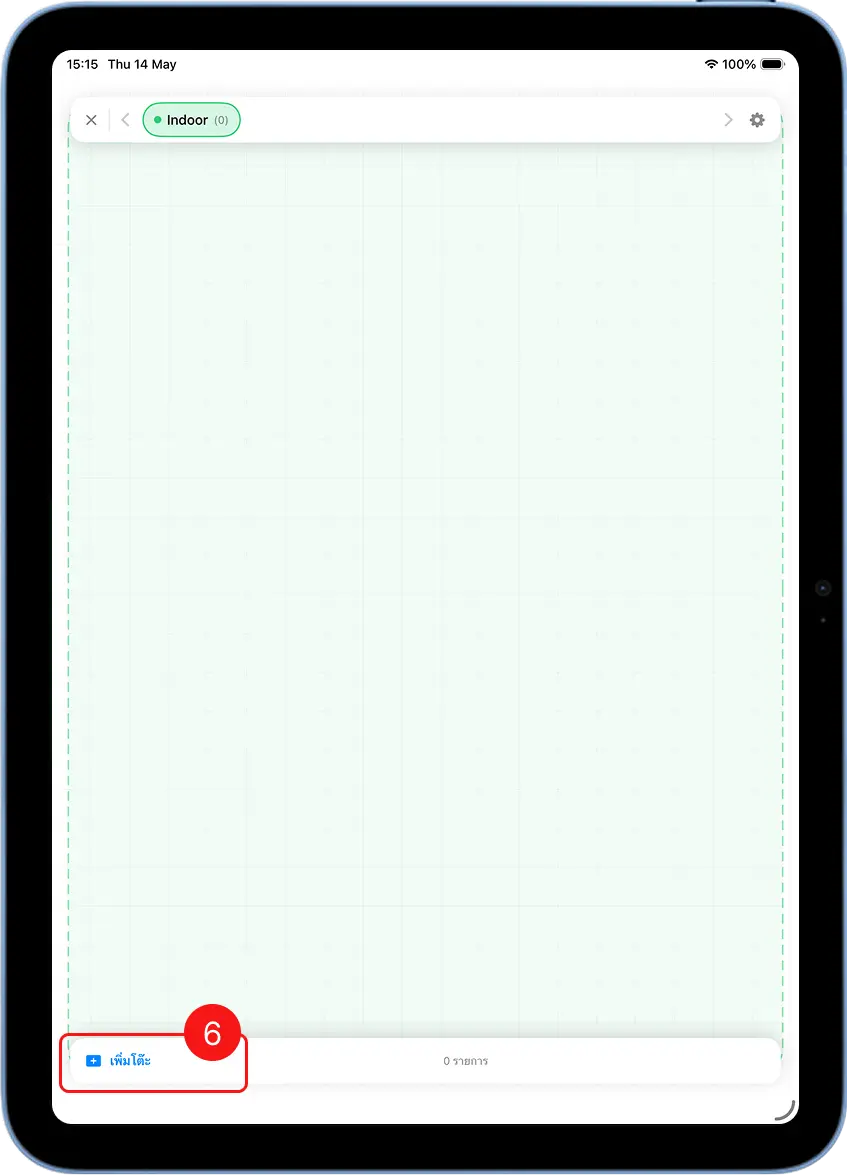
The empty Indoor floor plan — tap + Add Table
Once the zone is created, the system shows an empty floor plan for Indoor (0). Tap the "+ Add Table" button in the bottom-left to start placing tables.
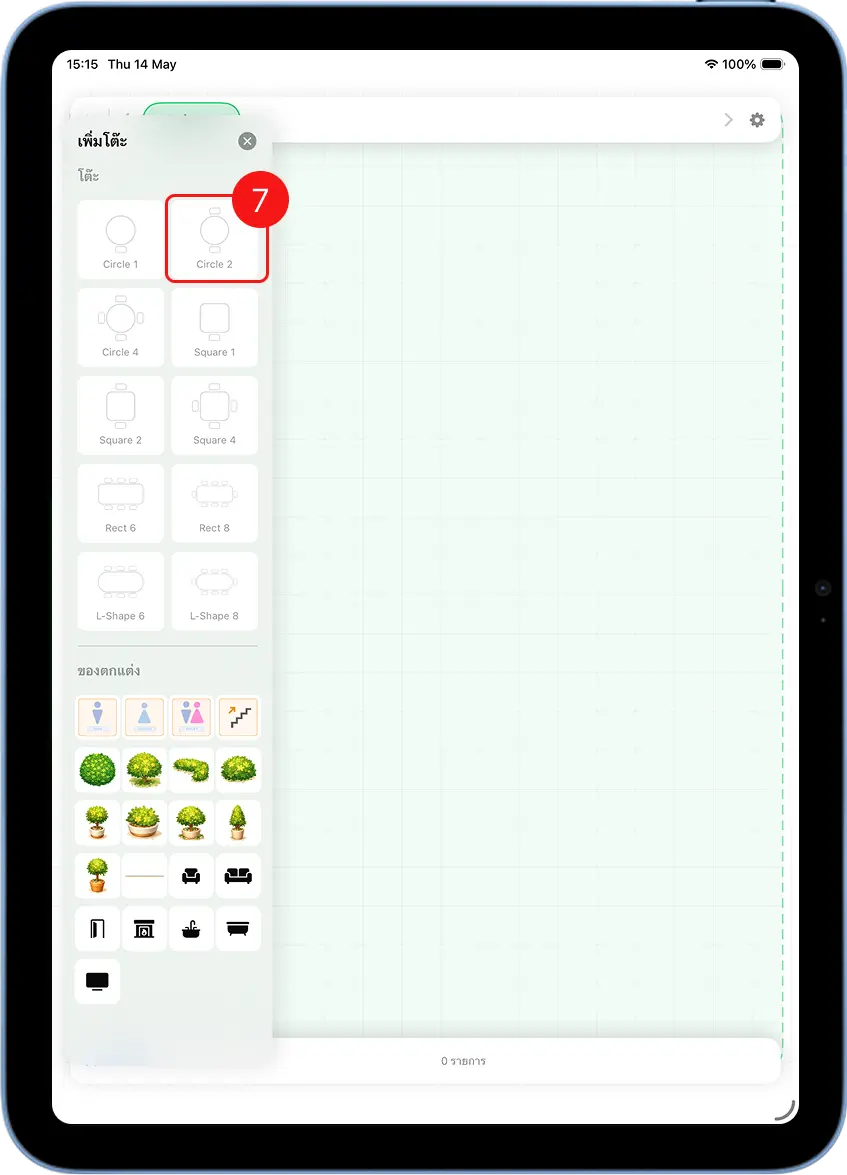
Choose a table shape and decorations, place them on the floor plan
The left sidebar shows table shapes and decorations to choose from — Tables: Circle for 1/2/4 people, Square for 1/2/4 people, Rect for 6/8 people, L-Shape for 6/9 people, and Decorations: restroom sign, plant, sofa, counter, and more.
Tap the shape you want and the system places it on the floor plan automatically — you can then drag it into position.
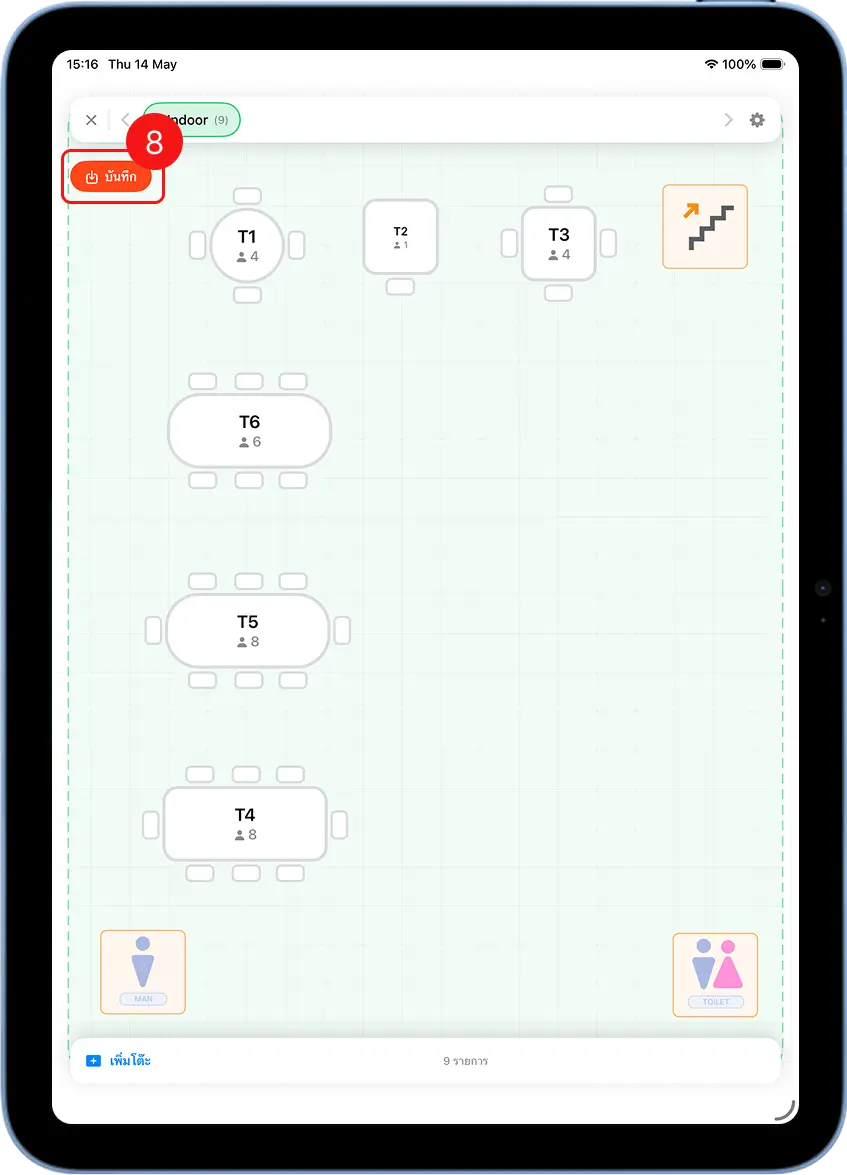
Review the completed floor plan and tap Save
Once every table is placed, the floor plan shows all tables with their numbers, e.g. T1–T6, and each table's seat count. Tap "Save" in the top-left corner to save the layout.
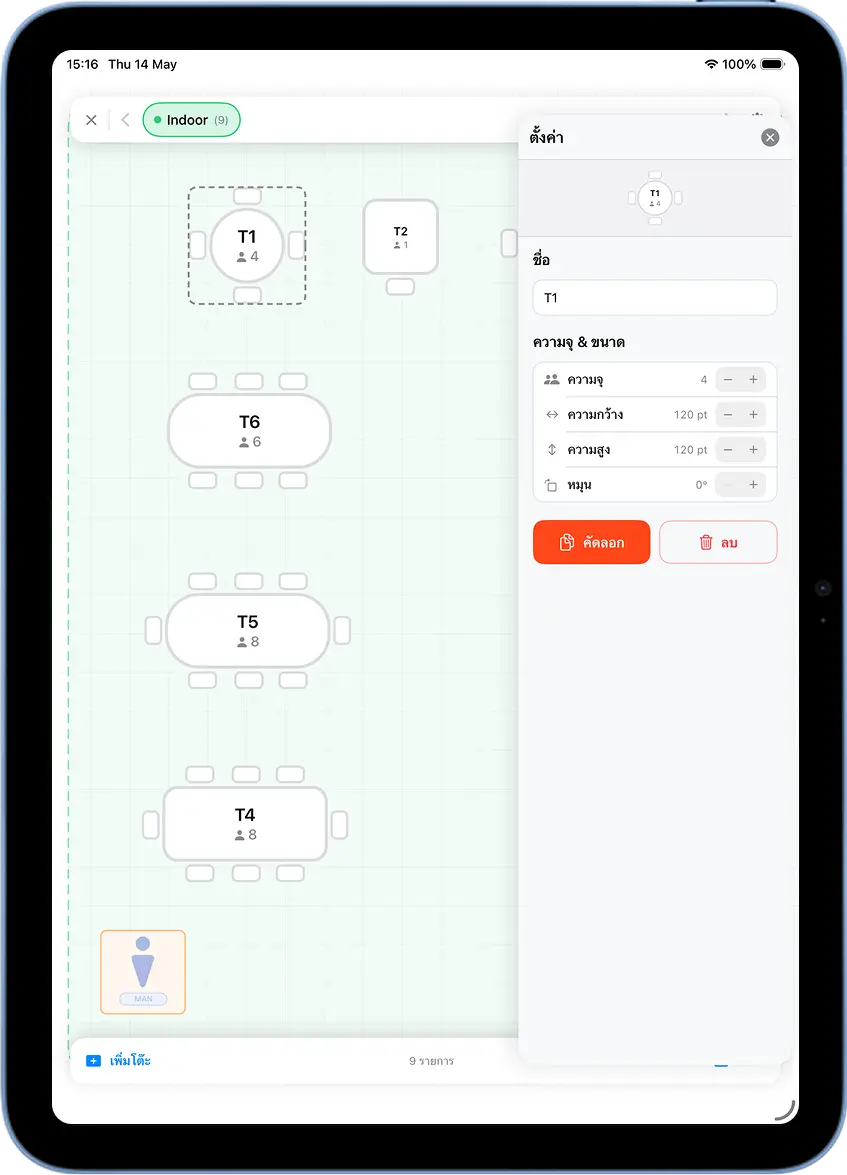
Tap a table to edit its details
Tap any table on the floor plan to open the right-side panel and adjust its Name (e.g. T1, VIP1), Capacity (seat count), Width / Height (size on the floor plan, in pt), and Angle (rotate 0–360°).
Part 3 — Take Table Orders
Go to the Floor Plan menu from the MeeD POS home screen
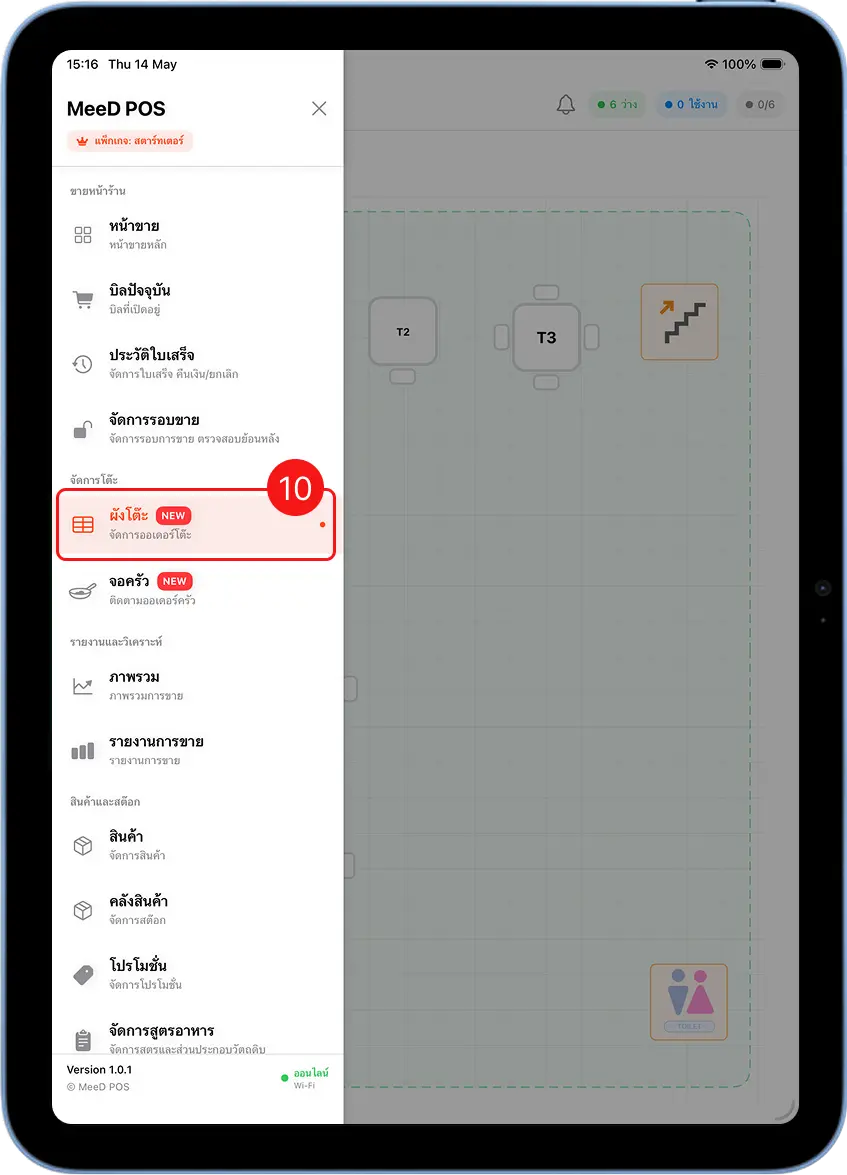
Tap the ☰ menu in the top-left, select "Floor Plan" under "Table Management." The system shows the floor plan with every table's status updated in real time.
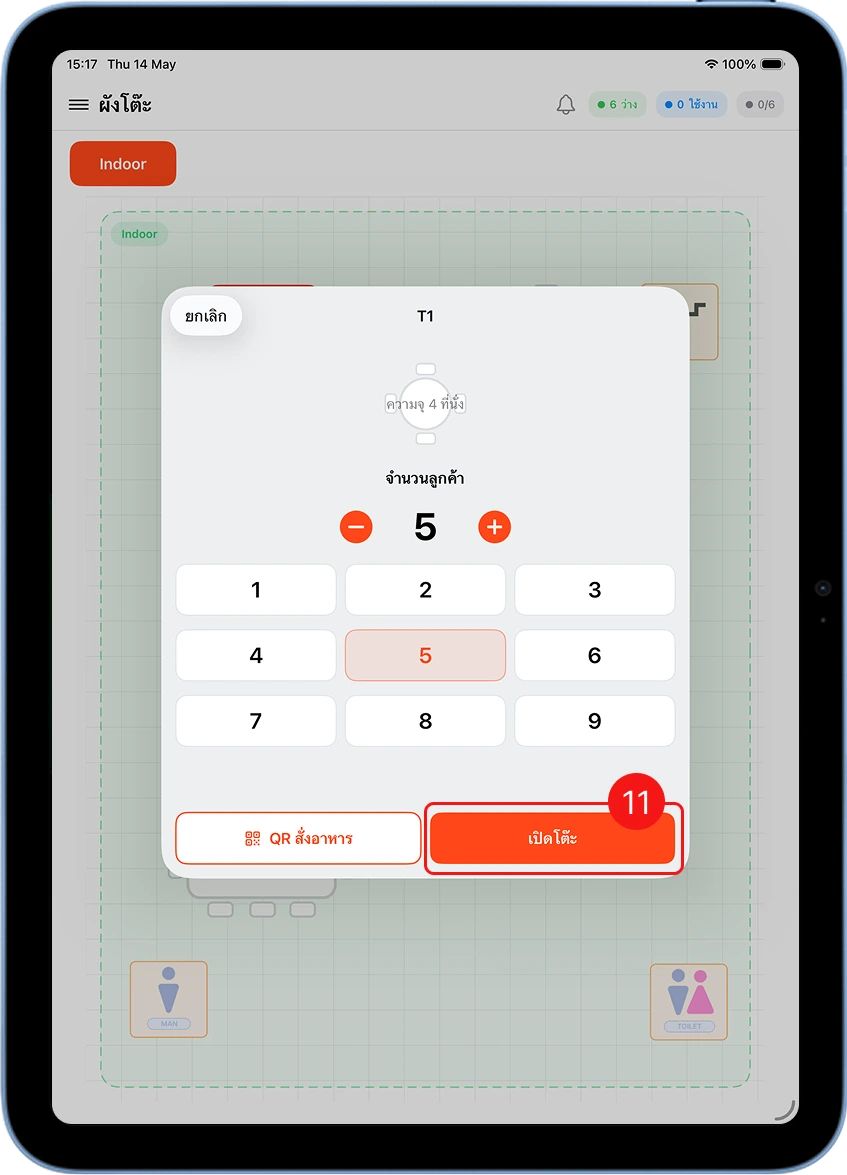
Tap a table, enter the party size, then tap Open Table
Tap an open table, e.g. T1 — the system shows a popup asking for the party size, with two options: QR Ordering (customers scan a QR code to order from their own phone) and Open Table (staff take the order directly in the app).
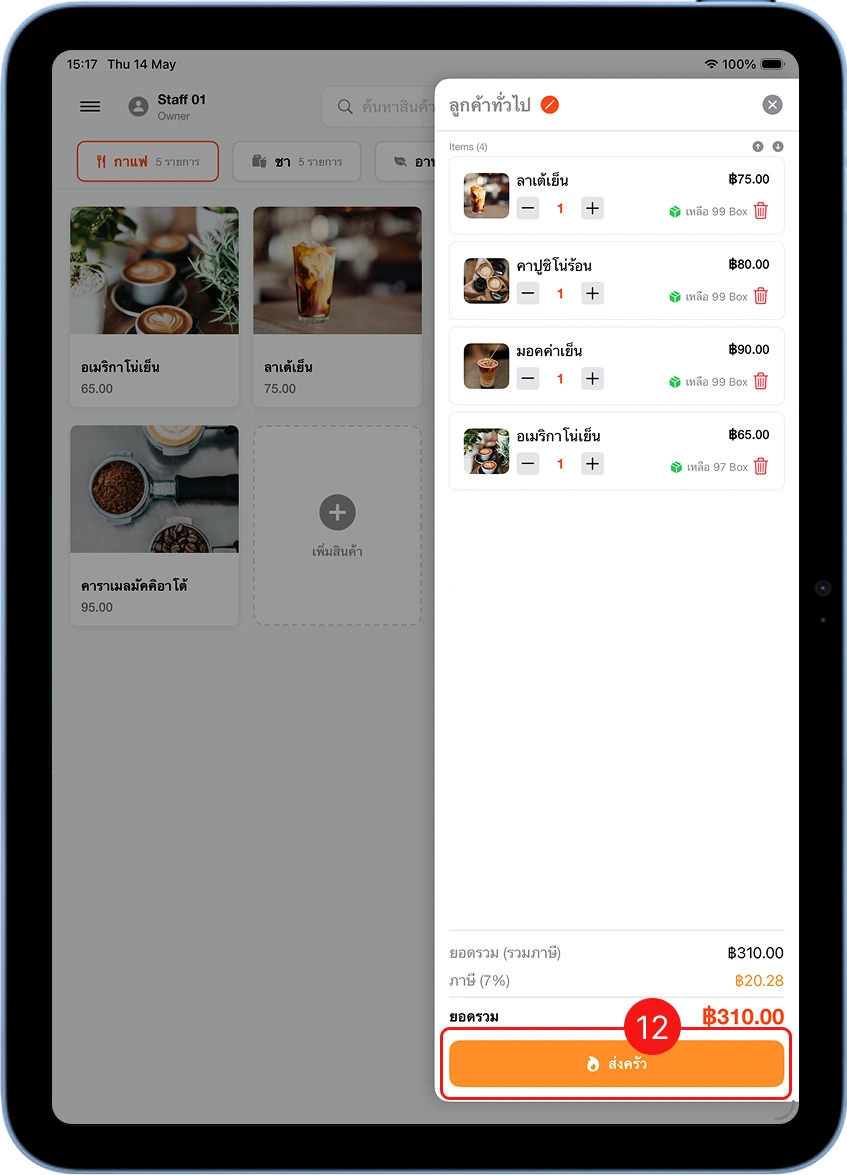
Add items to the cart and check the total
The ordering screen shows the logged-in staff member (e.g. Staff 01) with the full menu. Tap items to add them to the cart — the right side shows the order with a running total. The system calculates 7% tax automatically. Tap "Send to Kitchen" to submit the order — the system prints kitchen and bar tickets automatically based on your printer settings.
To set up staff accounts, PINs, and time-tracking, see Employee Clock In / Clock Out
Part 4 — Review Orders and Take Payment
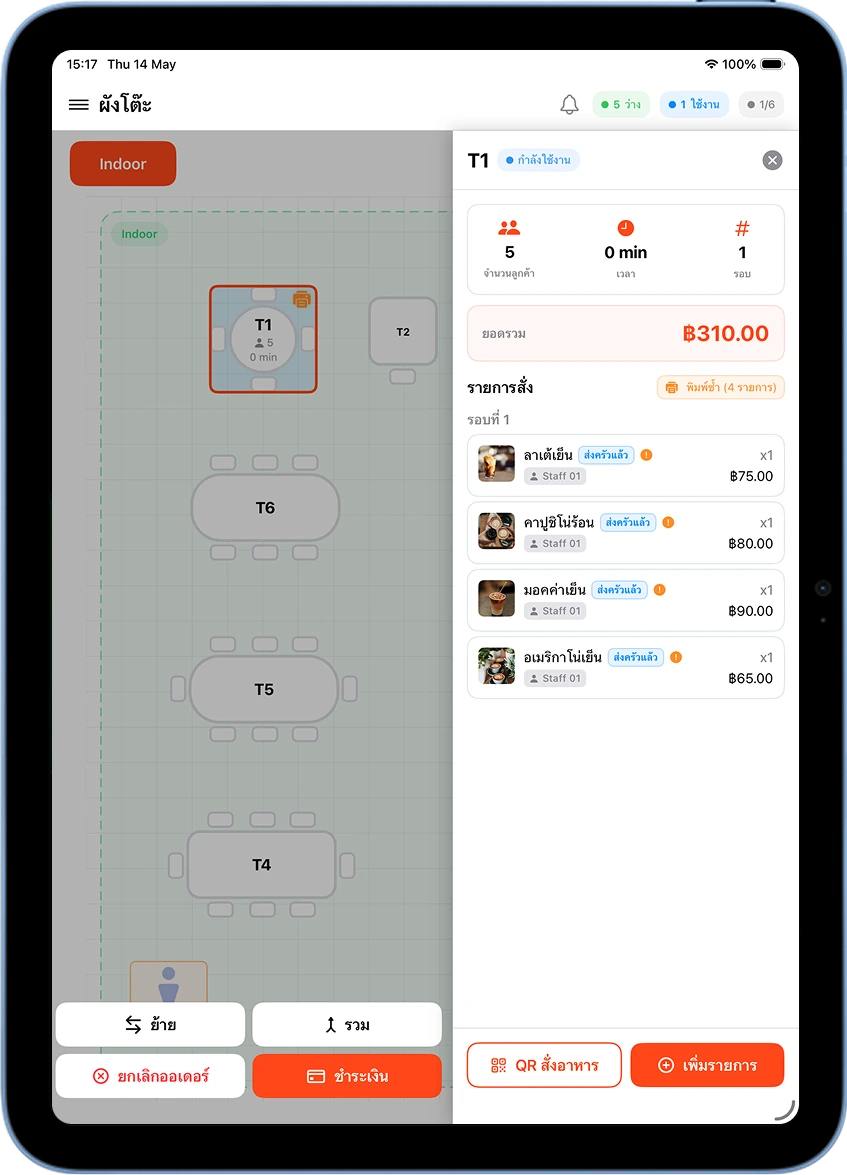
Tap an occupied table to view its order and take payment
On the floor plan, tap a table with customers, e.g. T1 — the right sidebar shows the party size, time, round number, the table's total, and every ordered item with its status (sent to kitchen / not yet sent).
Tap "Checkout" at the bottom to open the payment screen, or "Add Items" to take another order.
Comparing Sales Modes
| Mode | Best For | Highlights |
|---|---|---|
| Table Mode | Restaurants and cafés with seated tables | Floor plans, table status tracking, kitchen ticket printing |
| Standard Sales Mode | Take-away shops, counter service | Fast, no table selection needed, great for rush hours |
| Multi-Channels | Stores taking GrabFood, LINE MAN delivery orders | Revenue reports split by channel, per-channel delivery pricing |
Frequently Asked Questions
What's the difference between Table Mode and Standard Sales Mode?
Standard Sales Mode suits stores without tables or counter-service setups, like a take-away coffee shop. Table Mode suits restaurants where customers sit and dine — it tracks the status of each table, lets you add more items to an order, and prints kitchen tickets separately from the receipt.
How many zones and tables can I create?
The number of zones and tables depends on your plan: Basic = 1 zone, 15 tables; Starter = 3 zones, 30 tables; Pro = 5 zones, 50 tables. Each zone can be named and colored freely — e.g. Indoor, Outdoor, VIP, Bar.
What table shapes are supported?
MeeD POS supports several table shapes: Circle for 1–4 people, Square, and L-Shape for 6–8 people. You can drag and position them freely on the floor plan.
How does QR menu scanning work?
When a customer scans the QR code at their table, it opens a Digital Menu on their phone instantly. They can choose items and send the order directly to the POS without waiting for staff — the order appears on that table's floor plan automatically.
Can kitchen and bar tickets print separately?
Yes. MeeD POS supports multiple printer configurations — you can route food items to a kitchen printer and drink items to a separate bar printer. Kitchen/bar tickets show only items and quantities, while the customer receipt shows prices, VAT totals, and payment method.
Need More Help?
Still stuck after setup, or want our team to help lay out your floor plan? Get in touch anytime.